Soccer Decision Making Drills: 6 Games That Teach Players to Choose Faster (U10–U16)
Quick answer
Players who look sharp in drills and freeze on match day do not have a technique problem. They have a decision problem: nobody has trained them to read a changing picture and choose in half a second. These six games do exactly that — every repetition forces a real choice (pass or dribble, turn or lay off, attack or keep the ball) under a cue that changes, in one 60-minute session.
Suitable for: U10–U16 (ages 9–16)
Session snapshot
- Players: 10–14 (U10–U16, two teams plus neutrals)
- Area: 30 x 25 yards (grids from 20 x 15 to 30 x 25)
- Duration: 60 minutes
- Focus: Scanning, choosing, executing under pressure
- Equipment: 8–10 balls, 20 cones in 4 colours, 6 mini goals, bibs
Why these six games work
A decision drill is not a passing pattern with a new name. A drill only trains decisions when it gives the player information, demands a choice, and makes the choice matter — if every repetition ends with the same pass, the players are memorising a pattern, not deciding. FIFA’s Training Centre session on technical activation and small-sided games is built on exactly this idea: it aims to improve “game understanding and the speed of their decision-making” through 5v5 games with target areas and four goals, and it asks the coach to check whether players can “recognise the opportunity to play towards a free target area” and “recognise the best goal to attack”. Drills 1 and 2 below are built on that target-area model, in line with that FIFA session. In the UK the same session runs as football decision making drills — the cues and the games are identical. Research from the universities of Chichester, Portsmouth and Limerick, published in Psychology of Sport and Exercise, found that players who scan the field before receiving improve their awareness, their decision-making, and the quality and speed of their technical actions — and that the coaches who teach scanning best do it by changing practice conditions (pitch size, player numbers, coloured bibs) and by asking questions, not by shouting instructions. Every game below changes a condition and ends with a question.
Six rules of coaching decisions
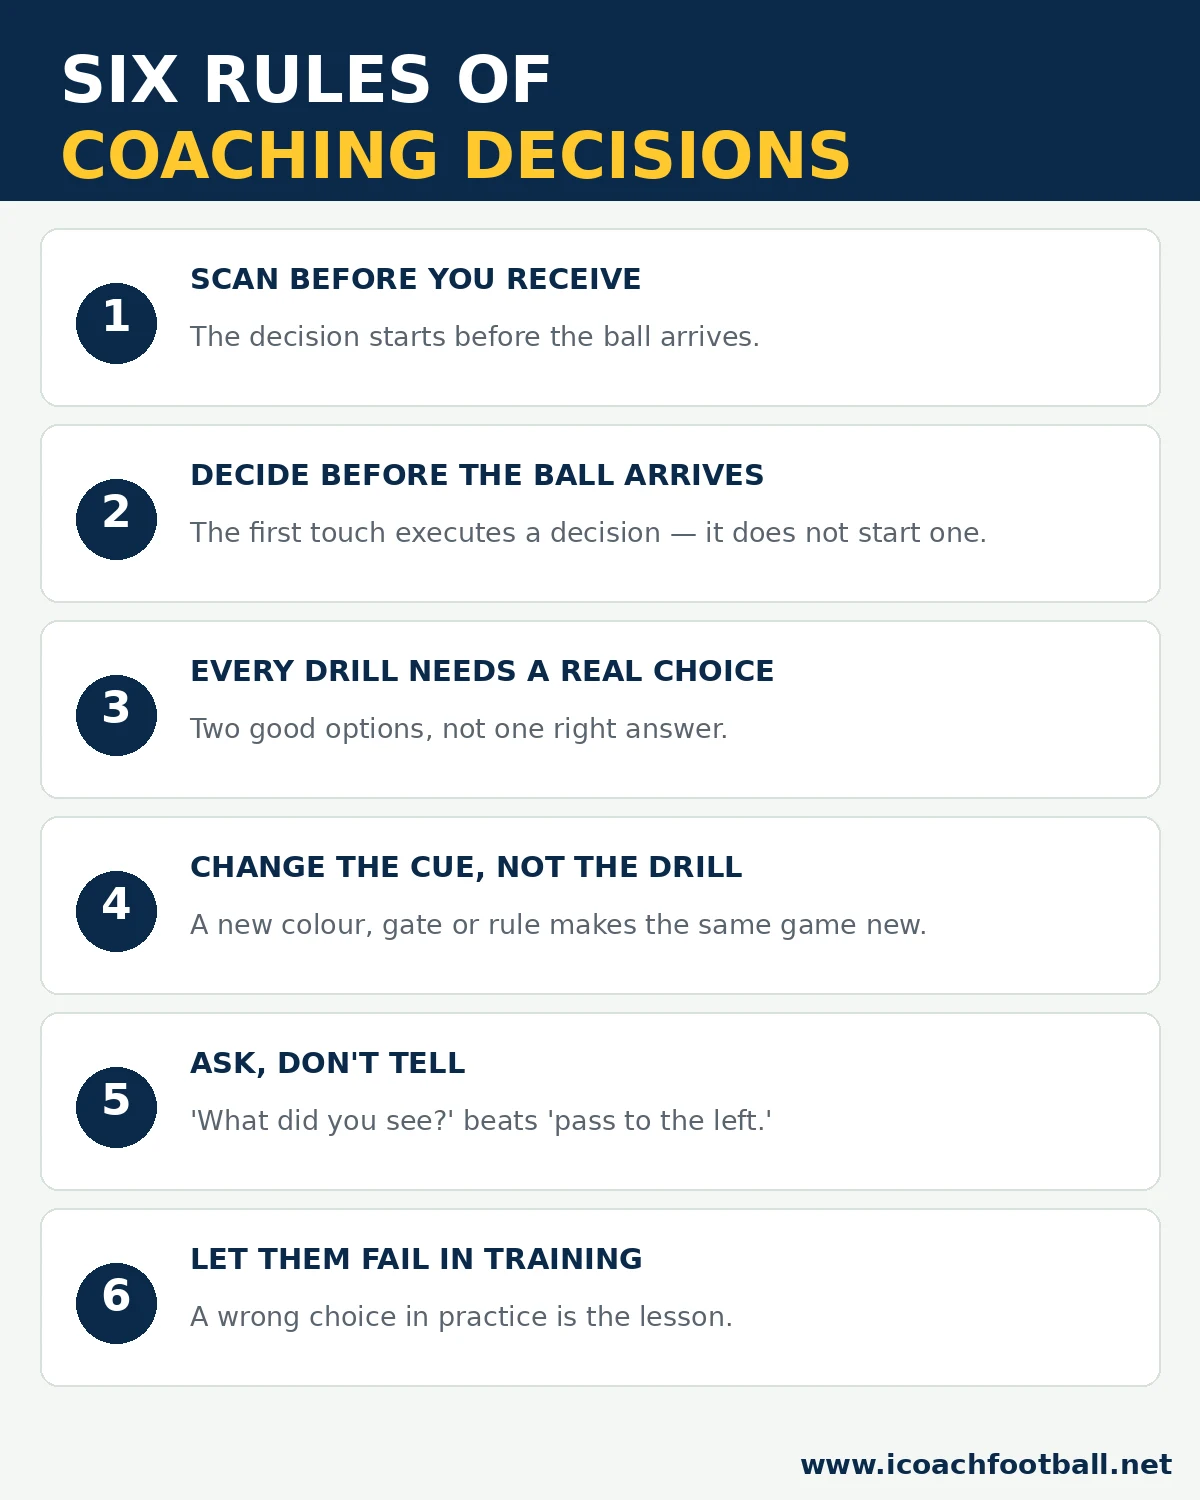
- Scan before you receive. The decision starts before the ball arrives.
- Decide before the ball arrives. The first touch executes a decision — it does not start one.
- Every drill needs a real choice. Two good options, not one right answer.
- Change the cue, not the drill. A new colour, gate or rule makes the same game a new decision.
- Ask, don’t tell. “What did you see?” beats “pass to the left.”
- Let them fail in training. A wrong choice in practice is the lesson. A wrong choice in a match is the cost.
Drill 1 — Colour-Call Passing Square
Four attackers on the corners of a square, one defender inside — and the coach calls a colour. The player on the ball must pass to the player on the called colour, which means they must scan, choose and play in one beat. The simplest decision drill there is, and the one to start with.
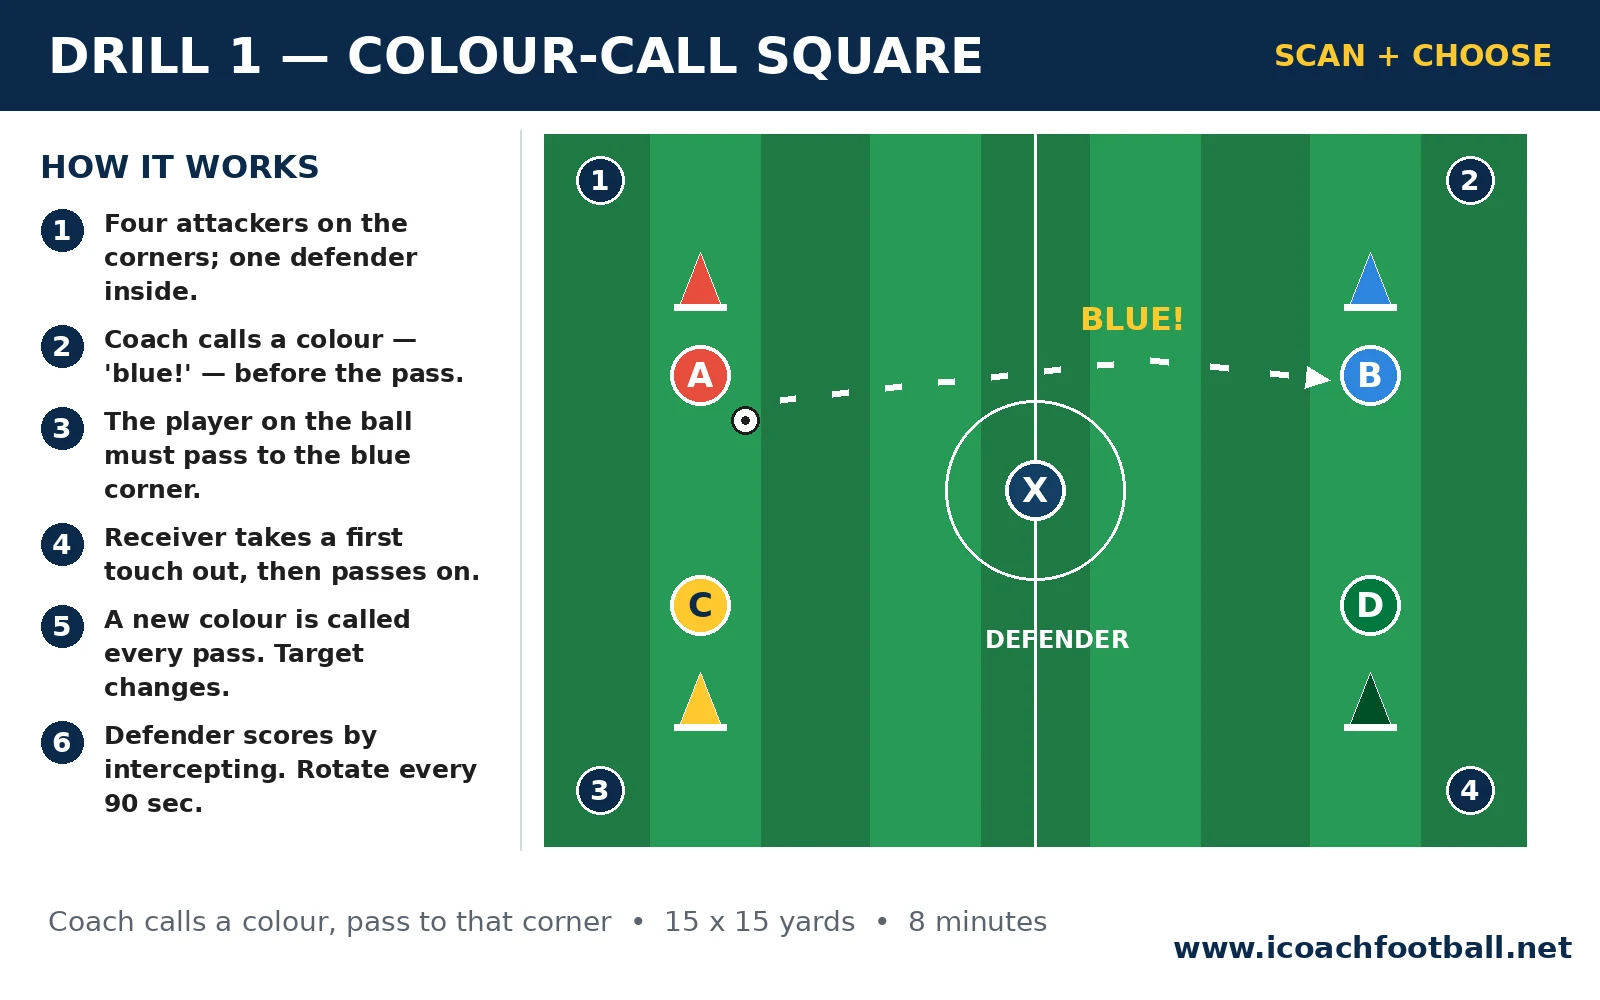
- Setup: 15 x 15 yard square. Four attackers on the corners, one defender inside. Cones in four colours at the corners. 8 minutes.
How to play:
- Four attackers stand on the corners; one defender works inside the square.
- The coach calls a colour — “blue!” — before the pass is played.
- The player on the ball must pass to the player on the blue corner.
- The receiver takes a first touch out of the square, then passes on.
- The coach calls a new colour every pass, so the target keeps changing.
- The defender scores by intercepting; rotate the defender every 90 seconds.
- Coach’s note: “Head up before the ball arrives — the colour is the decision, not the pass.”
- Progressions: Call the colour after the pass is played; two-touch limit; the defender presses the receiver as well as the passer.
Drill 2 — Gate Call 3v3
Four cone gates around the pitch, and only one of them counts — the one the coach just called. The team in possession must find the called gate, switch the point of attack, and go through it before the call changes. This is the FIFA target-area game with a moving target.
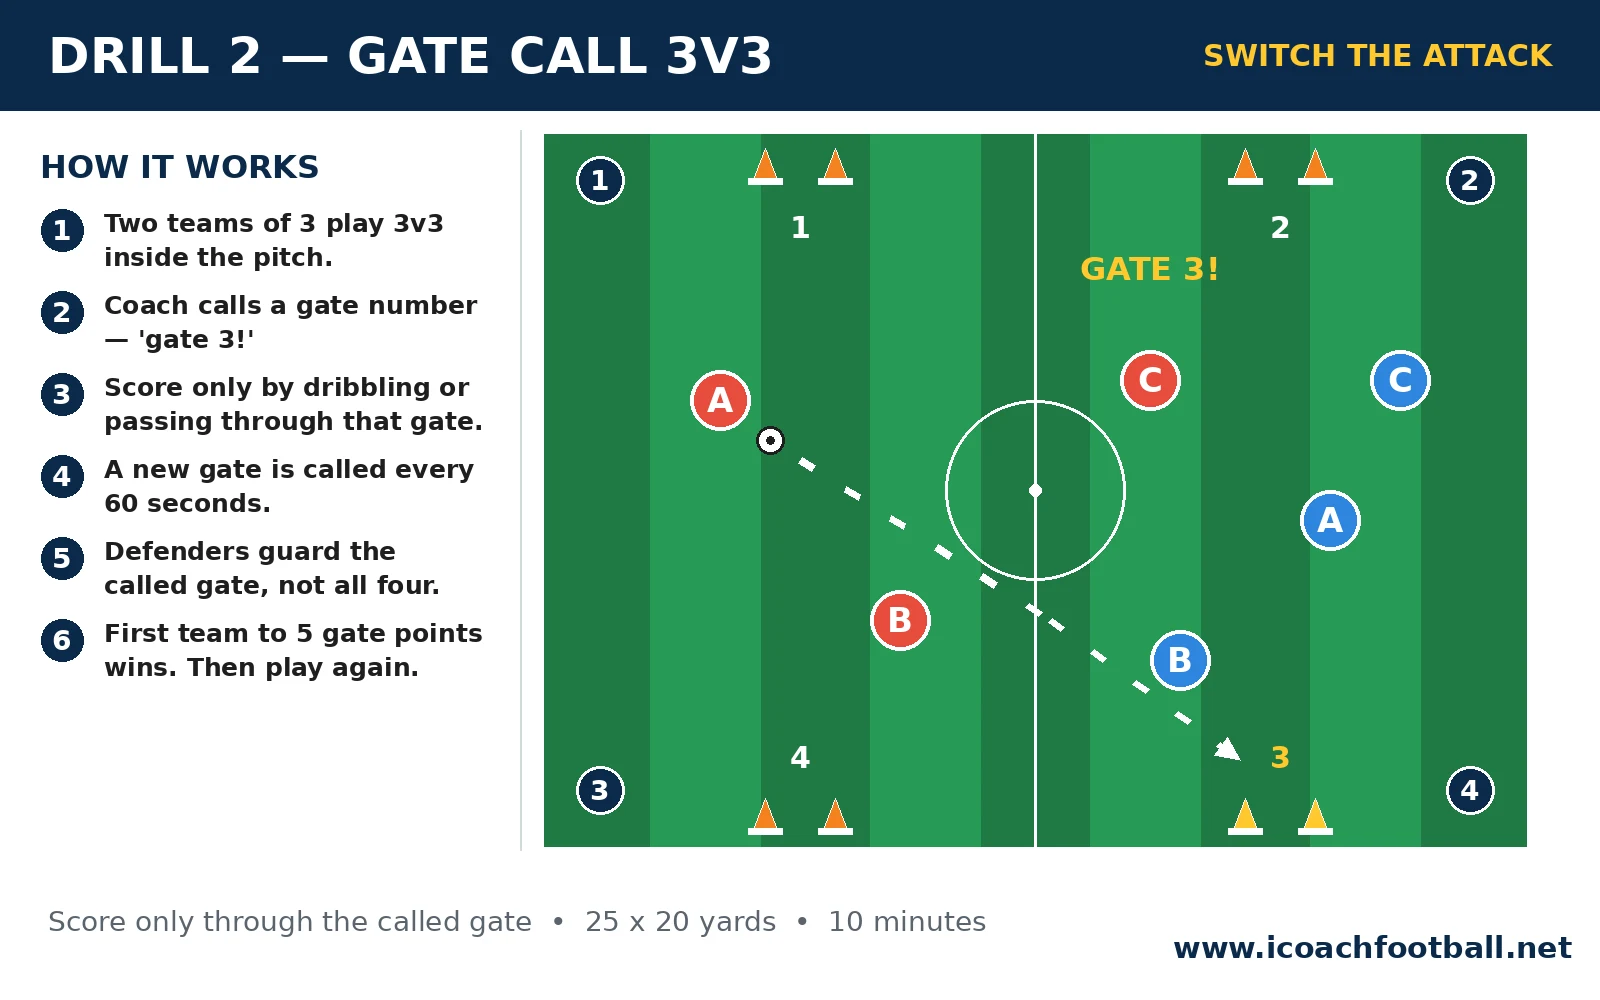
- Setup: 25 x 20 yard pitch. Four 2-yard gates on the pitch edges, numbered 1–4. Two teams of 3. 10 minutes.
How to play:
- Two teams of 3 play 3v3 inside the pitch.
- The coach calls a gate number — “gate 3!”
- A team scores only by dribbling or passing through the called gate.
- The coach calls a new gate every 60 seconds, so the target keeps moving.
- The defending team must guard the called gate, not all four.
- First team to 5 gate points wins; then swap the teams and play again.
- Coach’s note: “The gate is the decision — scan, switch, and go through it before the call changes.”
- Progressions: The coach calls the new gate while the ball is live; goals through the far gate count double; one-touch finish through the gate.
Drill 3 — Overload Flip 4v4+1
A 4v4 with one neutral player — and on the coach’s whistle the neutral switches teams. The overload flips in an instant, and both teams must read it: the team that gains the extra player attacks at once, the team that loses it keeps the ball. The decision is recognising the flip.
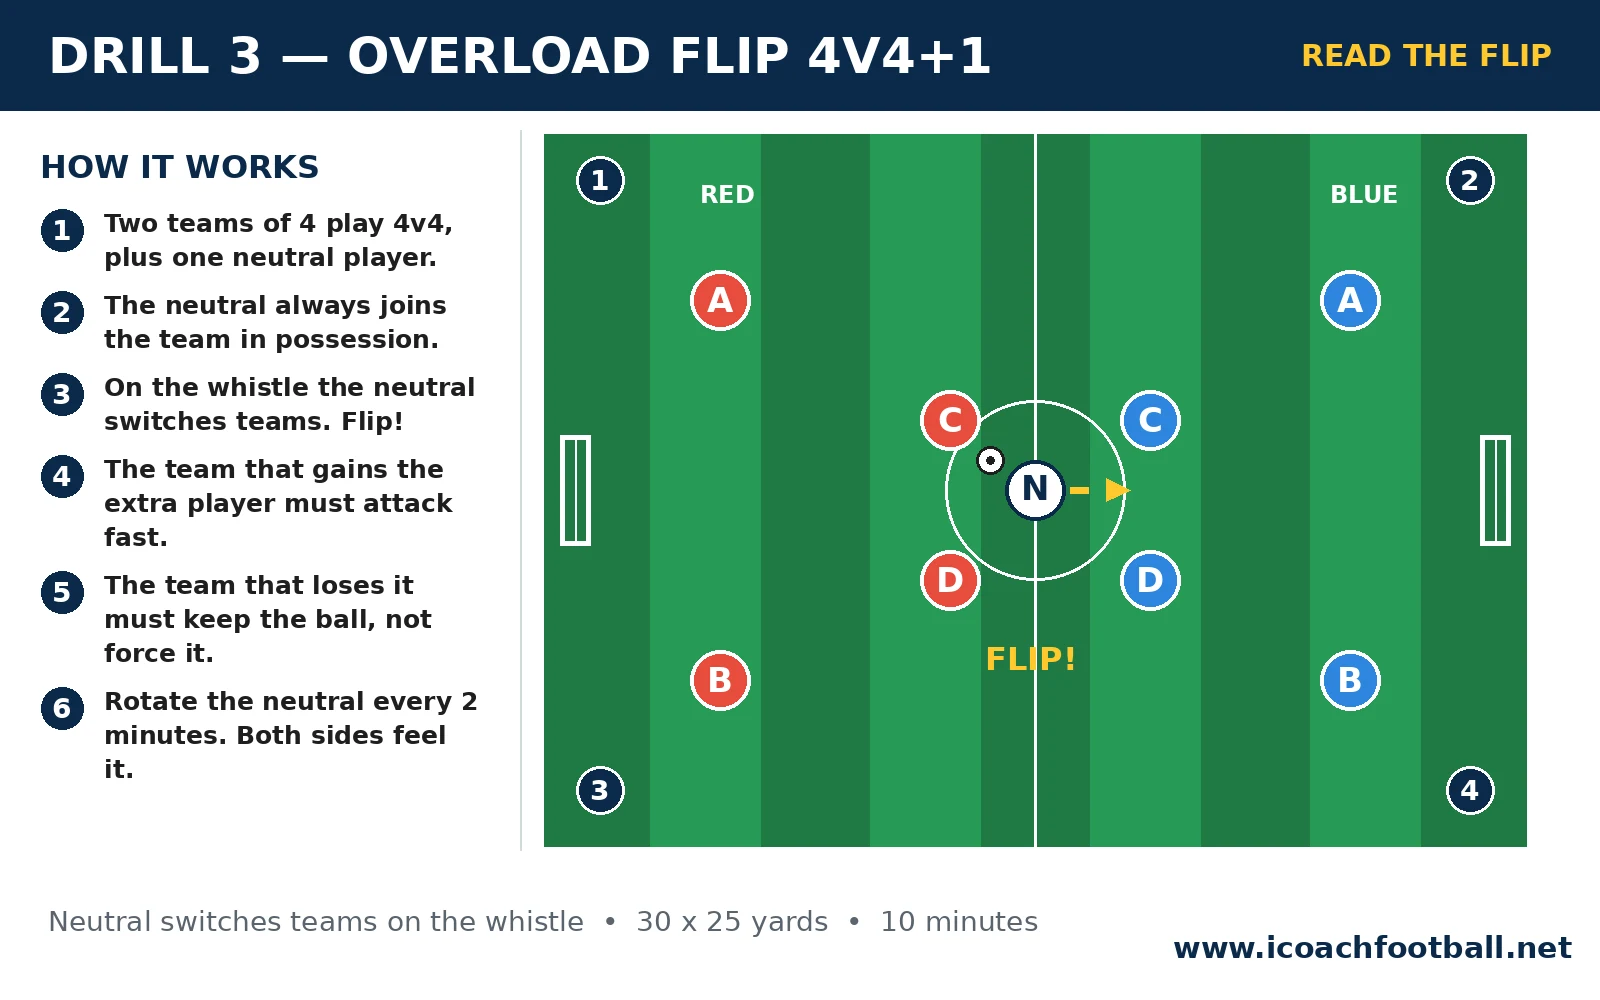
- Setup: 30 x 25 yard pitch. Two teams of 4 plus one neutral in a different bib. Mini goals at each end. 10 minutes.
How to play:
- Two teams of 4 play 4v4, with one neutral who always joins the team in possession.
- On the coach’s whistle the neutral switches to the other team, flipping the overload.
- The team that gains the extra player must attack a goal within 10 seconds.
- The team that loses the extra player must keep the ball and not force it.
- The whistle blows every 60–90 seconds, so the flip is never predictable.
- Rotate the neutral every 2 minutes so every player feels both sides of the flip.
- Coach’s note: “Count before you play — if you have the extra player, attack; if you don’t, keep it.”
- Progressions: The neutral flips on a turnover instead of the whistle; the extra player must touch the ball before a shot; two neutrals, one per team, flipping together.
Drill 4 — Turn or Lay Off
An attacker receives with their back to goal, a defender on one shoulder, and a support player behind them. The whole drill is one decision: turn into the space if it is open, or lay the ball off if the defender has it covered. The defender’s body position decides — not the coach.
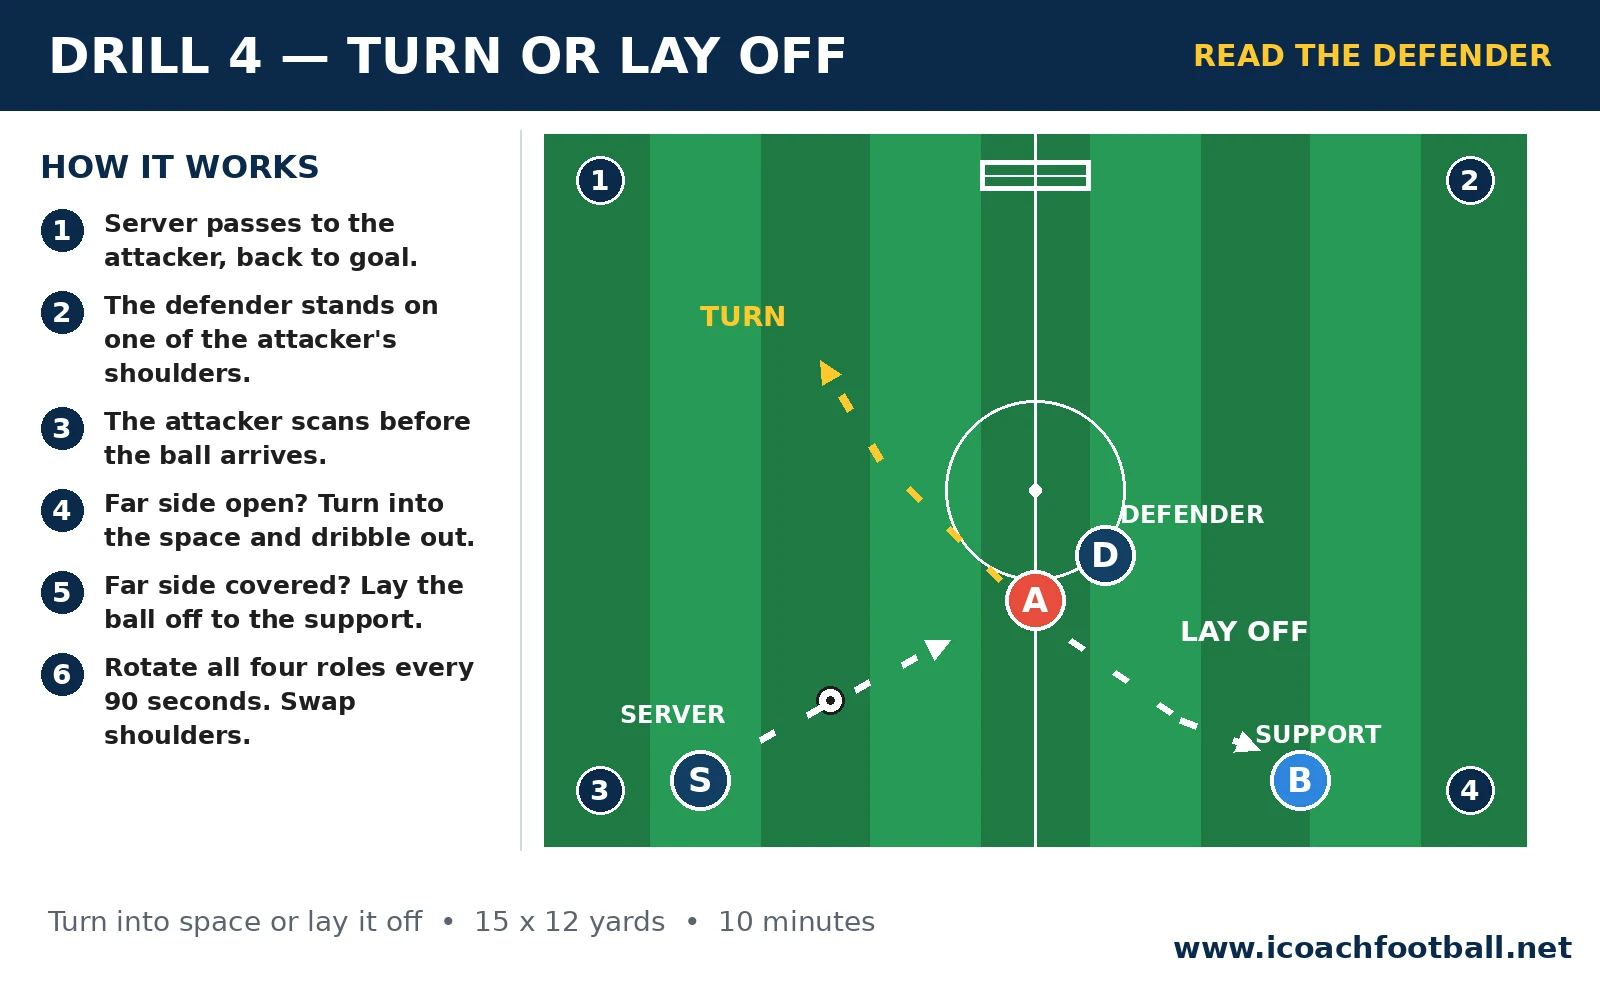
- Setup: 15 x 12 yard area. One server, one attacker with back to goal, one defender on a shoulder, one support player behind. 10 minutes.
How to play:
- The server passes to the attacker, who receives with their back to goal.
- The defender stands on one of the attacker’s shoulders as the pass travels.
- The attacker scans before the ball arrives and reads the defender’s position.
- If the far side is open, the attacker turns into the space and dribbles to the line.
- If the defender has the far side covered, the attacker lays the ball off to the support player.
- Rotate all four roles every 90 seconds, then swap the defender to the other shoulder.
- Coach’s note: “The defender tells you the answer — turn into the open side, or lay it off.”
- Progressions: The defender starts passive, then goes fully live; the support player must finish first time after the lay-off; the attacker must call “turn” or “lay off” before receiving.
Drill 5 — Three-Door Finish
One attacker, one defender, three mini-goals — and the coach calls the door mid-run. The attacker must beat the defender and finish at the called door, which means the shot is decided by a cue, not by habit. The finishing drill that trains the brain, not just the foot.
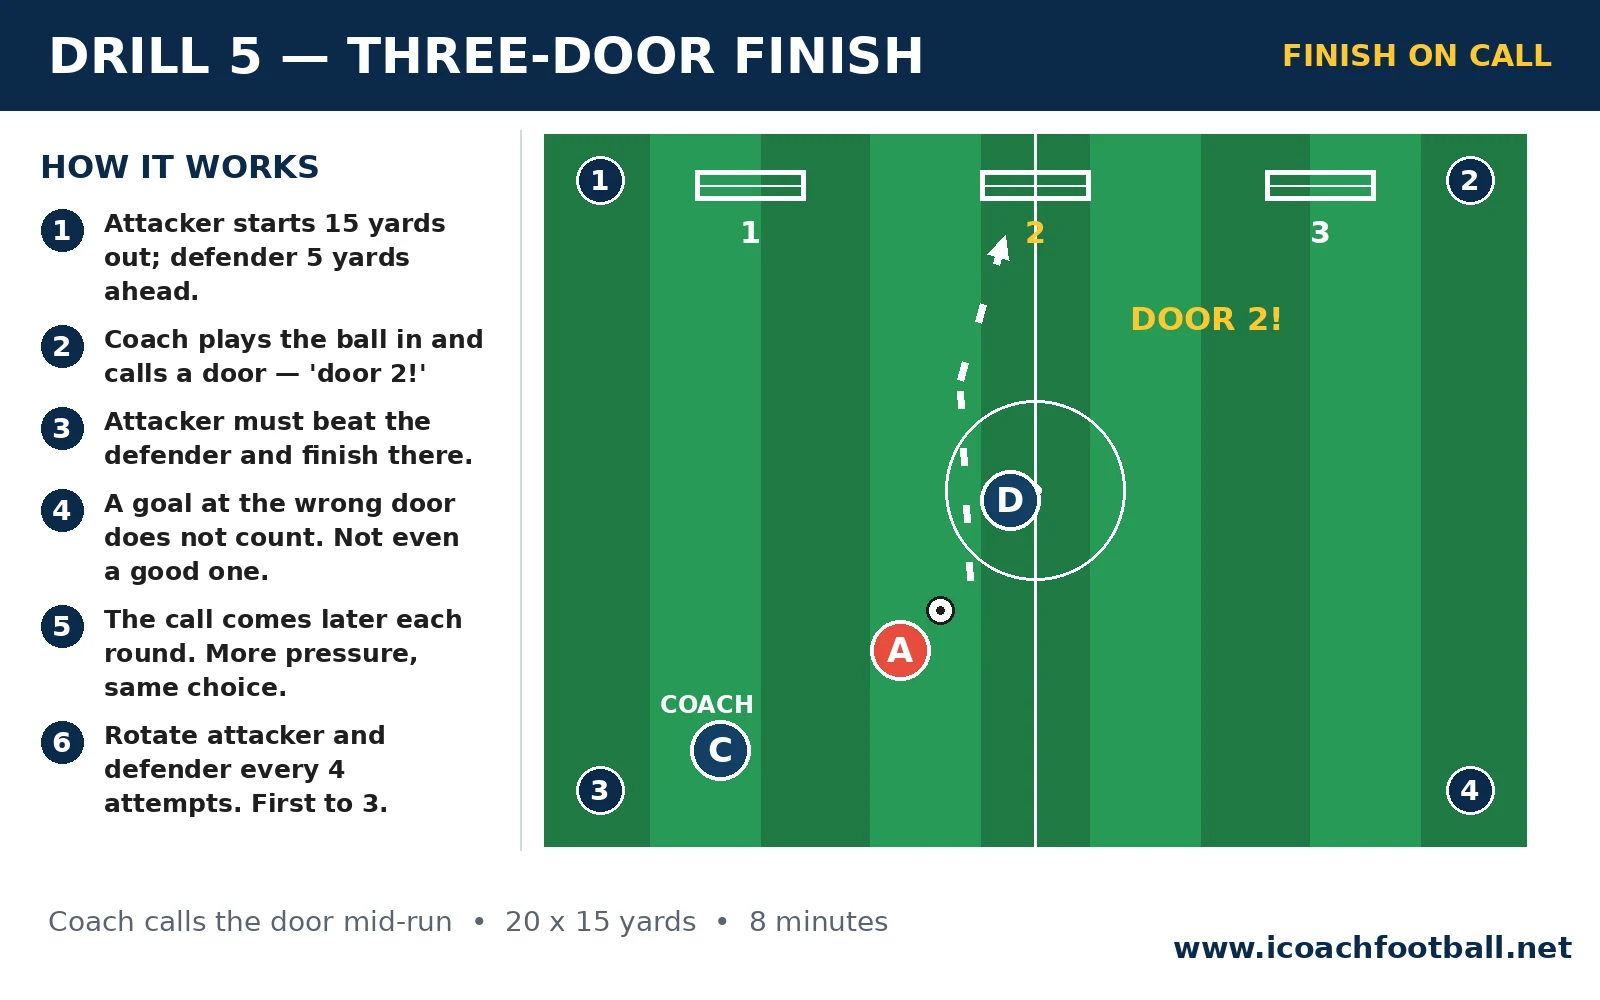
- Setup: 20 x 15 yard area. Three mini-goals at the far end (left, centre, right). One attacker, one defender, coach with the balls. 8 minutes.
How to play:
- The attacker starts 15 yards from the three goals, the defender 5 yards ahead.
- The coach plays the ball to the attacker and calls a door — “door 2!”
- The attacker must beat the defender and finish at the called goal.
- A goal at the wrong door does not count, however well it is struck.
- The coach calls the door later each round, so the decision comes under more pressure.
- Rotate the attacker and defender every 4 attempts; first to 3 correct finishes wins.
- Coach’s note: “Beat the defender first, then look up — the door is the last thing you decide, not the first.”
- Progressions: The defender starts closer; the attacker must finish first time; two doors only, called at the last step.
Drill 6 — Rule Switch 4v4
A normal 4v4 — except the rule changes every two minutes. One-touch only, then three passes before shooting, then goals only after a switch of play. The players must read the new rule, change their decisions, and play to it immediately. The final game, and the one that shows whether the session worked.
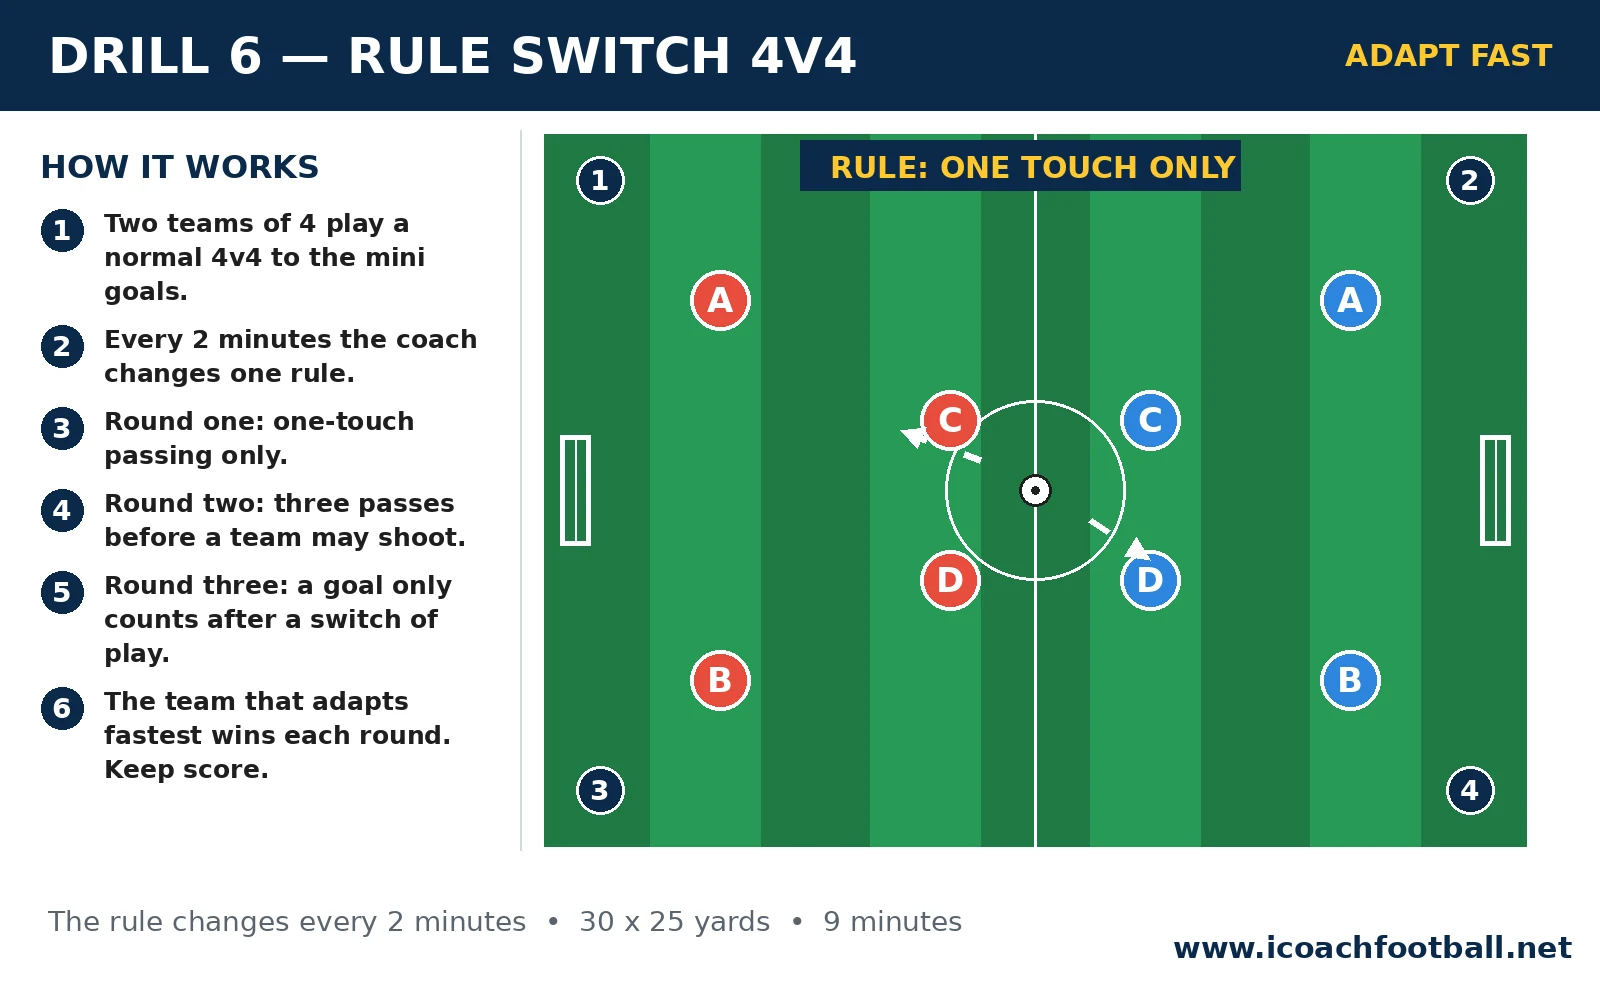
- Setup: 30 x 25 yard pitch. Two teams of 4, mini goals at each end. Coach with a rule card. 9 minutes.
How to play:
- Two teams of 4 play a normal 4v4 to the mini goals.
- Every 2 minutes the coach changes one rule and calls it out.
- Round one: one-touch passing only for the team in possession.
- Round two: three passes before a team may shoot.
- Round three: a goal only counts after a switch of play.
- The team that adapts fastest wins each round — keep the score across all three.
- Coach’s note: “The rule is the decision — the team that changes fastest wins the round.”
- Progressions: Change the rule mid-round without warning; let a player call the next rule; add a neutral who plays for the team in possession.
Coaching points: the five mistakes that stop players deciding
| Mistake | What you see | Fix |
|---|---|---|
| Coaching to the ball, not the picture | Players stare at the ball and miss every option | Freeze once, ask “what did you see?”, then play on |
| One right answer | Players pass where the coach points, not where the space is | Reward the decision, not just the outcome — praise a good choice that fails |
| No opposition | Patterns look perfect and transfer nowhere | Every drill needs a defender, a choice and a consequence |
| Changing the drill every week | Players never get enough reps to learn the choice | Keep the same six games for a month; change the cue, not the game |
| Stopping play every 30 seconds | Players wait for instructions instead of deciding | Coach at natural breaks and let the game teach between them |
Age adaptations
| Age | Area | What changes |
|---|---|---|
| U10–U11 (ages 9–11) | 20 x 15-yard grids | One decision per rep; the coach calls the colour or gate before the pass arrives; two-touch minimum; Drill 4 runs with a passive defender only — see the U10 soccer practice plan and the U11 soccer practice plan for the next step |
| U12–U13 (ages 11–13) | 25 x 20-yard grids | The cue changes mid-rep; one-touch options appear; the defender presses the receiver as well as the passer — see soccer drills for U13 and the U12 soccer practice plan |
| U14–U16 (ages 13–16) | 30 x 25-yard grids | All six games as written; cues change every 30 seconds; a second defender joins Drills 1 and 4; Drill 6 runs with rule changes mid-round — see soccer drills for U14, soccer drills for U15 and soccer drills for U16 |
60-minute session plan
| Time | Block | Drill |
|---|---|---|
| 0:00–0:05 | Arrival game | Free 3v3 — every player decides from the first touch |
| 0:05–0:13 | Scanning + choice | Drill 1 — Colour-Call Passing Square |
| 0:13–0:23 | Switching the point of attack | Drill 2 — Gate Call 3v3 |
| 0:23–0:33 | Recognising overloads | Drill 3 — Overload Flip 4v4+1 |
| 0:33–0:43 | Receiving decisions | Drill 4 — Turn or Lay Off |
| 0:43–0:51 | Finishing under a changing cue | Drill 5 — Three-Door Finish |
| 0:51–0:60 | Adapting to new rules | Drill 6 — Rule Switch 4v4 |
New to coaching this age? Stretch the arrival game to 8 minutes and cut Drill 3 to 7 minutes and you have the same session with more settling-in time — see our 60-minute plan for the structure (the same shape, shortened where you need it).
Keep building from here
Decisions sit on top of scanning, so start there if your players never look up: our soccer scanning drills teach the check-shoulder habit, and the moving monkeys rondo turns it into a game. Build the passing base next: soccer passing drills for the weight and accuracy Drills 1–3 need, and weak foot soccer drills so both feet can play the called colour. The formats in this session have their own deep dives: soccer 3v3 drills for the combination play behind Drill 2, soccer 4v4 drills for the shape behind Drills 3 and 6, the rondo blueprint for the possession angles behind Drill 1, and switching play for the four-goal game behind Drill 2. The overload in Drill 3 is the same problem as our 2v1 soccer drills, and the flip is the same skill as our football defensive transition drills — the moment possession changes, the decision changes with it. For the pressing side of the same coin, see coaching soccer pressing triggers and counter-pressing, and for the transition game that follows every decision, our 1v1 to 4v4 transition drill. Pairs work is the step before these games: soccer drills for two players run the same choices in pairs, and soccer drills for 6 players run them with a full small group — and when numbers change on the night, our soccer practice plans by number of players pick the session that fits. New to coaching? Start with soccer drills for beginners, and if you coach a school team, our soccer drills for middle school players run the same decisions in a school context. Protect the players as they grow: our soccer injury prevention guide shows how to build the warm-up into every session, and our 10 soccer warm-up drills give you the full warm-up library. When they are older, the road runs through our soccer drills for U13, soccer drills for U14, soccer drills for U15 and soccer drills for U16 — and if you run selections one day, our soccer tryout drills show how to grade a group fairly. Goalkeepers decide too: our soccer goalkeeper communication drills train the same scan-decide-execute habit from the back.
FAQ
At what age should players start decision making drills?
At U10 — once they can control and pass the ball reliably. Before that, the decision is too big: a U8 player who is still fighting the ball cannot also read the picture. Younger players need scanning games first, like our soccer scanning drills, and the full decision games in this session land best from age 9 or 10. In the UK the same session is football decision making drills, and the age is the same.
How is a decision making drill different from a normal drill?
A decision drill gives the player information, demands a choice, and makes the choice matter. The cue must change — a new colour, a new gate, a flipped overload — so the same drill produces a different correct answer every time. If every repetition ends with the same pass, the players are memorising a pattern, not deciding.
How many decisions should a drill contain?
One per repetition. A drill that asks for three decisions at once teaches none of them. Change the cue every 60–90 seconds so the players stay alert, and keep the same six games for a month — change the cue, not the game — so the reps build up.
Should the coach stop the game to correct a bad decision?
No — ask instead. Stop at a natural break, ask “what did you see?”, and let the player find the answer. Research from the universities of Chichester, Portsmouth and Limerick found that experienced coaches teach scanning and decisions through questioning and by changing practice conditions, not by shouting instructions — and that players who scan before receiving make better, faster decisions.
Can decision making be trained without opposition?
No. A decision needs a defender, a choice and a consequence. Unopposed patterns build technique — the weight of the pass, the shape of the turn — but the decision only exists when a defender can punish the wrong choice. Every game in this session has live opposition, because that is what makes the choice real.
Sources
- FIFA Training Centre, “#61: Technical activation and small-sided games” (8-to-12) — a session that aims to enhance “game understanding and the speed of their decision-making” through a 5v5 target-area game and a 5v5 four-goal game, asking players to “recognise the opportunity to play towards a free target area” and “recognise the best goal to attack”. The target-area and four-goal games in this post are based on / in line with that session. https://www.fifatrainingcentre.com/en/practice/grassroots/8-to-12/technical-activation-and-small-sided-games.php
- University of Chichester, University of Portsmouth and University of Limerick, study published in Psychology of Sport and Exercise (via EurekAlert!) — players who scan the field before receiving improve their awareness, decision-making, and the quality and speed of their technical actions; experienced coaches teach scanning through questioning (“what did you see?”) and by changing practice conditions such as pitch size, player numbers and coloured bibs. https://www.eurekalert.org/news-releases/772667