Weak Foot Soccer Drills: 7 Games to Build the Other Foot
Most players do not have a weak foot problem. They have a weak foot habit. Given a split second, they take an extra touch, turn back onto their strong foot, and let the defender recover — not because the other foot cannot pass or shoot, but because it has never been asked to do either when it mattered. A weak foot stays weak for one reason: in training, players always have time to choose their good foot, so they do.
These seven weak foot soccer drills take that choice away, for short, intense bursts, inside normal team training. No extra session is needed, no special equipment beyond cones, balls and a wall or rebounder. Each game forces the weaker foot — first for clean contact, then for control at speed, then for passing, receiving and finishing under pressure. Coaches looking for weak-foot football drills will find the same progression here; only the name of the game changes.
The rule that makes all of it work is simple: contact before power. A weak-foot pass struck cleanly at half pace beats a wild shot at full pace every time, and players who chase power first usually quit the work within a week. Build clean contact, then add speed, then add a defender. In six weeks of short, regular doses, most players stop avoiding the other foot and start using it without thinking.
- Players: 8–18 (every drill scales; pairs and small groups, no queues).
- Area: 20 x 20 yards for most drills, up to 30 x 20 yards for the final game.
- Duration: 60 minutes (45-minute version below).
- Focus: clean weak-foot contact, first touch with the weaker foot, passing and finishing under pressure.
- Equipment: 1 ball per player or per pair, 30 cones, 4 mini-goals or 2 full goals, bibs, a wall, fence or rebounder.
- Age: U8–U16 (start with contact and control at U8–U10; add speed and pressure from U11; full game conditions from U13).
The one idea that makes weak-foot work stick
A weak foot is not a different technique. It is the same technique, done by a leg that has had far fewer repetitions, with a plant foot that is usually in the wrong place. Fix the plant foot and the strike fixes itself.
Teach three checkpoints, and repeat them in every drill until players say them back to you:
- Plant foot beside the ball. The plant foot is the strong foot, and it still has to land beside the ball, pointing where the ball should go. Most weak-foot misses start here: the plant foot lands behind the ball or too far away, and the strike has no base. The cue is “Plant beside it!”
- Locked ankle, through the middle. The ankle of the striking foot must be locked, firm, not floppy. Strike through the middle of the ball for a pass, slightly below the middle for a low shot. The cue is “Lock it and hit through it!”
- Hips open, eyes on the ball. Turn the hips slightly towards the target instead of standing square, and watch the ball onto the foot. Players who look up too early mishit the ball with the weaker foot far more often than with the strong one. The cue is “Eyes down, then look up!”
That approach is in line with the FIFA Training Centre’s technical activation work, which builds balanced technique by demanding equal use of the left and right foot, with the foot chosen by the direction of the pass and the next movement — not by habit. The link to that work is at the end of this post. Everything below is that principle, turned into games players actually want to repeat.
Drill 1 — Weak-Foot First Gates (the warm-up that starts it all)
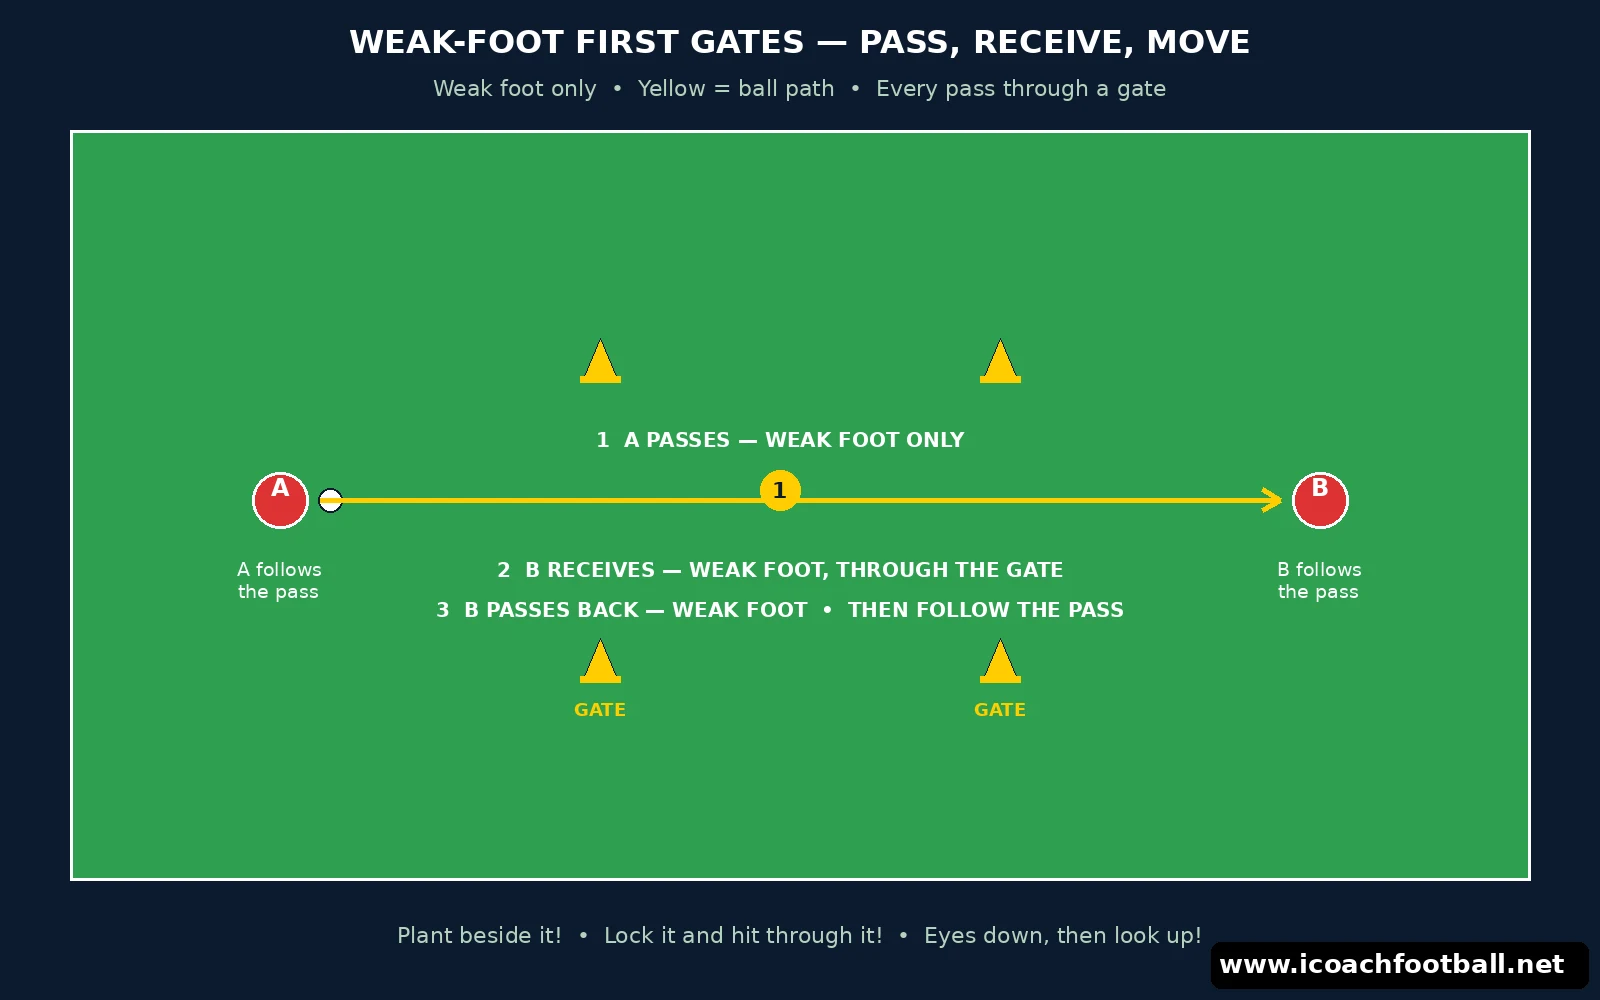
Setup: pairs, one ball per pair, in a 20 x 20 yard area scattered with 8 cone gates, each 2 yards wide. Gates face different directions so no two pairs queue behind the same one.
How it works:
- Partners stand 8 yards apart, facing each other, with a gate between them. Player A passes through the gate to Player B using the weak foot only, then follows the pass to B’s spot. B controls with the weak foot and passes back through the next gate.
- Every pass must go through a gate and be played with the weak foot; every first touch must be taken with the weak foot. A pass that misses the gate, or a touch taken with the strong foot, means the pair starts that gate again.
- After 2 minutes, move the gates further apart — 10 yards, then 12 — so the weak foot has to strike a longer pass without losing accuracy.
- Progression: one-touch only. The receiver must pass first time, weak foot, through a gate. This is hard at first; allow two touches for U10 and under, and let them earn the one-touch version.
Coaching points: count consecutive clean passes through gates, and let pairs chase their own record. Competition does what nagging cannot. If a player’s plant foot keeps landing behind the ball, stop the pair, place a cone beside the ball as the plant-foot marker, and run five slow passes from a standing start. Five correct reps beat fifty rushed ones.
Drill 2 — The 100-Pass Rally (volume no other drill gives)
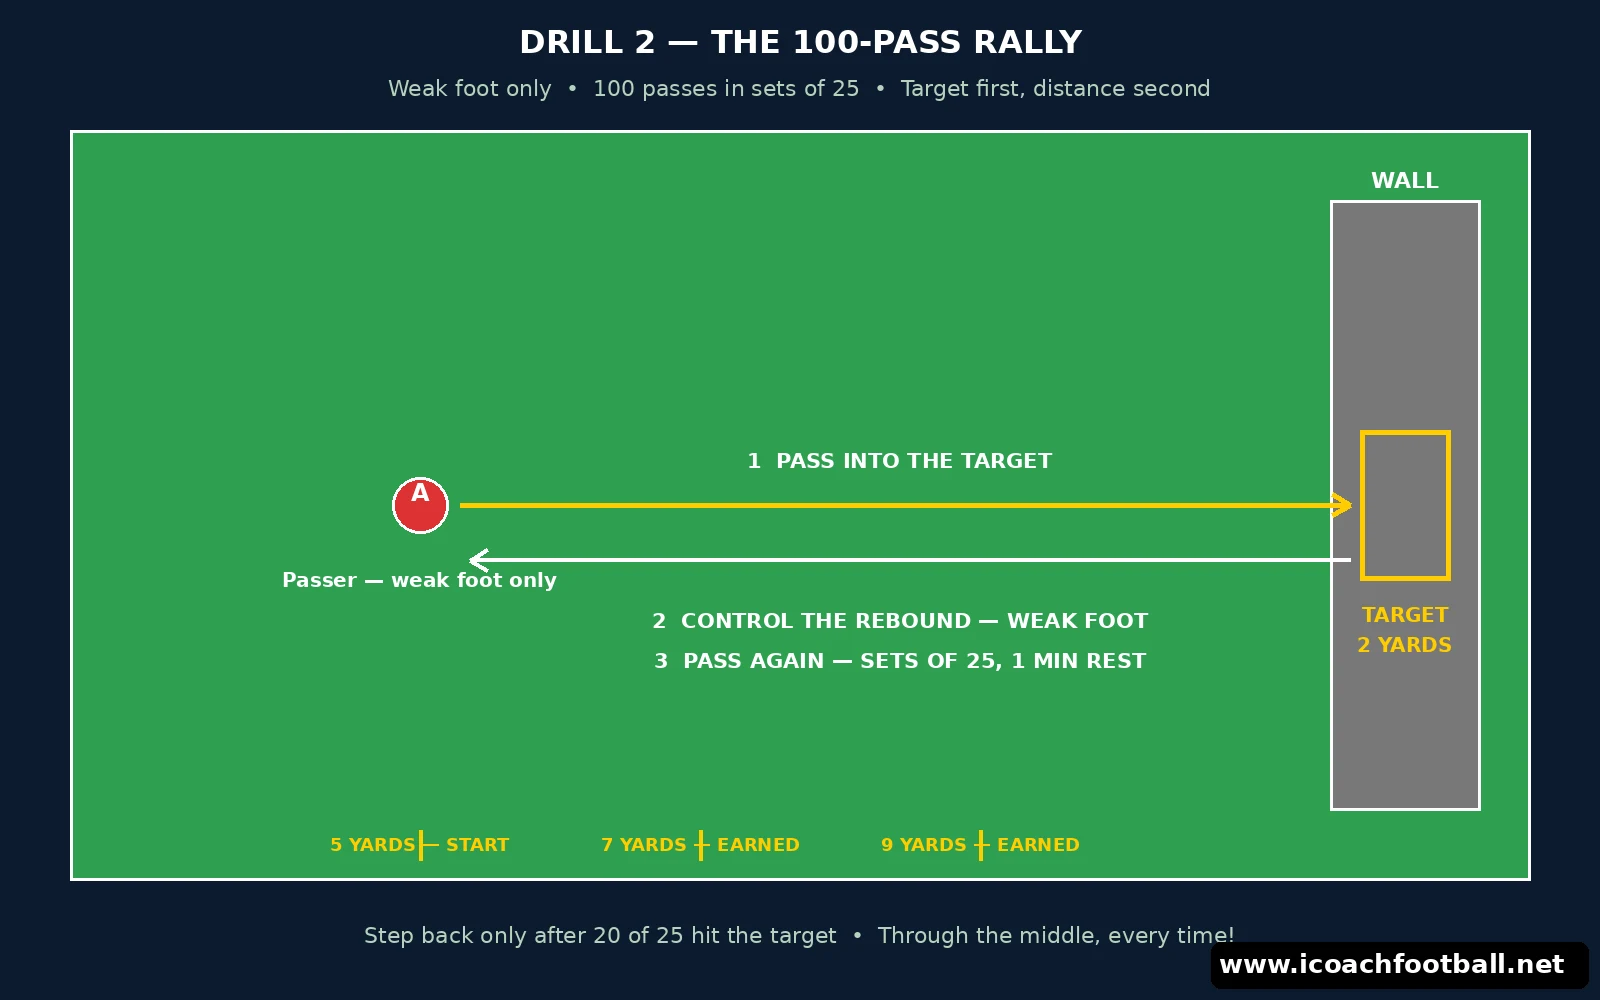
Setup: pairs at a wall, fence or rebounder, 5 yards away, one ball per pair. Mark a 2-yard target on the wall with cones or tape. If no wall is available, pairs pass to each other from 5 yards in a 5 x 5 yard box.
How it works:
- Player A passes with the inside of the weak foot into the target, controls the rebound with the weak foot, and passes again. The target is 100 passes, in sets of 25, with 1 minute of rest between sets.
- Set 1: two-touch, inside of the foot, along the ground. Set 2: one-touch, inside of the foot. Set 3: laces passes, still along the ground, still into the target. Set 4: alternate — receive with the strong foot, pass with the weak foot, because that is the pattern that comes up most in matches.
- Partners count for each other and call out every 25. When a pair finishes, they swap: the counter becomes the passer. The whole drill takes about 8 minutes for both players.
- Progression: step back to 7 yards, then 9, keeping the same target. Distance is earned by accuracy, not given for free — a pair only steps back when it hits 20 of 25 into the target.
Coaching points: this is the highest-volume weak-foot drill in this post, and volume is the point. Nothing builds a weak foot like a few hundred clean passes a week. Insist on the target, not just on kicking the ball at a wall: a pass that misses the target by a yard is a pass that misses a team-mate. The cue that fixes most rallies is “Through the middle, every time!” — a strike through the middle of the ball stays along the ground and comes back true. The laces set is a driven pass in miniature, and the driven pass technique post linked below breaks down the striking mechanics behind a firm, flat pass.
Drill 3 — The Weak-Foot Slalom (control at speed)
Setup: lines of 6 cones, 1.5 yards apart, one line per group of 3 players, in a 20 x 15 yard area. One ball per group.
How it works:
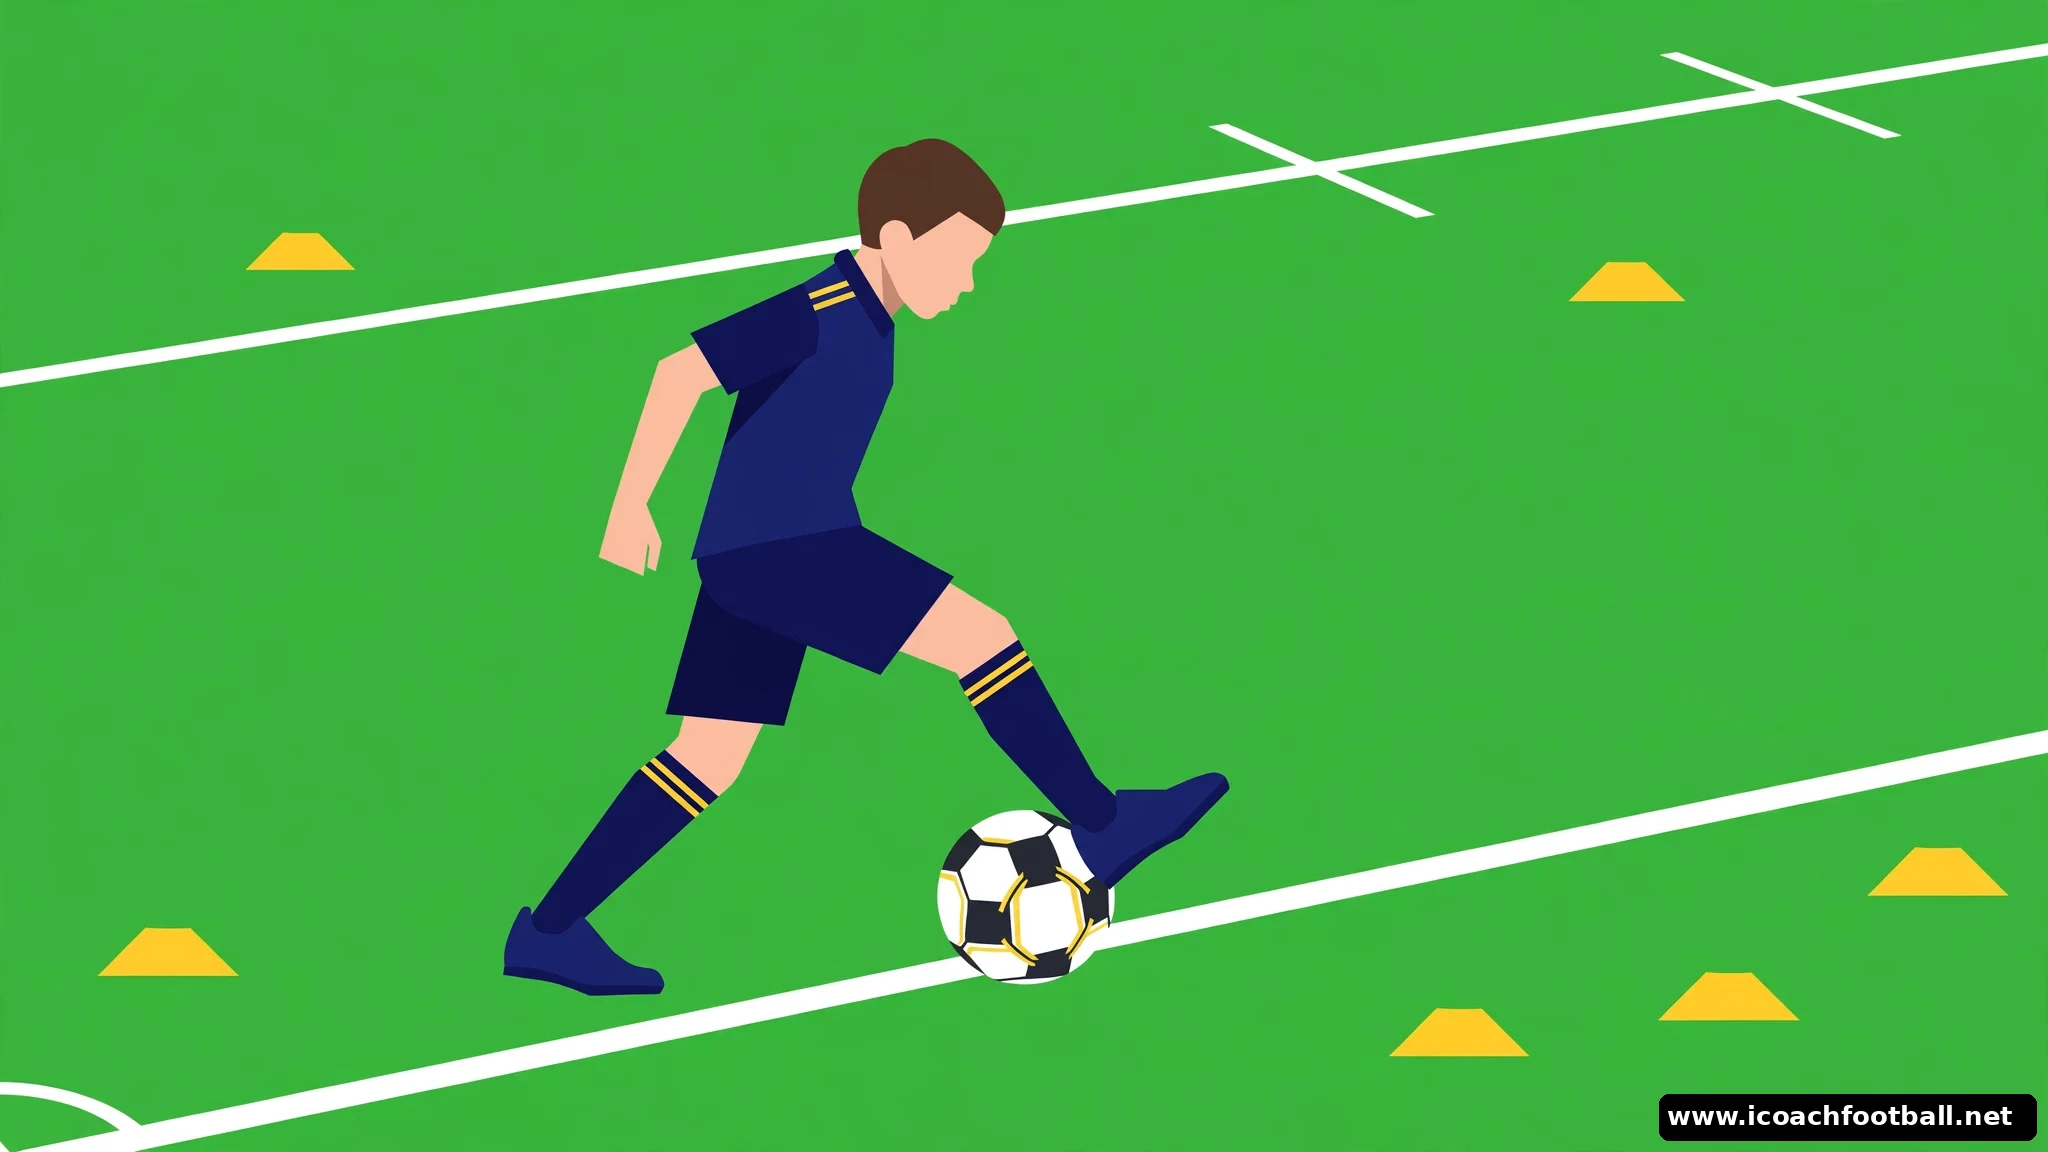
- Player A dribbles through the cones using the weak foot only — inside, outside, inside, outside — turns at the end with the weak foot, and dribbles back. The next player starts as soon as A turns.
- First round: slow, head down, every touch with the weak foot. Second round: at jogging pace. Third round: at full pace, head up, looking at a fixed point (the coach, a cone) instead of the ball.
- Add a finish: after the last cone, the player takes one weak-foot touch out of the slalom and shoots at a mini-goal 8 yards away, weak foot only. A goal counts double if the shot is first time.
- Progression: add a defender at the end of the slalom who may only jockey, not tackle, for 3 seconds. The attacker must beat the defender with a weak-foot move — a drag-back, a body feint, a change of pace — and finish.
Coaching points: small touches, close to the foot. The classic slalom mistake is a big first touch that sends the ball two cones ahead, followed by a sprint to catch it. That is not control. The cue is “Little touches, close!” If a player keeps using the strong foot to rescue a bad touch, restart the run from the cone where it happened — no argument, no lecture, just a restart. Players learn the rule in one session when it costs them a run.
Drill 4 — The Receiving Gate (first touch with the other foot)
Setup: pairs, one ball, a 3-yard gate made of two cones, 10 yards from the passer. This is the weak-foot version of the receiving game in the first-touch drills linked below.
How it works:
- Player A passes firmly to Player B. B must receive the ball with the weak foot, take it through the gate to one side — left or right, decided by a call from A (“Left!” or “Right!”) just as the ball travels — and pass back with the weak foot.
- The first touch must move the ball through the gate, not stop it dead. A touch that kills the ball at B’s feet, or a touch taken with the strong foot, loses the point. First pair to 10 points wins, then swap roles and play again.
- Vary the serve: along the ground, bouncing, and at different heights. The weak foot must learn to receive all three, and the bouncing ball is where most players secretly switch feet — watch for it.
- Progression: A serves from an angle, so B must open the body with the weak foot and play the return pass in a different direction. Now the first touch is doing two jobs at once: control and direction, which is exactly what a match demands.
Coaching points: the receiving foot should be the foot furthest from the direction of travel — it opens the body naturally. Say it once, demonstrate it once at walking pace, then let the points do the coaching. The cue is “Take it where you are going!” A first touch that goes backwards, towards the passer, hands the ball straight back to pressure.
Drill 5 — Weak-Foot Rondo (the foot you cannot avoid)
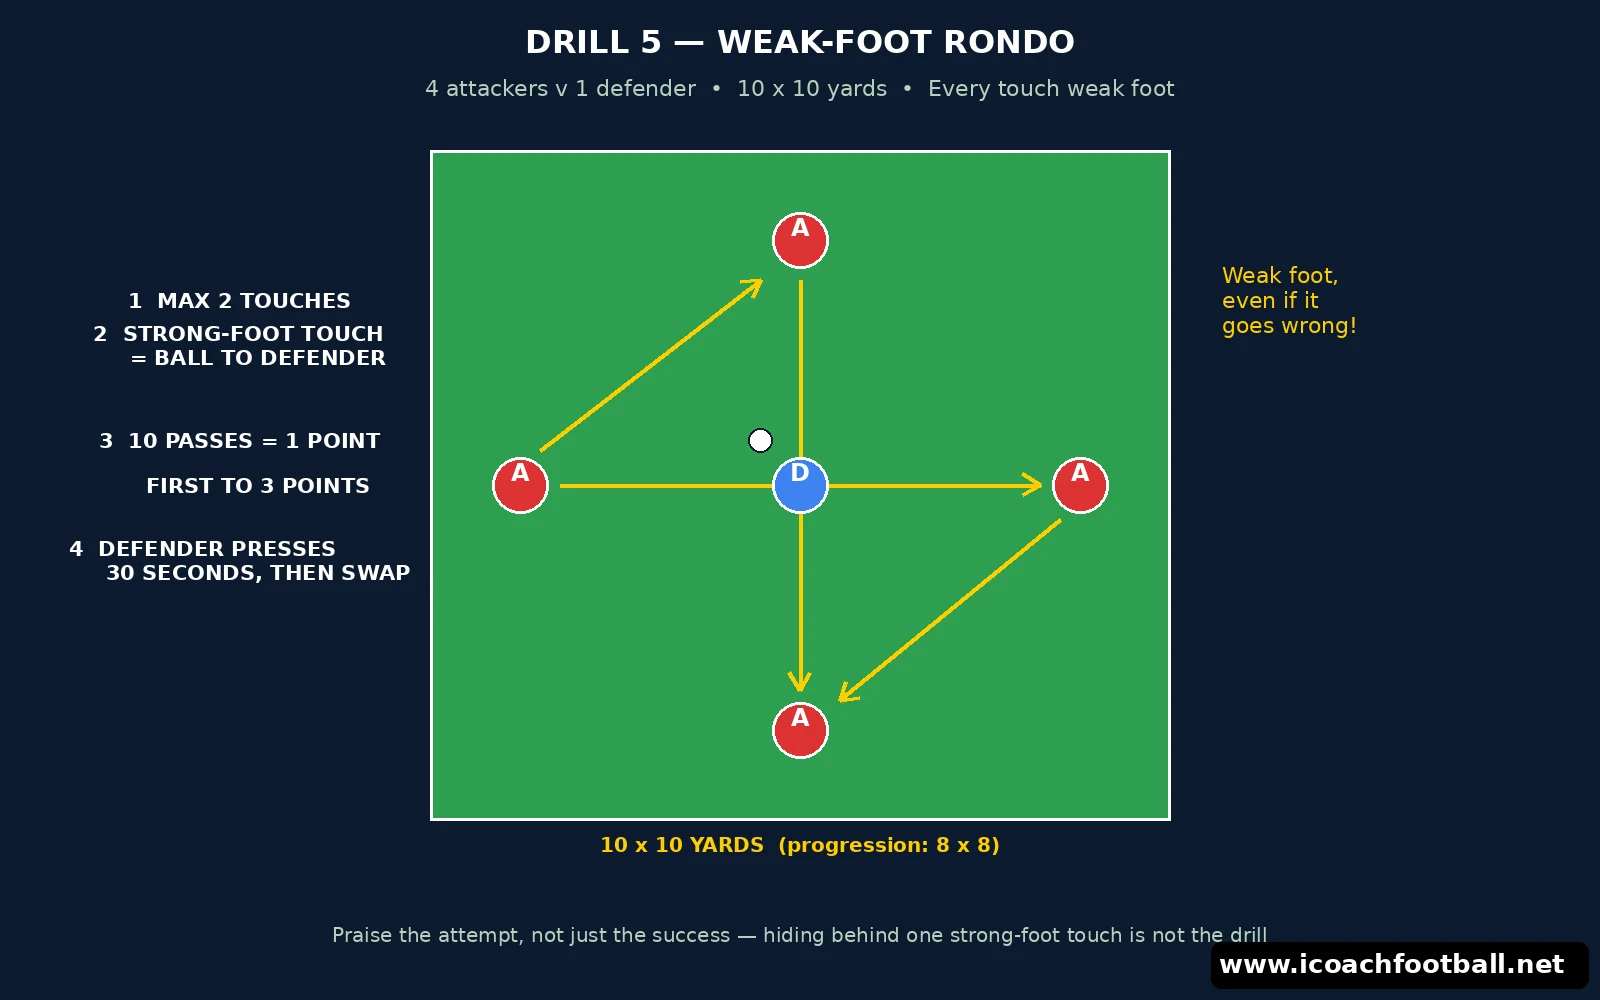
Setup: 4 attackers against 1 defender in a 10 x 10 yard square, one ball. Groups of 5, several squares running at once so every player is involved.
How it works:
- Attackers keep the ball with a maximum of two touches. Every touch — pass and first touch — must be with the weak foot. A touch with the strong foot gives the ball to the defender, who swaps in.
- The defender presses for 30 seconds, then swaps with the attacker who lost the ball most recently, or with a nominated player on the coach’s whistle. Short, sharp defending keeps the pressure honest.
- Score it: 10 consecutive weak-foot passes is a point. The first group to 3 points wins the round. Keep rounds to 3 minutes, then rotate one player in each group so the combinations change.
- Progression: shrink the square to 8 x 8 yards, or allow the defender to win the ball only by intercepting a weak-foot pass — no tackling. The smaller space forces quicker decisions, and the weaker foot has to work at match speed.
Coaching points: this is the drill where players discover whether their weak foot works under pressure or only in isolation. Expect mistakes, and praise the attempt, not just the success: a player who tries the weak foot and loses the ball is doing the drill right; a player who hides behind one strong-foot touch is not. The cue is “Weak foot, even if it goes wrong!” — said once, warmly, at the start, and the group will police itself.
Drill 6 — The Finishing Ladder (weak-foot shooting, short to long)
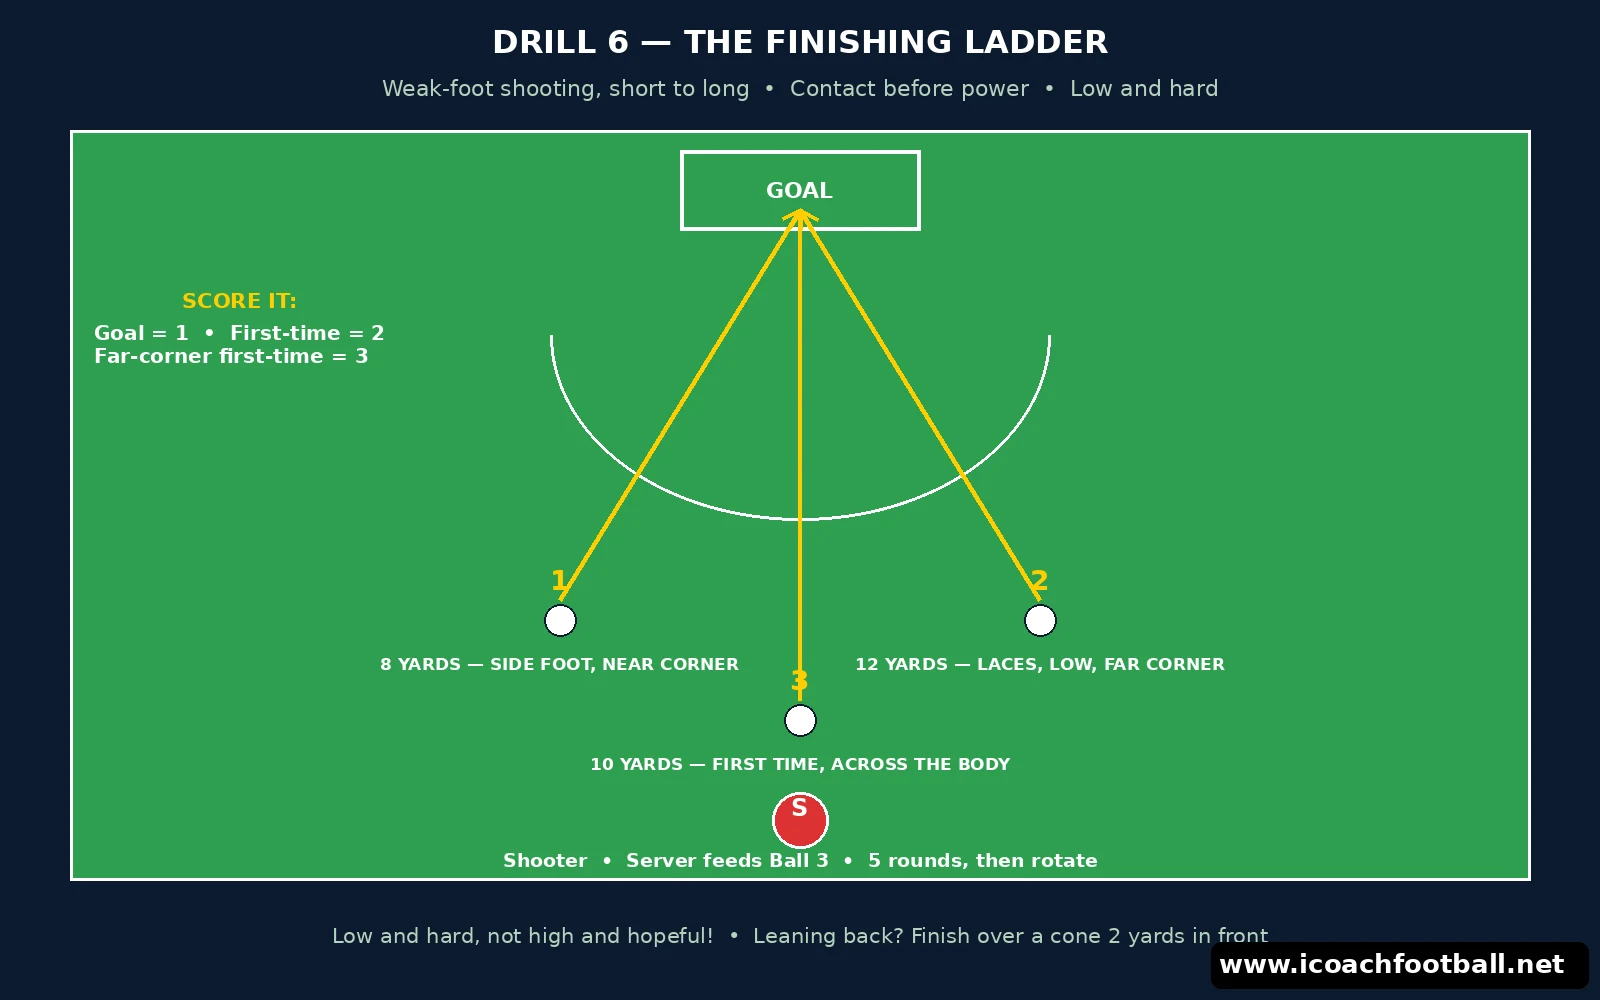
Setup: three balls on the edge of the penalty area, staggered so each one sits further towards the player’s weak side, one goal with a goalkeeper if available. Groups of 3, one shooter, one server, one in goal or retrieving.
How it works:
- Ball 1: side-foot finish into the near corner, weak foot, from 8 yards. Ball 2: laces finish, low, into the far corner, weak foot, from 12 yards. Ball 3: the server plays a pass across the shooter’s body, and the shooter finishes first time, weak foot, from 10 yards.
- Five rounds per shooter, then rotate: shooter becomes server, server becomes goalkeeper or retriever, retriever becomes shooter. A round takes about 90 seconds, so every player shoots 15 times in under 8 minutes.
- Score it: 1 point for a goal, 2 points for a first-time goal, 3 points for a first-time goal in the far corner. Keep a running total across the session; players will ask to go again without being told.
- Progression: the server adds a bouncing ball, or serves from behind the shooter so the finish comes after a turn. At U14 and above, add a recovering defender who starts 5 yards behind the shooter and may challenge once the first ball is struck.
Coaching points: contact before power, again — and nowhere does it matter more. A weak-foot shot struck at full power with a loose ankle balloons over the bar, and the player concludes the foot “cannot shoot”. A firm, low, well-struck finish into a corner proves the opposite in one rep. The cue is “Low and hard, not high and hopeful!” If a player keeps leaning back, put a cone 2 yards in front of the ball and tell them to finish over it, not over the bar — the body follows the target it is given.
Drill 7 — The Weak-Foot Game (where it has to work)
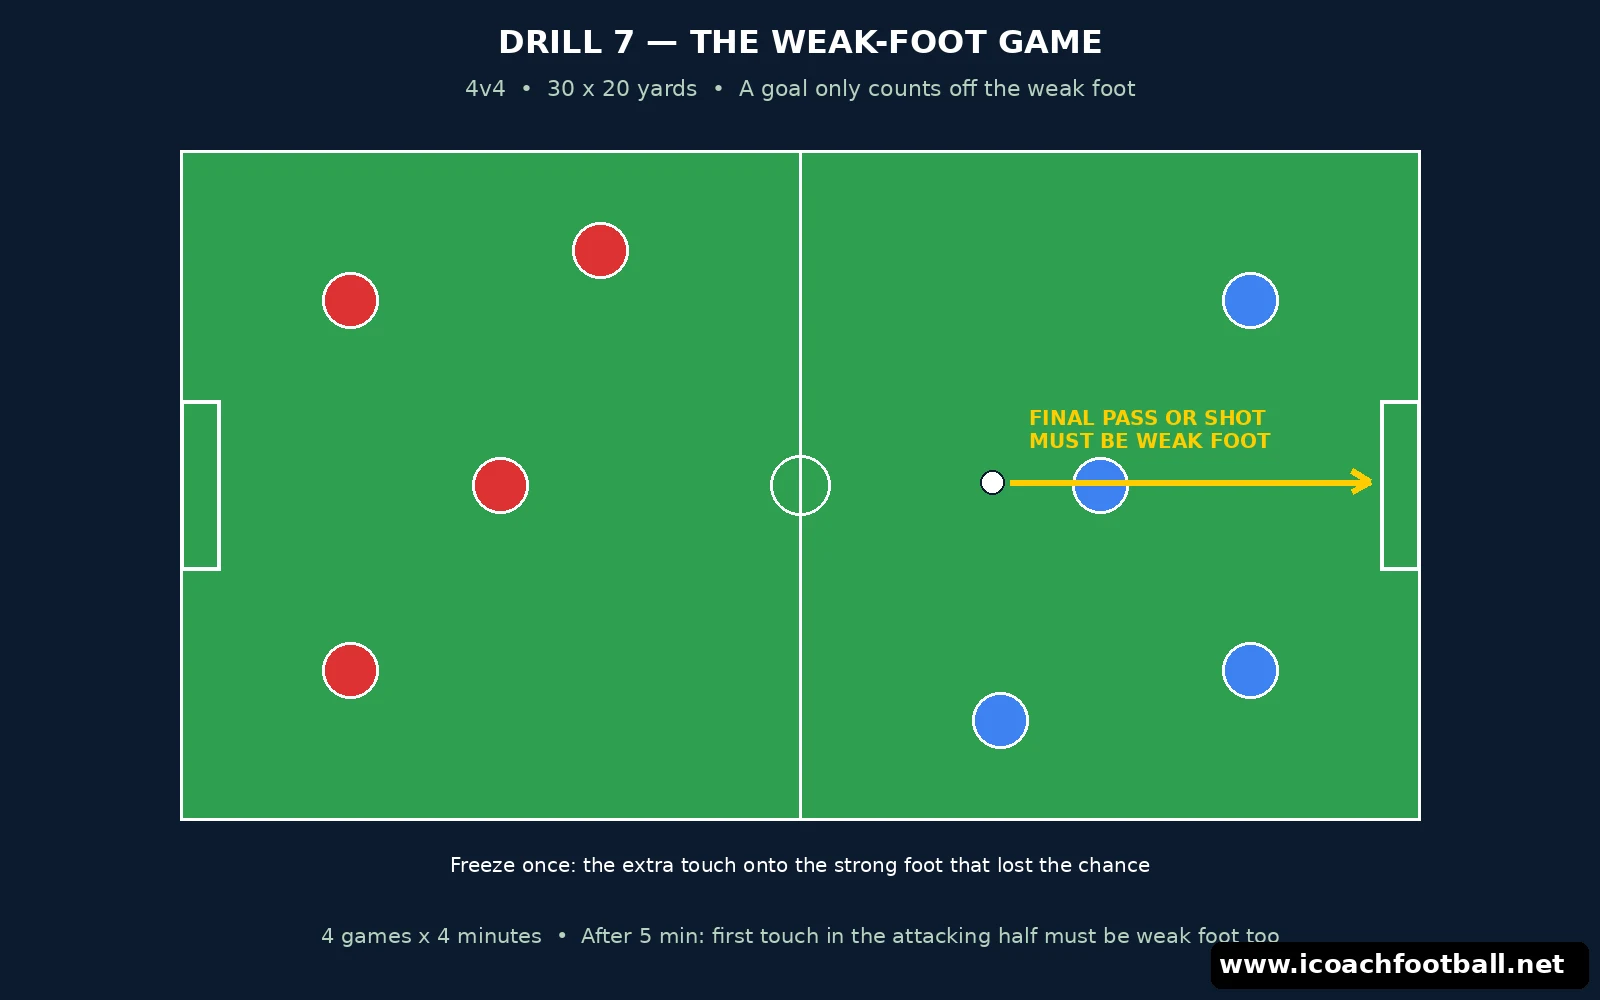
Setup: 4v4 on a 30 x 20 yard pitch, two mini-goals or full goals, one ball in play, spares at each end. Bibs for one team.
How it works:
- Play a normal small-sided game, with one condition: a goal only counts if the final pass or the shot was taken with the weak foot. A goal scored any other way is disallowed, and play restarts with the other team’s ball.
- Add a second condition after 5 minutes: every player must take their first touch with the weak foot when they receive the ball in the attacking half. This forces the weak foot into the moments players usually protect most.
- Play 4 games of 4 minutes, with 1 minute between games to rotate bibs and remind the group of the condition. Between games, ask one question only: “Where did your weak foot win you something?” Let players answer; the answers teach the next game.
- Progression: remove the first-touch condition but keep the weak-foot finish rule, and let the defending team press high. Now the weak foot must survive real pressure, at real speed, with a real score at stake.
Coaching points: freeze the game once, no more. The freeze to use: a player took an extra touch to get onto the strong foot and lost the chance. Walk the group through what the weak-foot option looked like — one touch, one shot — and restart. One freeze teaches the game; five freezes kill it. For the small-sided structure itself, the soccer drills for beginners post linked below is a useful starting point for younger groups.
Common mistakes (and the fix)
- Mistake: chasing power before contact. Fix: go back to Drill 2 at 5 yards, sets of 25, until 20 of 25 hit the target. Power is added only when contact is clean.
- Mistake: the plant foot lands behind the ball. Fix: a cone beside the ball as the plant-foot marker, five slow passes from a standing start, in Drill 1.
- Mistake: the player switches feet when the ball arrives awkwardly. Fix: Drill 5’s rule — a strong-foot touch gives the ball away. The cost has to be real, or the habit survives.
- Mistake: the strong foot does all the receiving, the weak foot only passes. Fix: Drill 4, where the first touch and the pass must both be weak foot. Receiving is half the skill, and it is the half most players skip.
- Mistake: weak-foot work only happens once, in one big session, and is never repeated. Fix: the 6-week plan below. Fifteen minutes, three times a week, beats one long session every time — the foot learns by frequency, not by volume in a single day.
- Mistake: only practising from one side. Fix: swap sides in every drill, and make left-footed players lead the slalom from the right and right-footed players from the left. A weak foot that only works on one side of the pitch is half a skill.
Adapting by age group
- U8–U10: run Drills 1, 2 and 3 only, at walking and jogging pace, with two touches always allowed. Keep scores simple (gates hit, passes counted) and praise every weak-foot attempt loudly. No finishing ladder from distance — keep shots inside 8 yards.
- U11–U12: run all seven drills as written, with the one-touch progression in Drill 1 and the rondo in Drill 5. Introduce the finishing ladder at 8 and 12 yards, and let players choose when to use the weak foot in the final game before making it a condition.
- U13–U16: add the recovering defender in Drill 6, shrink the rondo square, and play Drill 7 with high pressing. Link the weak foot to positions: wide players must cross with the weak foot, central players must finish across their body, defenders must clear with the weak foot under pressure. At this age, the weak foot is a selection issue — players who can use both feet get picked in more positions.
The 6-week plan (and the 45-minute version)
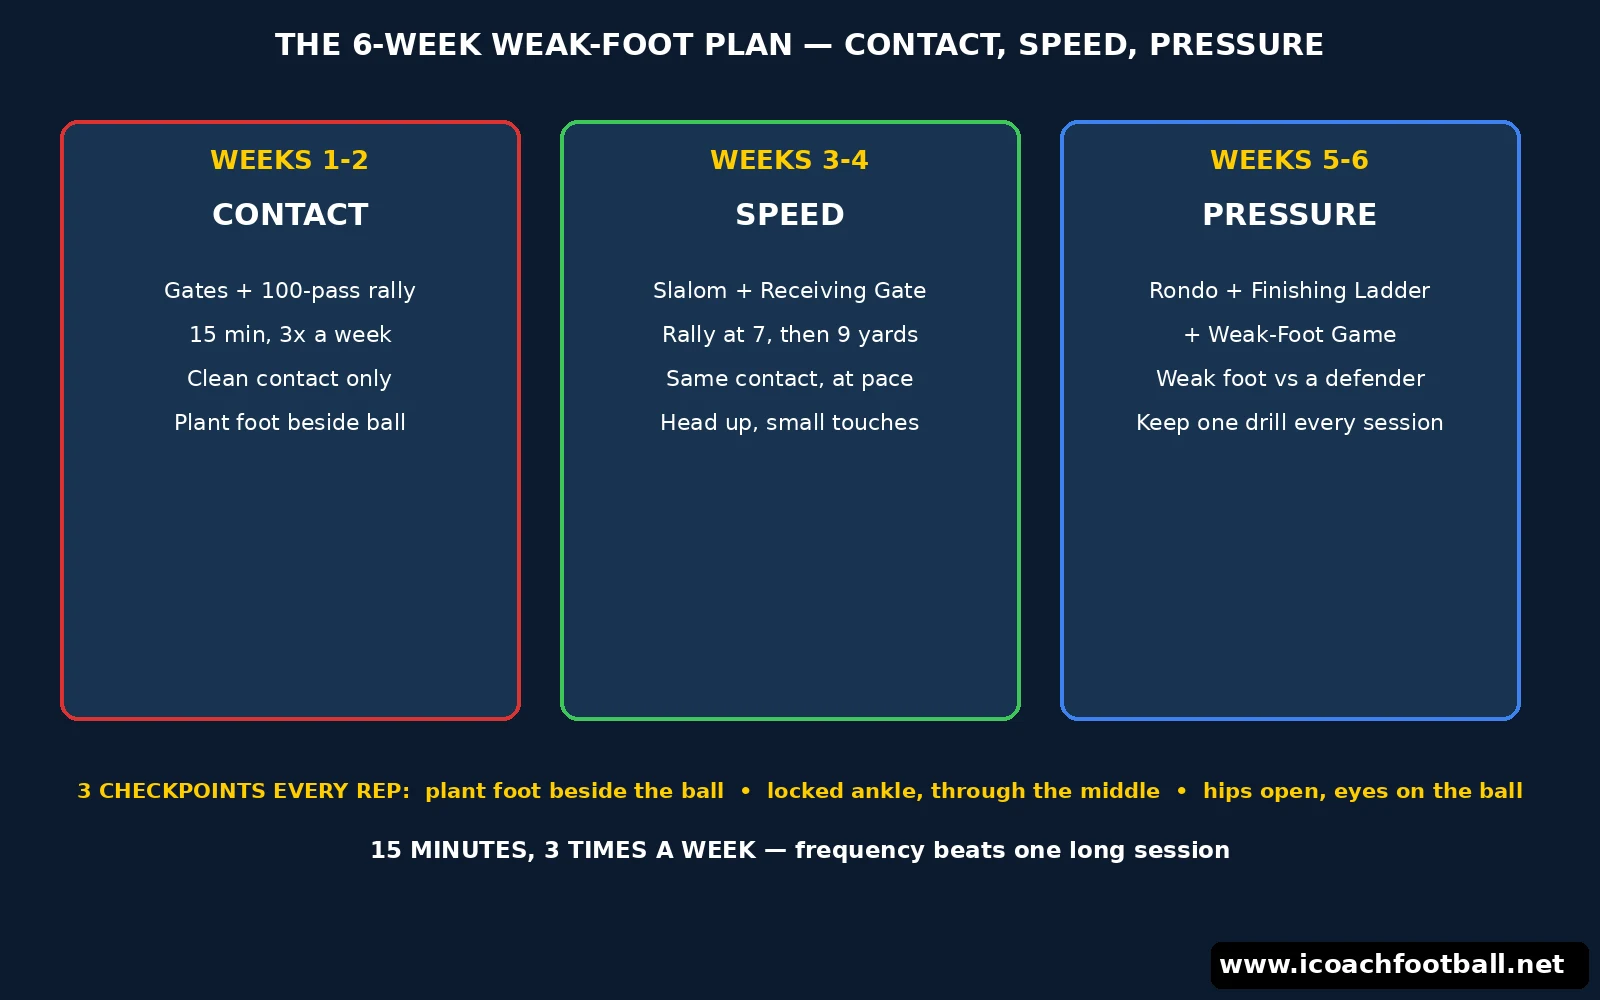
Weeks 1–2, contact: Drills 1 and 2 only, 15 minutes, three times a week. The only goal is clean contact and a correct plant foot. Weeks 3–4, speed: add Drills 3 and 4, and run the rally at 7 and 9 yards. The goal is the same contact, at jogging pace and then at full pace. Weeks 5–6, pressure: add Drills 5, 6 and 7. The goal is the weak foot surviving a defender, a bouncing ball and a scoreboard. After week 6, keep one weak-foot drill in every session as a warm-up — the foot keeps what it keeps using, and loses what it stops using.
The 45-minute version: Drill 1 (8 min), Drill 2 (8 min), Drill 4 (8 min), Drill 6 (10 min), Drill 7 game (11 min). Skip the rondo and the slalom on a short session, and use them as the next session’s opening games.
FAQ
What are the best weak foot soccer drills?
The highest-value drill is the weak-foot wall rally: 100 passes in sets of 25, weak foot only, into a marked target. It gives more clean weak-foot touches per minute than any other drill. Build on it with gate passing for accuracy, a cone slalom for control at speed, a rondo for pressure, and a finishing ladder for shooting — the full set is in the seven drills above.
How long does it take to improve your weak foot?
Most players feel cleaner contact within two to three weeks of short, regular practice — 15 minutes, three times a week — and start trusting the weaker foot in matches around week six. The key is frequency: daily or near-daily short doses beat one long session, because the foot learns by repetition, not by a single big effort.
Should young players train both feet equally?
Yes, and the younger the better. Young players are still building their movement patterns, so equal left- and right-foot work becomes habit rather than repair work later. That is why the drills above start with the weak foot first in every rep, and why the FIFA Training Centre’s technical activation work insists on balanced left- and right-foot use from the start.
Why does my weak foot shot keep going over the bar?
Almost always the plant foot and the body shape: the plant foot lands behind the ball, the player leans back, and the strike goes underneath the ball and up. Fix it by planting beside the ball, keeping the chest over it, striking through the middle and aiming low. Practise at 8 yards with the finishing ladder’s first ball until low finishes are routine, then add distance.
How do you coach weak foot drills for a whole team at once?
Use pairs and small groups running at the same time, so nobody queues — the gate game, the wall rally and the slalom all run in parallel. Set one rule for the whole group (weak foot only, or the rep restarts), score it, and let the competition carry the session. Keep the whole weak-foot block to 15–20 minutes inside a normal session, and repeat it three times a week.