Football Attacking the Half Space Drills: 6 Games to Find the Lane and Play Through
Quick answer
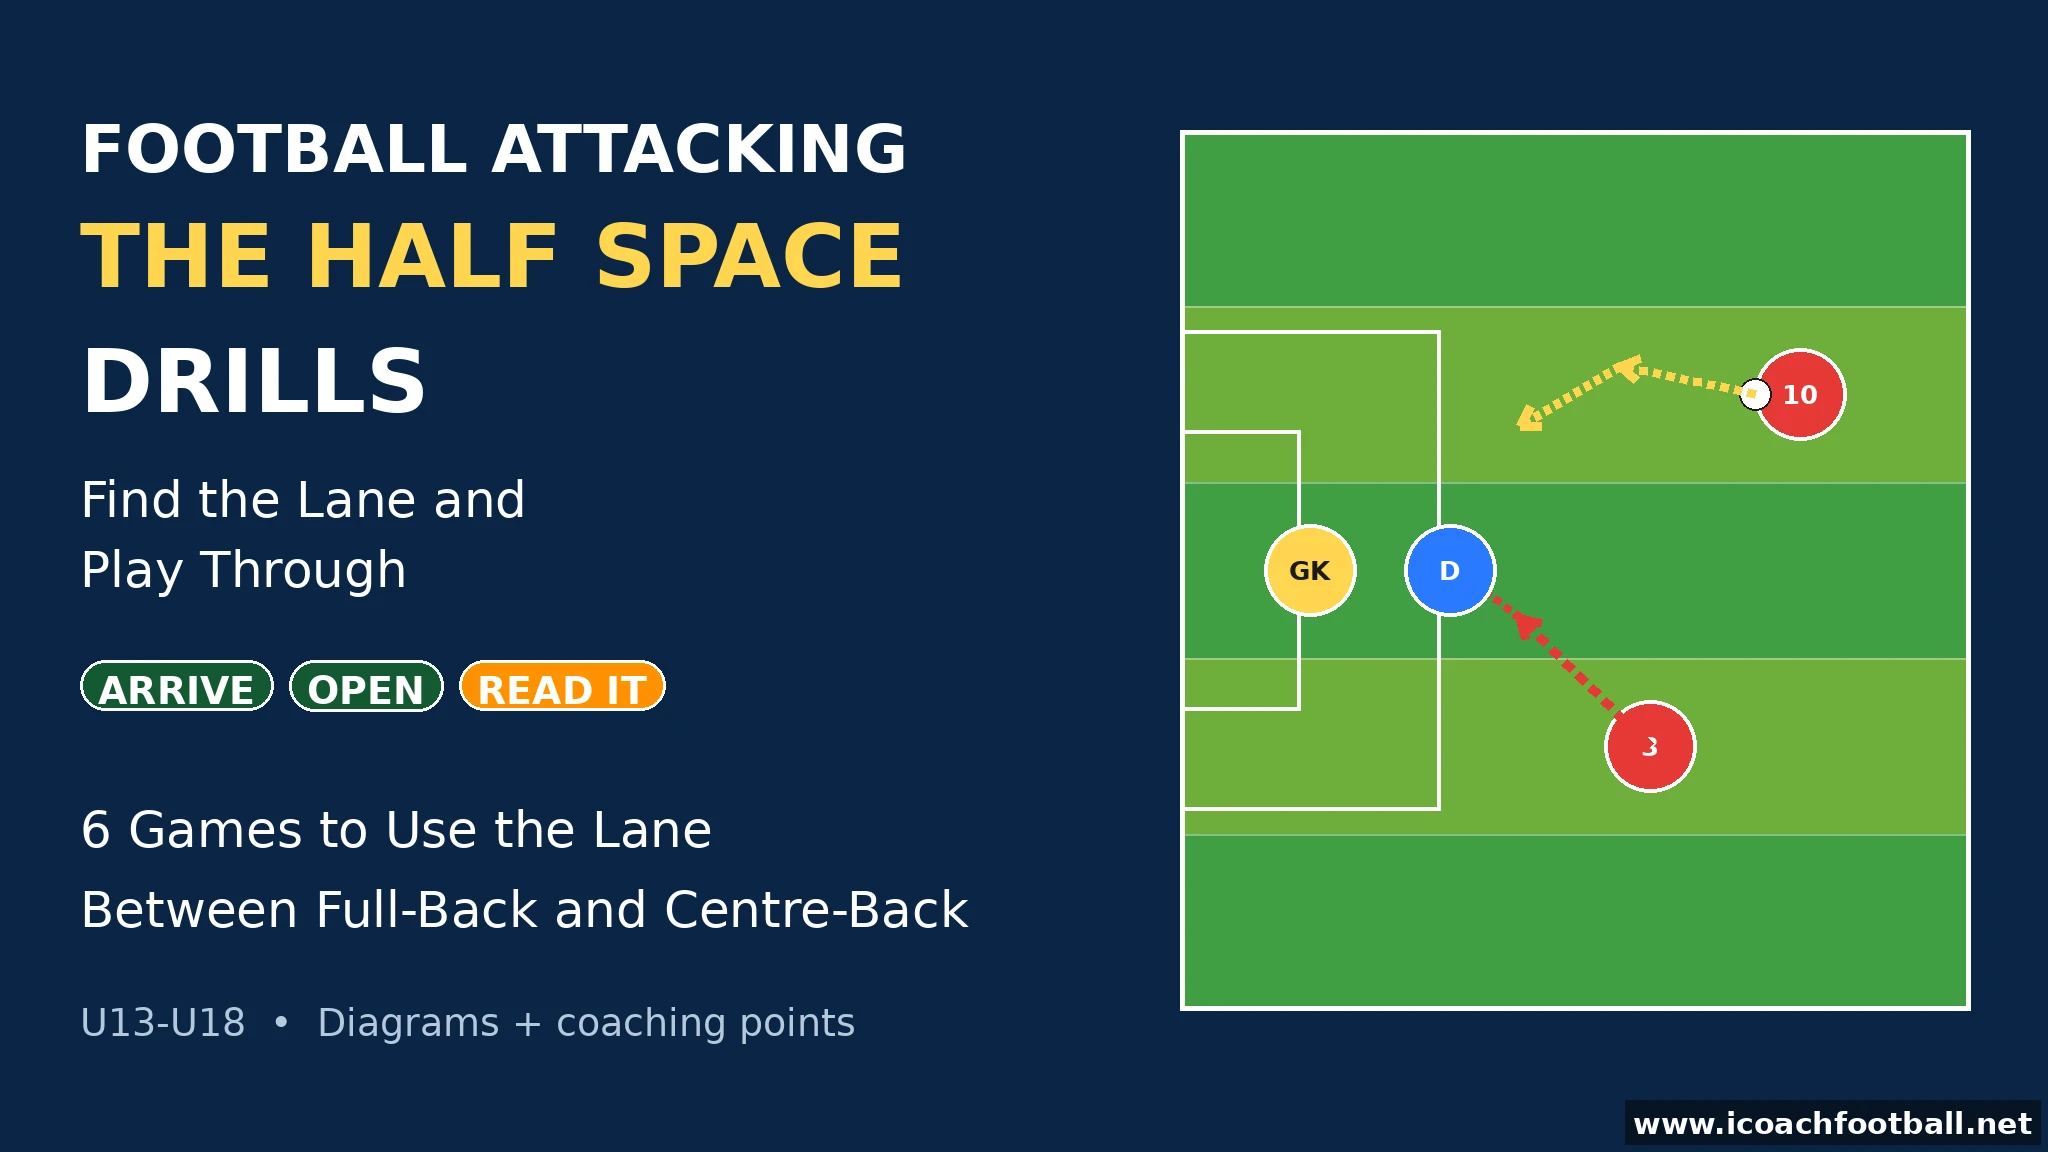
The half-space is the vertical lane between the touchline and the centre of the pitch. These six football attacking the half space drills teach players to arrive in that lane at the right moment, receive with an open body and play through — because a receiver in the half-space forces a defender into a choice they cannot win.
Suitable for: U13–U18
Most youth teams attack in two places: down the wing, or straight through the middle. The wing is safe but far from goal, and the middle is crowded. The half-space sits between the two — close enough to goal to threaten, wide enough that a centre-back must decide whether to step out and leave a gap, or stay and let the receiver turn. Coaches in the US run the same games as soccer drills, and the lane works the same way: arrive at the right moment, receive open, and the defence has a problem. These six games build that habit in order, from finding the lane to using it in a full game.
Session snapshot
- Players: 12–16, plus goalkeepers
- Area: Half a pitch, one goal
- Duration: 60 minutes
- Focus: Finding the lane, open body shape, third-man timing, the defender’s dilemma
- Age: U13–U18 (see Age adaptations)
The five lanes — and the defender’s dilemma
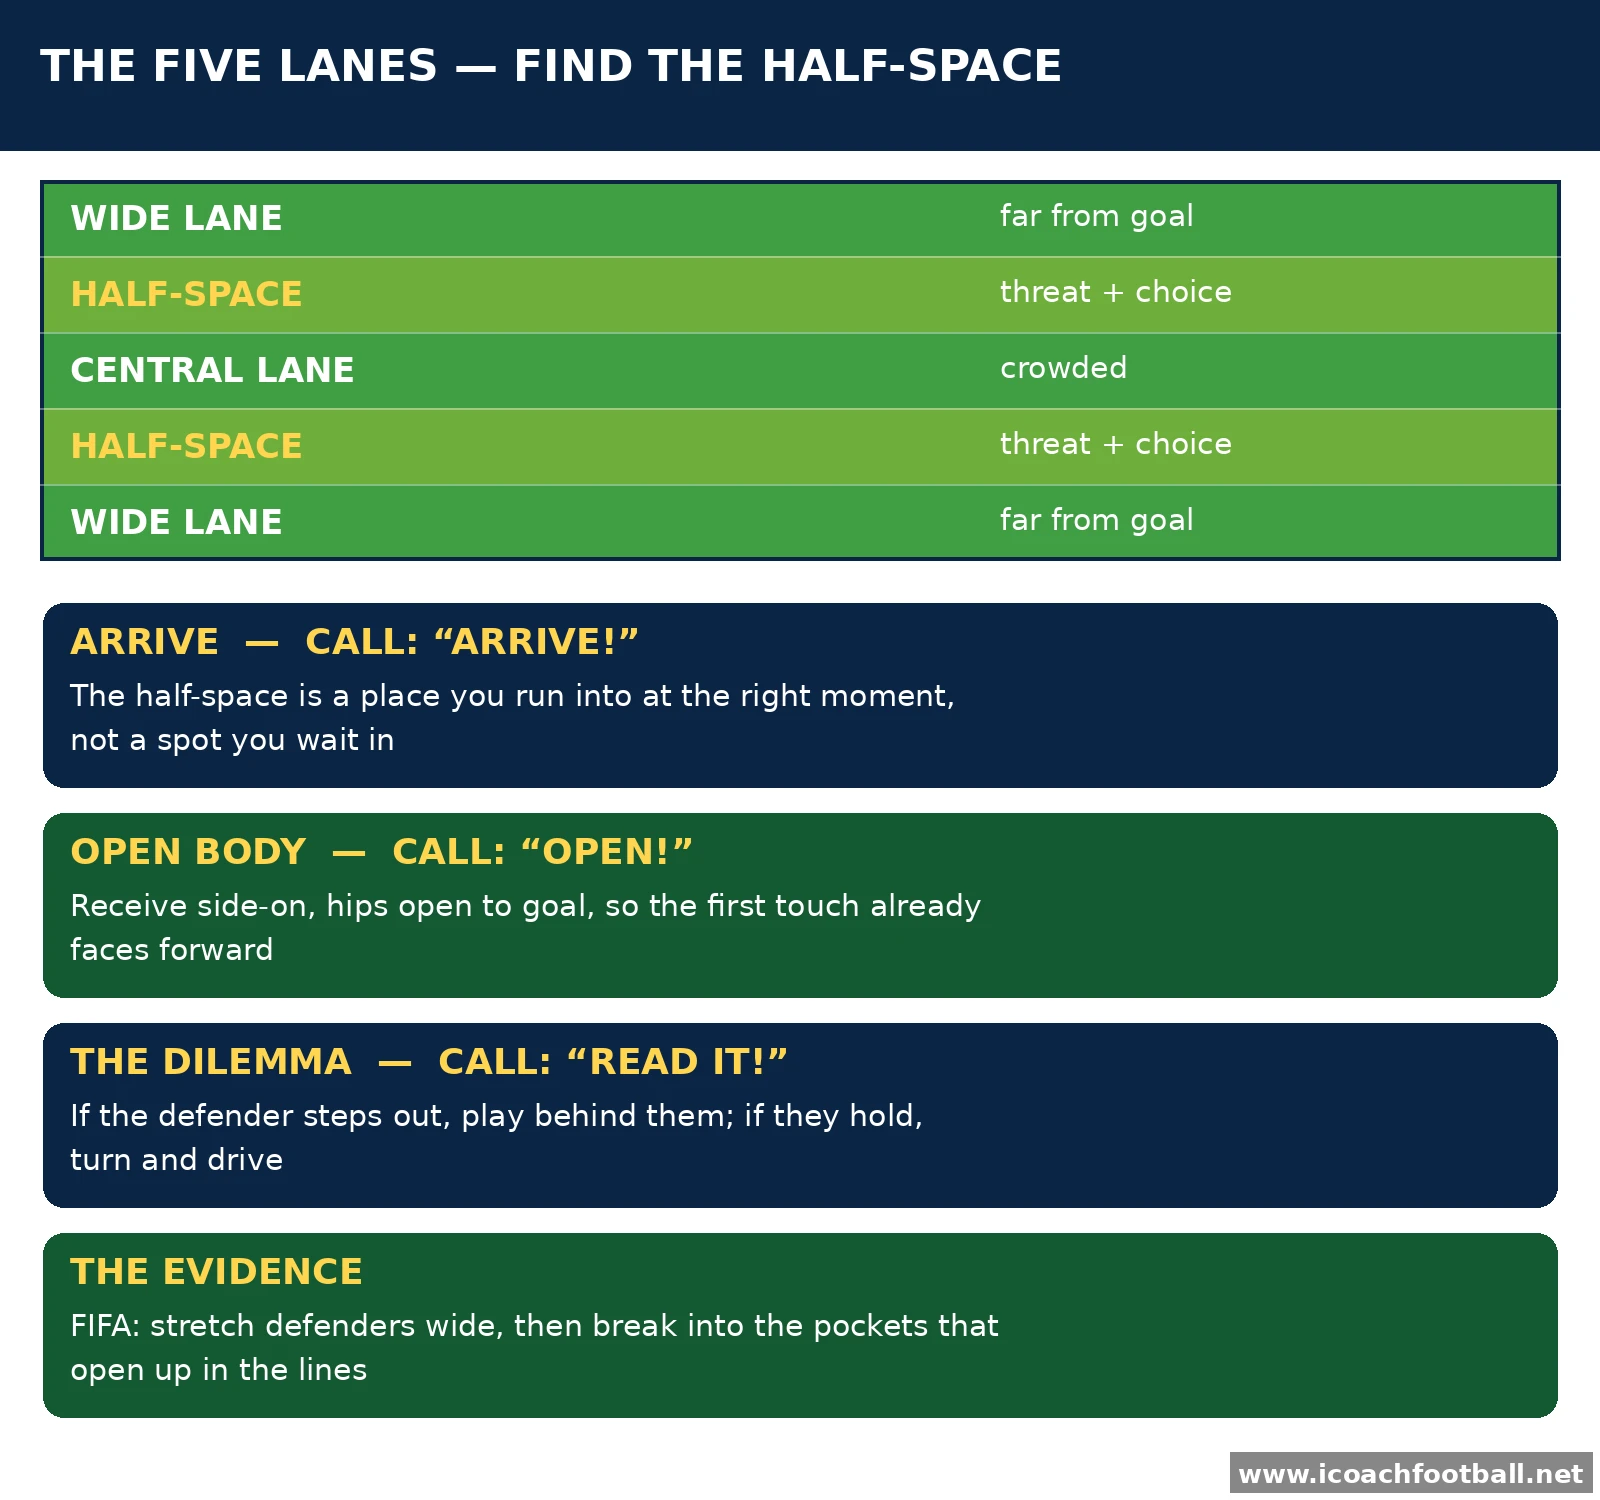
Split the pitch lengthwise into five vertical lanes: two wide lanes, two half-spaces and one central lane. The half-spaces are the lanes between the full-back and the centre-back. This map is the whole session — once players can see the lanes, they can find them. The principle is in line with the FIFA Training Centre’s work on attacking the space in behind: stretch defenders with wide players, then break into the pockets of space that open up in the lines.
| Rule | What it means | The call |
|---|---|---|
| ARRIVE, DON’T STAND | The half-space is a place you run into at the right moment, not a spot you wait in | “ARRIVE!” |
| OPEN BODY | Receive side-on, hips open to goal, so the first touch already faces forward | “OPEN!” |
| THE DILEMMA | If the defender steps out, play behind them; if they hold, turn and drive | “READ IT!” |
Drill 1: Find the Lane
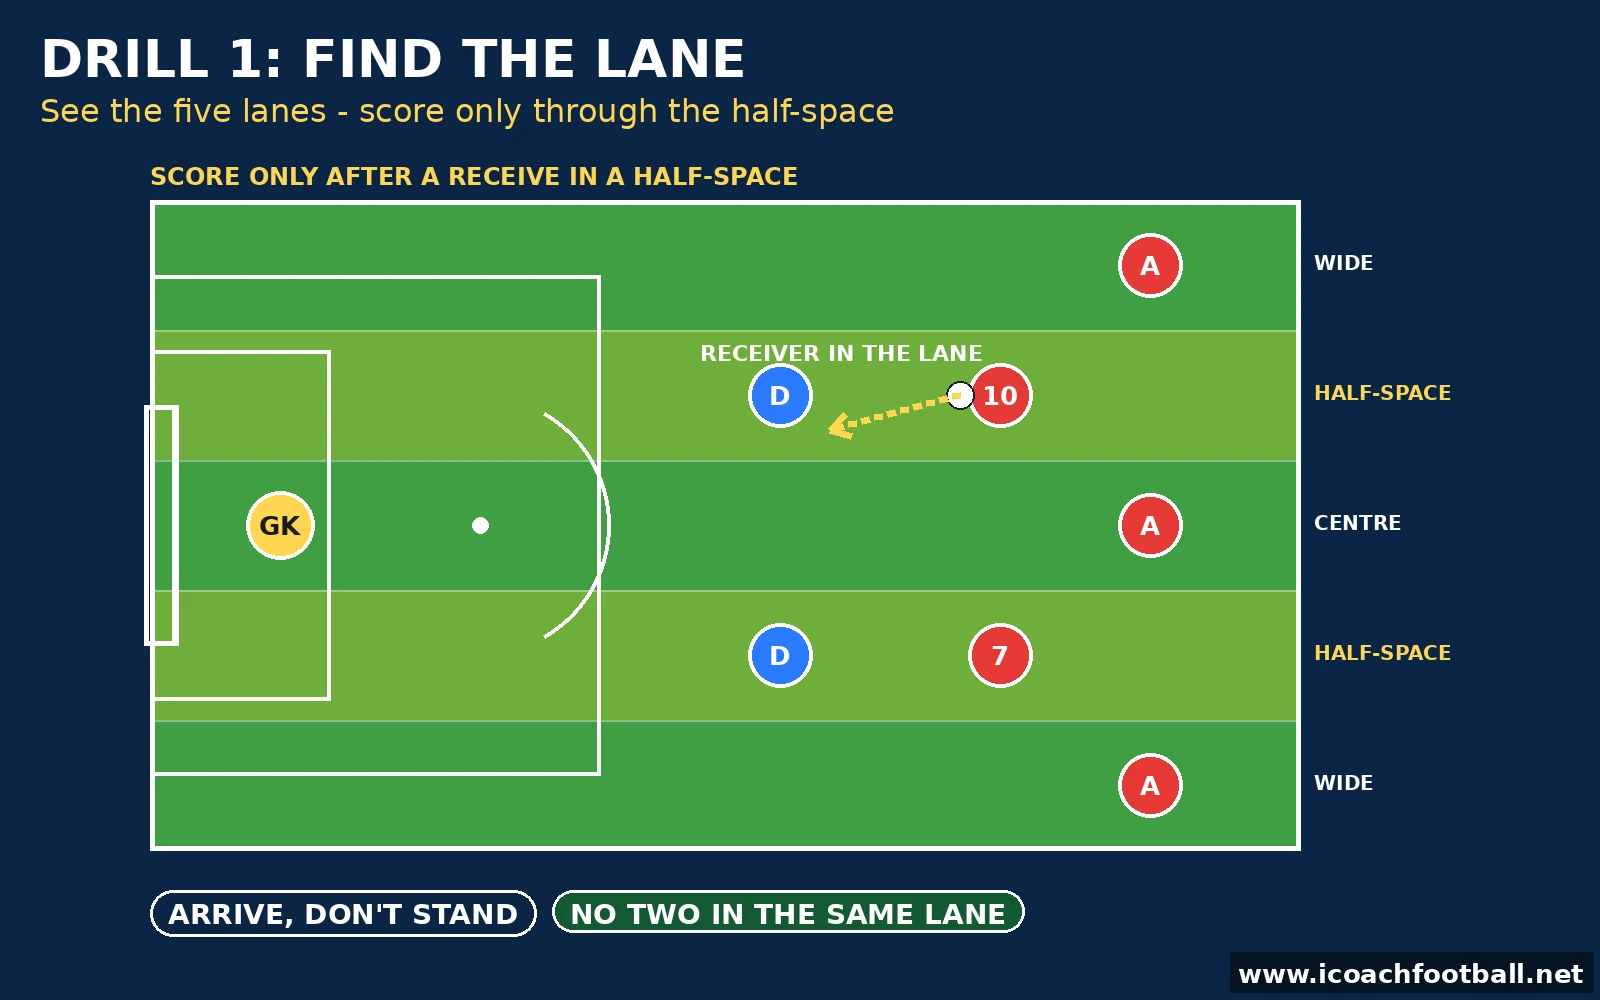
Before players can use the half-space, they must be able to see it. This game paints the lanes on the pitch and only rewards play that goes through them.
Setup
- 40 x 30-yard area, flat discs marking five vertical lanes along both end lines, 6v6 plus 2 neutrals
- Two small goals or target zones at the attacking end; one ball, 12 minutes
How to Play
- Mark the five lanes with cones or flat discs so players can see the corridors.
- Teams play 6v6 plus two neutral players, with a simple rule: a team can only score after a player has received a pass while standing in a half-space.
- The receiver must take the ball with their body open to the goal — a square receive does not count.
- If a team scores without a half-space receive first, the goal does not count and play restarts from the coach.
- Rotate the neutrals every 3 minutes so everyone gets reps receiving in the lane.
Coach’s note: The first five minutes will look messy — players will stand in the lane waiting for the ball, which is exactly the wrong habit. Freeze the game and ask the waiting player what they were doing before the pass was played. The answer should be “running into it”. Add a rule if needed: no player may stand in a half-space for more than three seconds without the ball arriving. This lane discipline is the same positional map from our football playing between the lines drills, drawn on the pitch instead of described.
Progressions: Only one touch is allowed in the half-space, so the receive must go forward at once; add a spacing rule — no two team-mates in the same vertical lane at the same time, so the team must stagger to create the lane.
Drill 2: The Half-Turn Receive
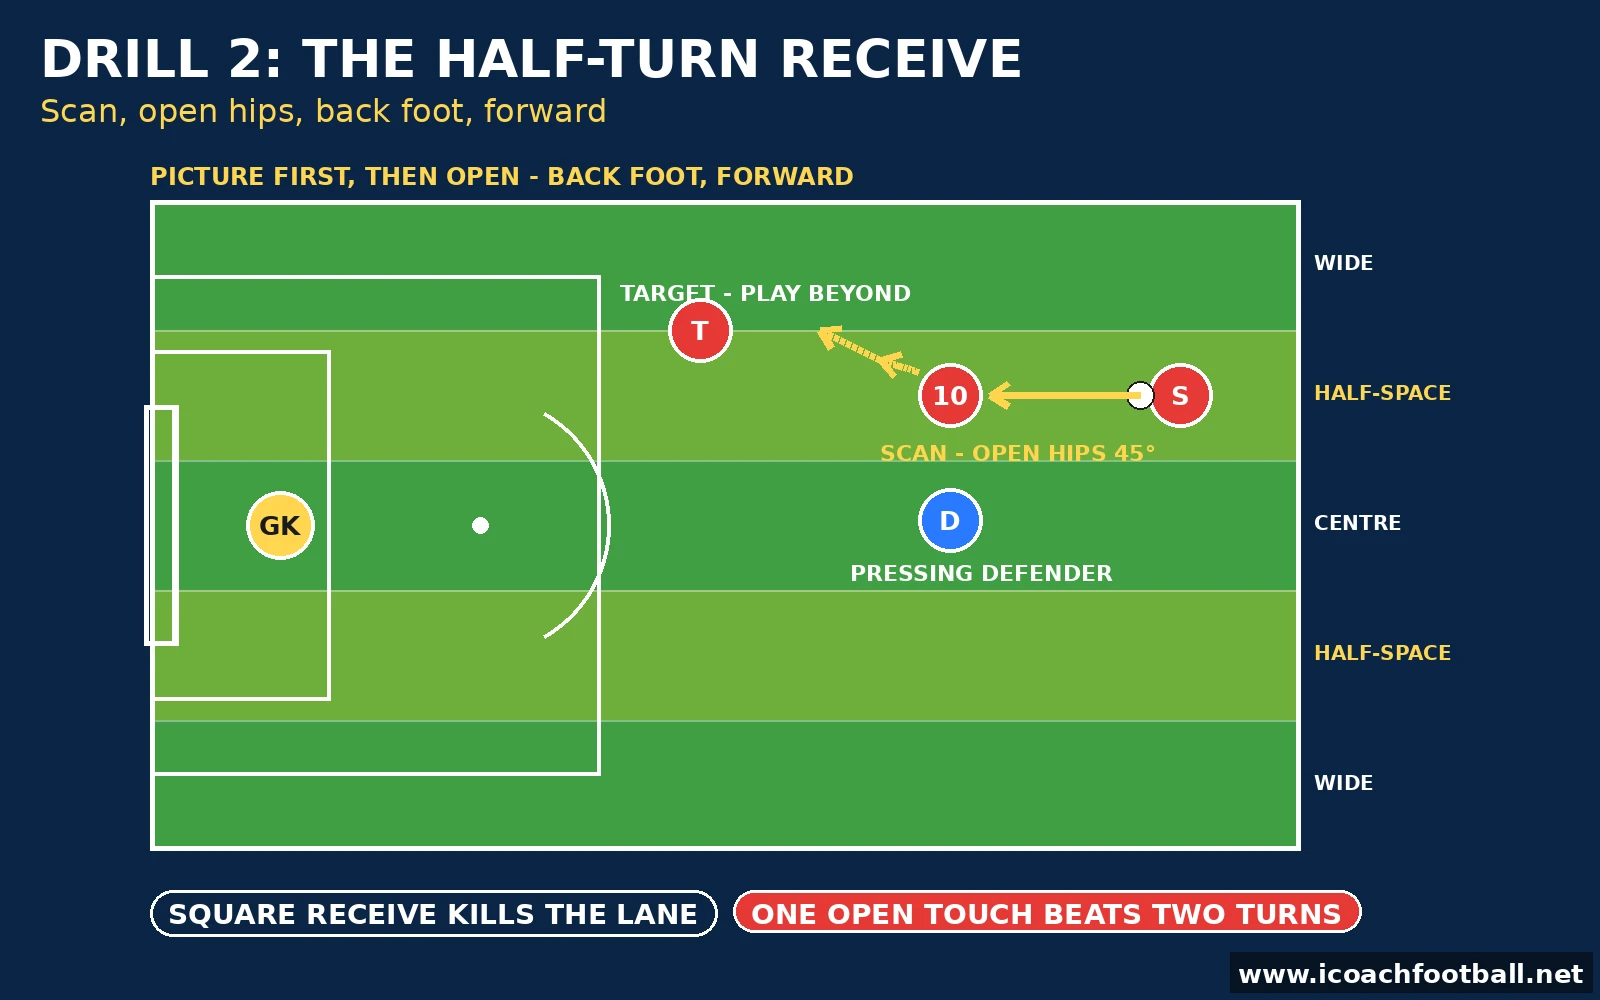
The lane is useless if the receiver kills the ball dead. This drill trains the receive that makes the half-space dangerous: scan, open hips, back foot, forward.
Setup
- 20 x 15-yard grid in a half-space channel, 3 players per grid plus a server, 1 ball per grid
- Cones mark the half-space lane; the receiver starts on the edge of the grid, 10 minutes
How to Play
- The server plays a firm pass into the receiver, who is standing in the half-space lane.
- Before the ball arrives, the receiver scans over their shoulder and opens their hips to about 45 degrees.
- The receiver takes the ball on the back foot, across the body, so the first touch moves forward into space.
- If the space behind is open, the receiver turns and drives; if a defender is tight, they set the ball back first time.
- After the turn or the set-back, the receiver plays beyond the press to a target player and rotates to the back of the line.
Coach’s note: Watch the receiver’s feet before the pass, not after it. A receiver who is square-on when the ball is played has already lost the lane — the turn takes two touches and the defender arrives. The cue phrase is “picture first, then open”: the scan gives the picture, the body shape keeps it. If a player keeps receiving square, put a cone behind them and forbid them from turning their back to it. This is the same half-turn habit trained in our football half turn drills, applied to one specific lane.
Progressions: Add a passive defender who presses on the receiver’s first touch, so the scan must be real; the server varies the pass — firm, bouncing, driven — so the back-foot touch must adapt.
Drill 3: Third-Man Through the Half-Space
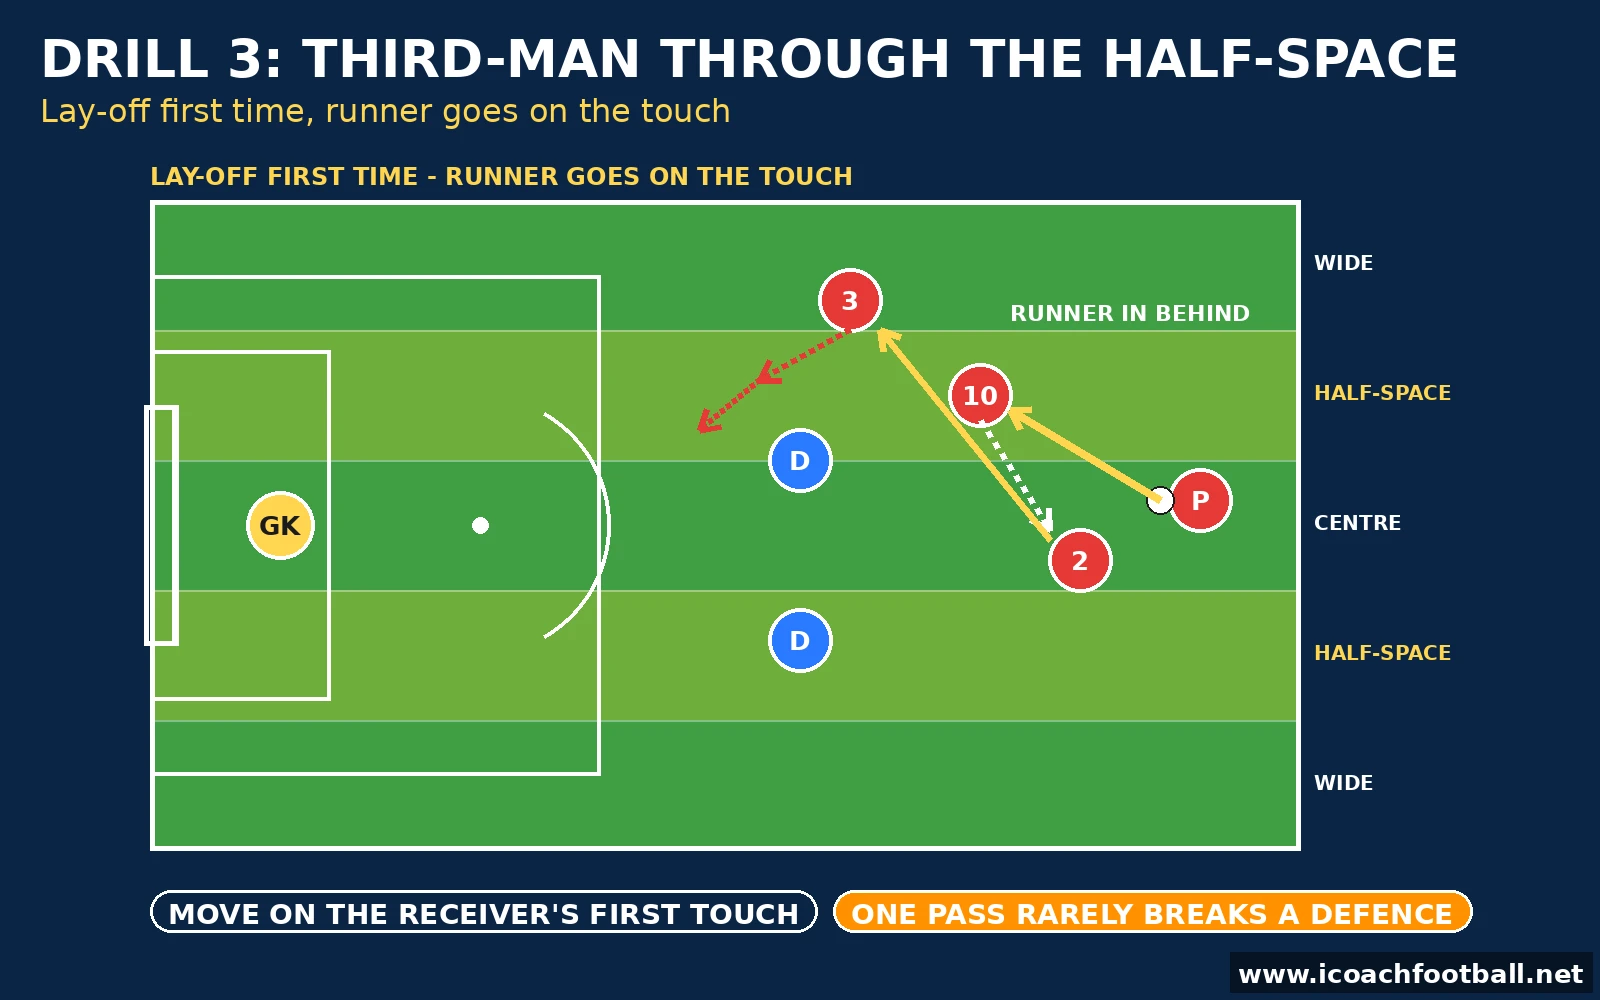
One pass into the lane rarely breaks a defence. This drill trains the combination that does: the half-space receiver lays it off, and the third man runs behind.
Setup
- Final third, one full-size goal, 1 goalkeeper, 8 attackers in three lines, 2 passive defenders
- The half-space lane is marked with flat discs; the passer starts 30 yards from goal, 12 minutes
How to Play
- The passer plays a firm ball into the half-space receiver, who has arrived in the lane on the move.
- The receiver lays the ball off first time to a midfielder arriving from deep — the second man.
- As the lay-off is played, the third man — a winger or striker — runs in behind the defence, through the gap the stepping defender leaves.
- The second man plays the through ball at once, into the runner’s path, for a first-time finish.
- Rotate all three roles every 4 repetitions so everyone learns the lay-off, the pass and the run.
Coach’s note: The timing is everything and it will be wrong for the first ten reps. The runner goes too early and is offside, or too late and the gap closes. Teach the trigger: the runner moves on the receiver’s first touch, not on the pass. Shout “GO!” the moment the receiver touches it, and the timing clicks within a session. This is the same third-man pattern from our soccer third man runs drills, run through the half-space instead of the centre.
Progressions: The two defenders become live, so the receiver must read whether the defender steps or holds; the runner may also peel wide, so the second man must choose between the run in behind and the run to the touchline.
Drill 4: The Defender’s Dilemma
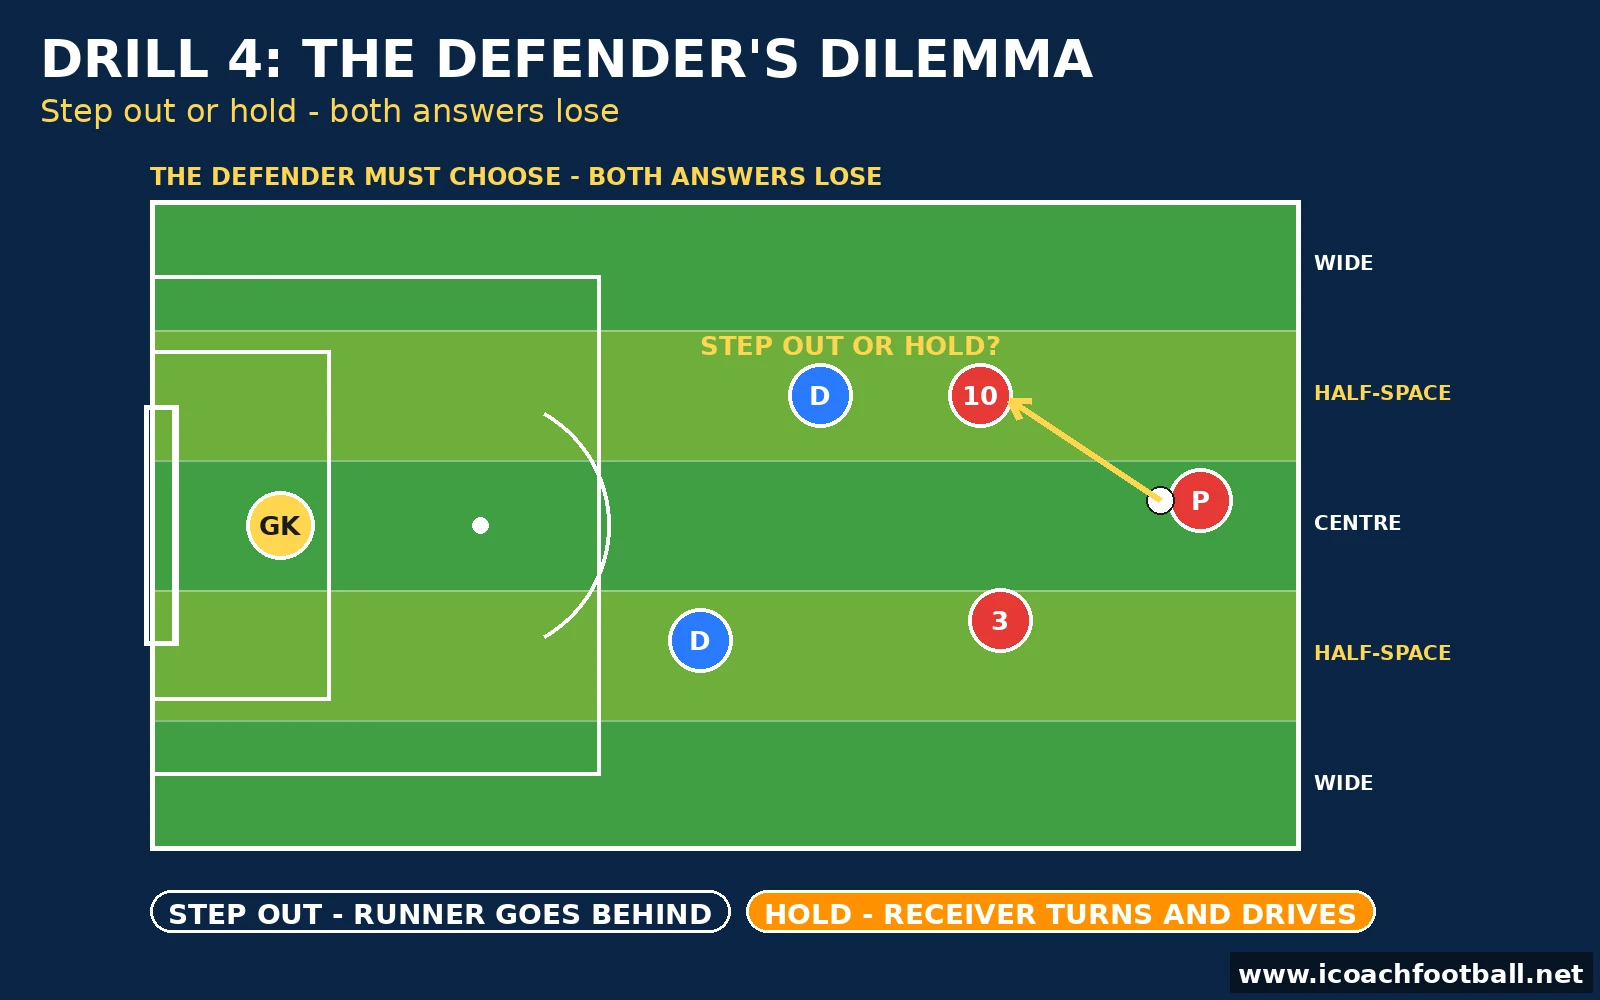
This is the drill the whole session is built on. A receiver in the half-space forces the nearest defender into a choice — and both answers lose. Watch the animation below the diagram: the defender steps out, and the runner goes in behind; the defender holds, and the receiver turns and drives.
Setup
- Final third, one full-size goal, 1 goalkeeper, 3 attackers, 2 defenders, 1 ball
- The half-space lane is marked; the receiver starts on the edge of the lane, 12 minutes
How to Play
- The passer plays into the half-space receiver, who arrives in the lane with an open body.
- The nearest defender must choose: step out to press the receiver, or hold their position.
- If the defender steps out, the receiver plays first time to the runner, who has gone in behind the gap.
- If the defender holds, the receiver turns on the half-turn and drives at goal.
- The second defender covers the space the first defender leaves, and the attackers finish or reset.
Coach’s note: Do not tell the defender which answer is right — there isn’t one, and that is the lesson. Freeze the drill after each rep and ask the defender what they chose and what it cost. The attackers’ job is to punish the choice, not to beat the defender 1v1. If the attackers keep forcing the same answer, the defender is not really choosing — swap the defender and let them feel both sides of the dilemma. The pass weight matters here: a soft pass into the lane lets the defender recover, so demand a firm, driven ball, as in our soccer through ball drills.
Progressions: Add a second runner on the far side, so the defender’s step also opens the switch; the receiver may also set the ball back and spin in behind, so the defender must read the spin as well as the pass.
Drill 5: Switch and Attack the Far Half-Space
Defences shift to the ball. This drill overloads one side, then switches the play to the far half-space, where the space is.
Setup
- Half a pitch, one full-size goal, 1 goalkeeper, 7 attackers, 5 defenders, 1 ball
- Both half-spaces marked with flat discs; the attack starts on the left side, 12 minutes
How to Play
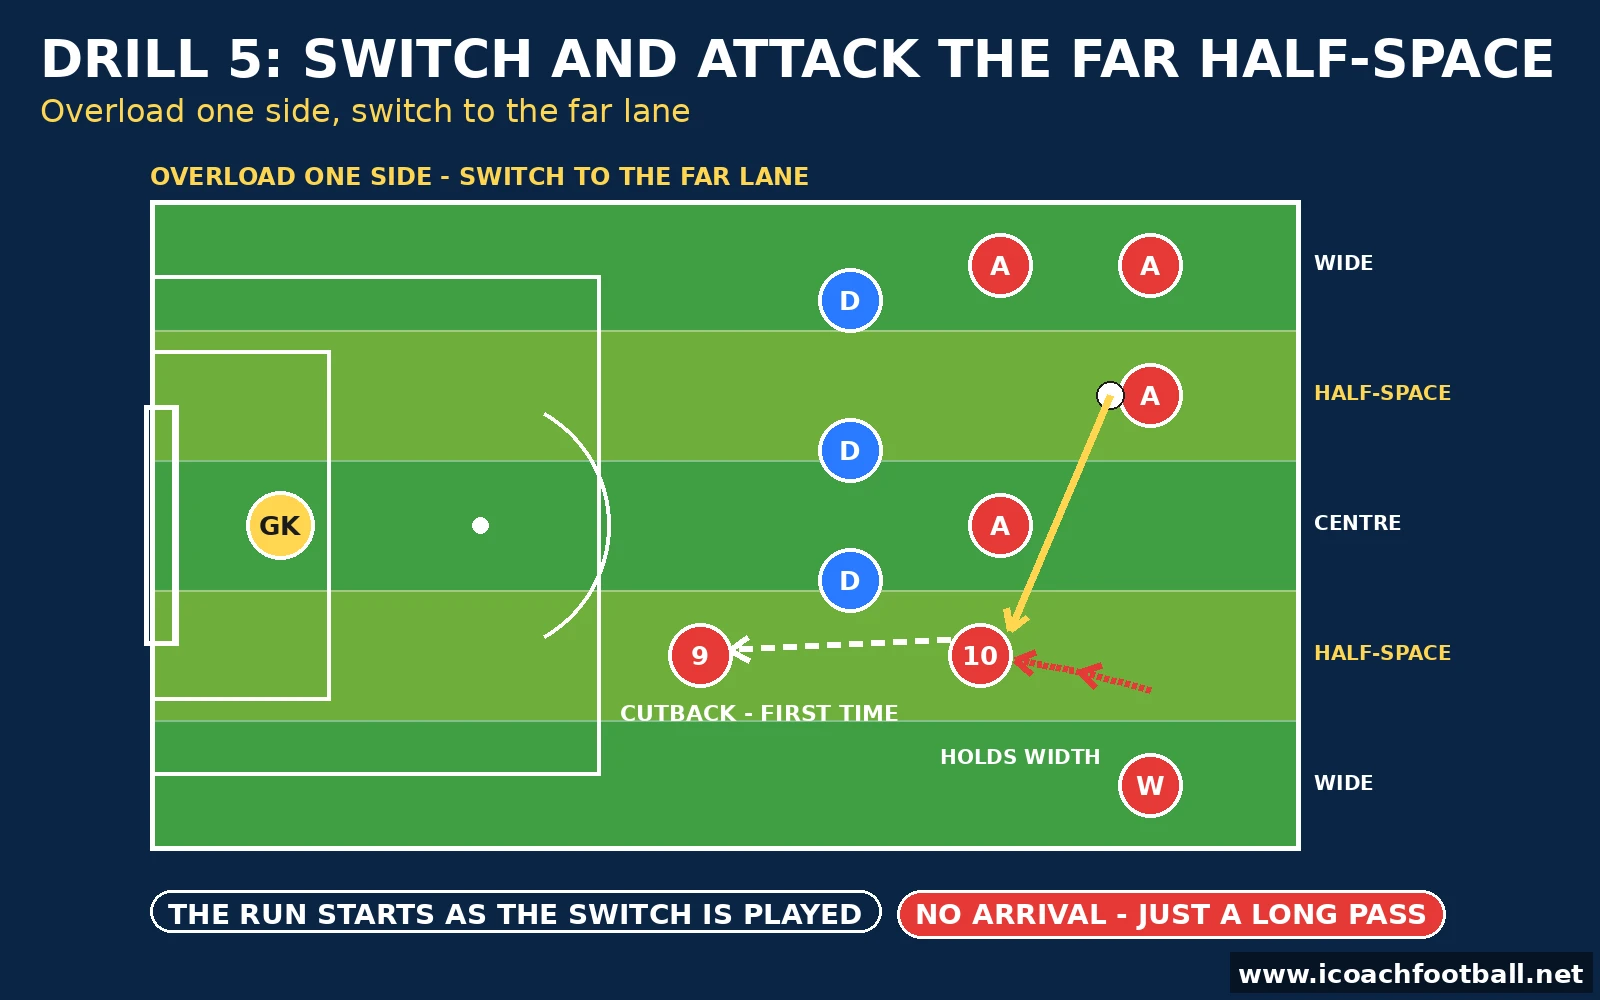
- The attackers overload the left side — five players against three defenders — and circulate the ball quickly.
- The far-side winger holds the touchline wide, pinning the opposing full-back and keeping the far half-space open.
- On the coach’s call, or when the defence has shifted across, the ball is switched diagonally to the far half-space.
- The far-side midfielder arrives in the lane at the moment the switch is played and receives open.
- The receiver plays the cutback or the through ball for a first-time finish, and the team resets to the other side.
Coach’s note: The switch is only as good as the arrival. A switch played to an empty lane is just a long pass — the far-side player must be moving into the half-space as the ball travels, not after it lands. Teach the trigger: the run starts when the switcher’s head goes down to play it. And the overload must be real — if the left side is not genuinely threatening, the defence will not shift and there is no space to switch into. This is the same switch-and-finish idea from our soccer cutback drills, started from the opposite half-space.
Progressions: The switch must be played first time, so the circulation has to be sharp; the defenders may press the switcher, so the diagonal must be played under pressure and the arrival timed even tighter.
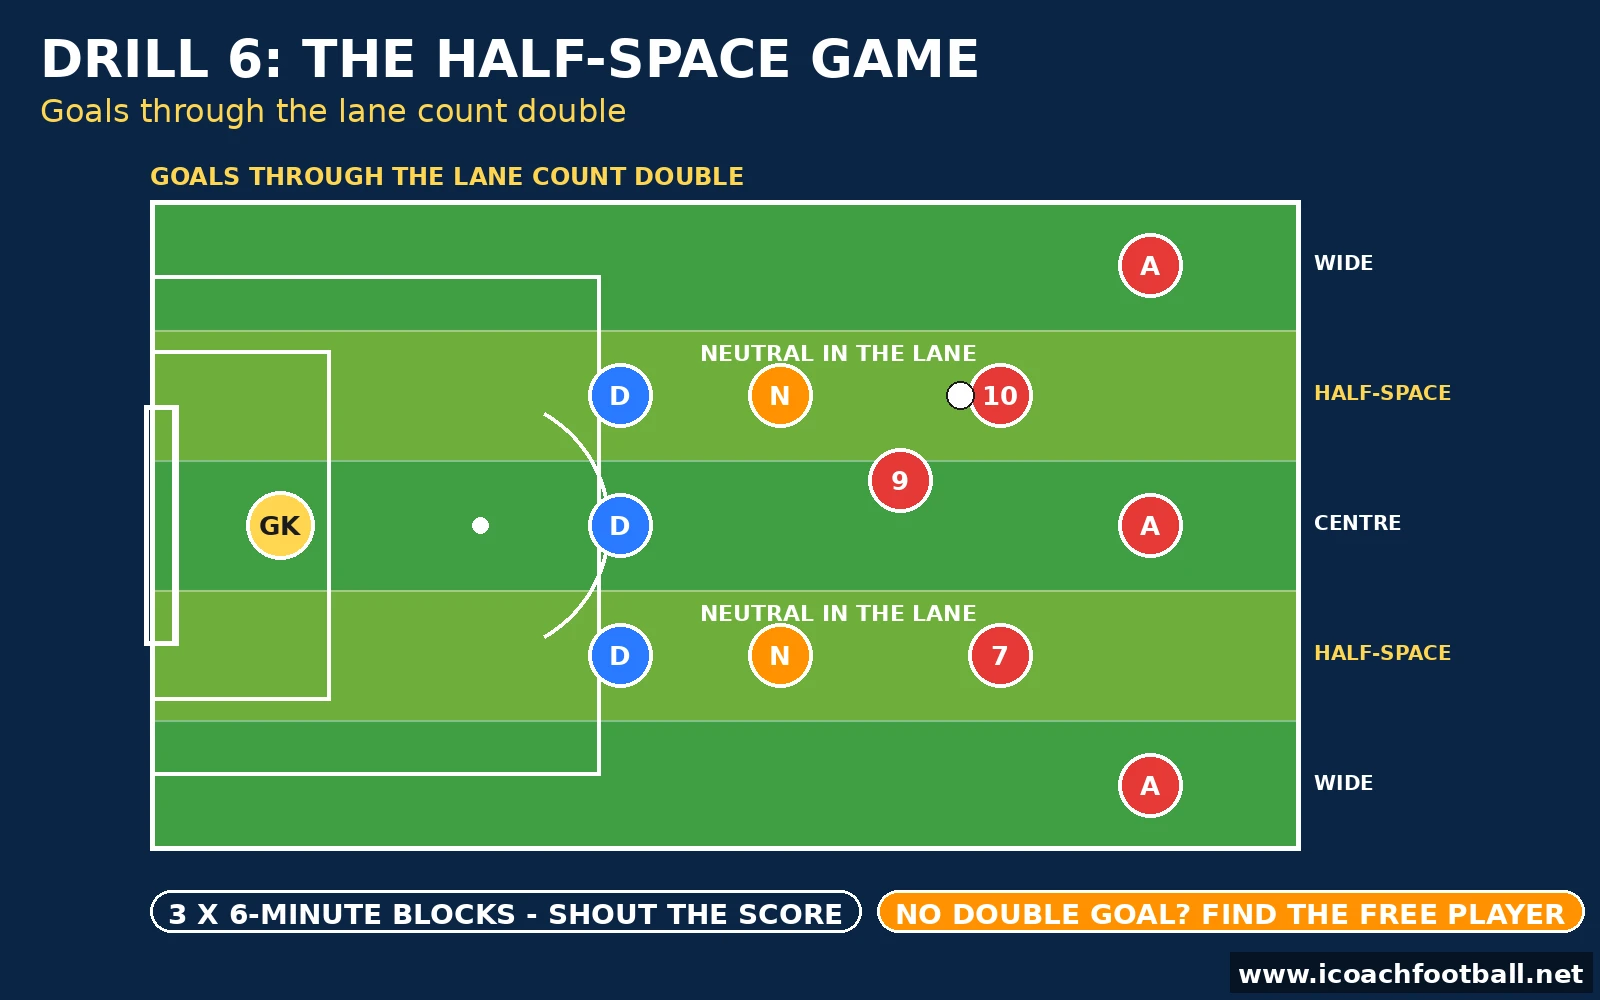
Drill 6: The Half-Space Game
Now play for real, with one rule that makes the whole session pay off: the lane is worth double.
Setup
- Half a pitch, one full-size goal plus two mini-goals, 7v7 plus 2 neutrals, 1 ball
- Both half-spaces marked; goals scored after a half-space receive count double, 18 minutes
How to Play
- Play 7v7 with two neutral players who always join the team in possession.
- A goal counts double if the final pass, the assist or the shot itself came from a player receiving in a half-space.
- Goals scored any other way count single, so teams must choose: take the easy goal, or build through the lane for two.
- The neutrals play in the half-spaces only, so there is always a lane option — but the defenders know it too.
- Play three 6-minute blocks with a 1-minute break; the coach shouts the score after every block.
Coach’s note: Watch for the team that stops using the lane once they are winning — that is when the other team should punish them, and often doesn’t. Keep the double-goal rule loud: shout the score after every goal so the whole pitch hears what the lane is worth. If no team has scored a double goal after six minutes, stop the game and ask both teams where the free player is. The answer is usually “in the half-space, unmarked” — and that is the whole lesson. The scanning habit that finds that player is the same one trained in our soccer scanning drills.
Progressions: The neutrals are removed, so the lane must be found by the team’s own movement; the double goal only counts if the receiver took the ball on the half-turn, so the receive and the lane are trained together.
Coaching points
- Arrive, don’t stand. The half-space is a place you run into at the right moment — a player waiting in the lane is a player the defence has already marked.
- Open body on the receive. Hips open to goal, back foot, first touch forward — a square receive throws the whole advantage away.
- Punish the defender’s choice. Step out and the runner goes behind; hold and the receiver turns — teach attackers to read the answer, not to force one.
- Width pins the defence. The full-back holds the touchline so the half-space stays open — without width, there is no lane.
- The third man breaks the line. One pass into the lane rarely scores; the lay-off and the run behind it is the combination that finishes the move.
- Firm passes into the lane. A soft pass lets the defender recover — drive the ball in so the receiver’s first touch is already forward.
Common mistakes
- Standing in the lane. The player waits in the half-space for the ball and gets marked. Fix it with Drill 1 — no player may stand in a lane for more than three seconds without the ball arriving.
- Receiving square-on. The receiver faces the passer, back to the space, and needs two touches to turn. Fix it with Drill 2 — scan first, open the hips, take it on the back foot.
- Running too early. The third man goes before the lay-off and is offside, or too late and the gap closes. Fix it with Drill 3 — move on the receiver’s first touch.
- Forcing one answer. The attackers try to beat the defender 1v1 instead of punishing their choice. Fix it with Drill 4 — freeze and ask the defender what they chose and what it cost.
- Switching to an empty lane. The diagonal is played before anyone arrives in the far half-space. Fix it with Drill 5 — the run starts when the switcher’s head goes down.
Age adaptations
| Age group | How the drills change |
|---|---|
| U12–U13 | Use Drill 1 and Drill 2 only, in smaller areas (30 x 20), with no offside and the five lanes marked in bright colours. Keep the rule simple: receive in the lane, play forward. Skip the third-man timing until the receive is clean. |
| U14–U15 | Full areas, introduce Drill 3 and Drill 4, and let the defenders choose freely — the dilemma is the lesson. Add the spacing rule (no two team-mates in the same lane). |
| U16–U18 | Full speed, full-size pitch, live defenders in every drill, and the attackers vary the pattern without warning — lay-off, spin, switch or drive. Players must read the game, not the coach’s call. |
| Adults | Add the offside line to Drills 3 and 4, and let the far-side winger choose between holding width and arriving in the lane — the defence must read both threats at once. |
60-minute session plan
| Block | Time | What to run |
|---|---|---|
| Warm-up | 0–8 min | Rondo in the five lanes: the player in a half-space may only play forward |
| Drill 1 | 8–18 min | Find the Lane — see the five lanes, score only through the half-space |
| Drill 2 | 18–26 min | The Half-Turn Receive — scan, open hips, back foot, forward |
| Drill 3 | 26–36 min | Third-Man Through the Half-Space — lay-off and the run behind |
| Drill 4 | 36–46 min | The Defender’s Dilemma — punish the step, punish the hold |
| Drill 5 | 46–54 min | Switch and Attack the Far Half-Space — overload, switch, arrive |
| Game | 54–60 min | The Half-Space Game — double goals through the lane (extend to 18 minutes if time allows) |
Sources
- FIFA Training Centre — “Movement to attack the space in behind” (Claudio García and Costa Rica Talent Coaches): attackers isolate defenders 1v1 or 2v1, thread through-balls in behind, and combine perfectly weighted passes with well-timed runs; players should stretch defenders with wide players and break into the pockets of space that open up in the defensive lines. https://www.fifatrainingcentre.com/en/practice/talent-coach-programme/sessions/movement-to-attack-the-space-in-behind.php
- UEFA Champions League Performance Insights — “Finding space between the lines”: Bellingham received between the lines 17 times in one match and ranked first for line-breaking passes — “the best players need very little space because their body control, their awareness, and their technical ability is so good” (Jan Peder Jalland, UEFA Technical Observer). https://www.uefa.com/uefachampionsleague/news/029f-1f1f7f9745be-b4346e769d91-1000–champions-league-performance-insights-finding-space-between/
FAQ
What is the half-space in football?
The half-space is the vertical lane between the touchline and the centre of the pitch — the strip between the full-back and the centre-back. Split the pitch into five lanes lengthwise and the two half-spaces are the lanes either side of the centre. A player receiving there is close enough to goal to threaten and wide enough that a defender must choose whether to step out or hold.
Which players should occupy the half-space?
Attacking midfielders, inside forwards and inverted full-backs live there most, but the lane belongs to whoever arrives at the right moment. The key is arrival, not occupation — a striker dropping in, a winger cutting inside or a midfielder pushing up can all use it. No player should stand in it waiting for the ball.
How do you teach the half-space to youth players?
Start with the map, not the tactics. Mark the five lanes with cones so players can see them, then play a game where a team can only score after receiving in a half-space (Drill 1). Once they can find the lane, teach the open-body receive (Drill 2) and the third-man run (Drill 3). U12–U13 players learn it best with the lanes painted and the rule kept simple.
What is the difference between the half-space and between the lines?
Between the lines is a horizontal idea — receiving in the gap between the opposition’s midfield and defence. The half-space is a vertical idea — which lane across the pitch you receive in. The two overlap: the most dangerous receive in football is often a player between the lines AND in a half-space, facing forward with the whole pitch in front of them.
How do you defend the half-space?
The defender’s dilemma is the problem: step out to press the receiver and you leave a gap behind you; hold your position and the receiver turns and drives. The best answer is usually a coordinated one — the nearest player presses while a team-mate drops to cover the space behind, and the far side stays compact. Drill 4 trains attackers to punish either choice, which is why defenders must make the decision together.