The Ultimate Crossing and Finishing Soccer Drill
Elevate your team’s shooting prowess with this dynamic Crossing & Finishing Drill! This engaging drill, suitable for players aged U13 and above, refines shooting techniques from central areas and finishing after crosses, replicating crucial attacking moves in a game-like setting.
Drill Set-Up:
- Equipment: Football, cones (4), and mannequins (5).
- Players: Groups of 3 players rotating (can train 12-15 players total).
- Playing Area: Half of a full-size football field.
- Duration: 30 minutes.
📺 Watch the Drill in Action
Want to see the timing of the wall passes and the final cross at full speed? Watch the complete video breakdown below to see exactly how this 3-part crossing and finishing drill flows in a real practice environment.
Drill Breakdown:
This drill focuses on two key attacking elements: shooting from central areas and finishing after crosses.
Step 1: Central Shooting (Pass-Back-Shoot)
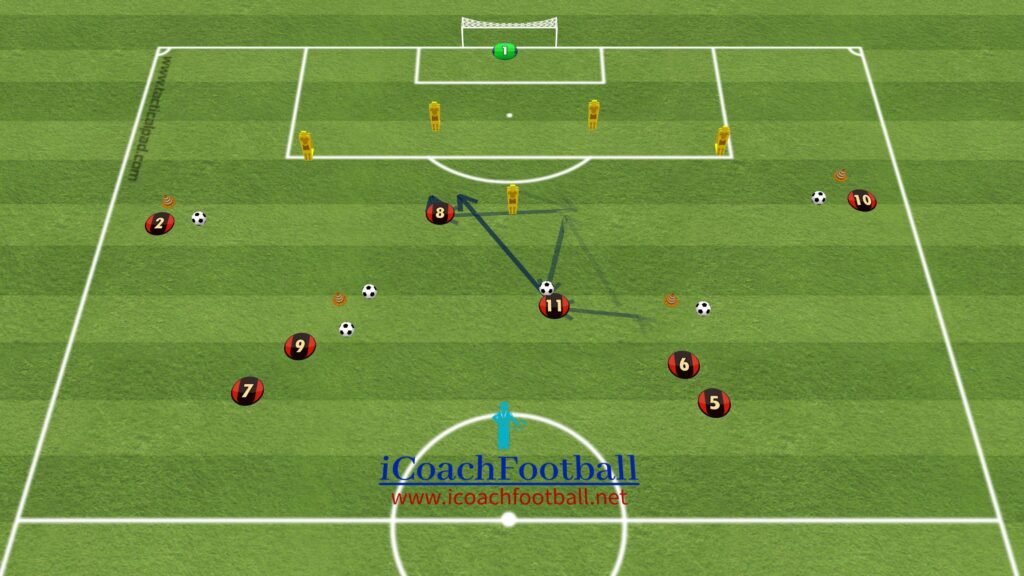
- Player Positions: Player 1 stands near a cone in the center of the field, Player 2 positions themselves to the left of a forward mannequin in the penalty area (15-20 meters from the goal), and Player 3 stands near a cone on the right side of the field.
- Passing Sequence: Player 1 initiates the drill by passing the ball to Player 2.
- Wall Pass & Shooting: Player 2 plays the ball back to Player 1 (one-touch pass) and moves to the left of the mannequin to create space. Player 1 receives the pass and takes a shot on goal.
Step 2: 1-2 Play & Shooting (Using Mannequin)

- Player Positions: Same as Step 1.
- 1-2 Combination: Player 1 passes the ball to Player 2, who uses the mannequin for a one-two wall pass.
- Shooting After 1-2: Player 1 receives the return pass from Player 2 and takes a shot on goal.
Step 3: Crossing & Finishing

- Player Positions: Same as Step 1.
- Passing Through Mannequins: Player 1 plays a ball between the left and center-left mannequins for Player 3.
- Cross and Finish: Player 3 receives the ball and delivers a cross towards the goal area.
- Attacking the Posts: Players 1 and 2 attack the near and far posts (respectively) to meet the cross and attempt to score.
Rotation:
After completing each sequence (Steps 1-3), players rotate positions. The next group of 3 players enters the drill, with Players 2 and 3 now starting near the cones, and Player 1 positioned near the forward mannequins (alternating sides for crossing).
Coaching Points:
- Shooting Technique: Focus on proper shooting mechanics for power and accuracy, emphasizing controlled shots on target.
- Crossing Accuracy: Encourage precise crosses with good pace and trajectory to find teammates in scoring positions.
- Attacking Movement: Guide players on attacking the near and far posts during crosses, anticipating the ball’s trajectory.
- Communication: Emphasize clear communication between players, especially during the passing sequences and attacking the cross.
Benefits:
- Improves shooting accuracy and finishing technique from central areas.
- Develops crossing skills for delivering inviting balls into the penalty box.
- Enhances attacking movement and anticipation in the box.
- Sharpens overall attacking coordination and teamwork.
Frequently Asked Questions (FAQ)
Why is a 1-2 (wall pass) so effective in the attacking third?
A 1-2 pass, or wall pass, is one of the most effective ways to break down a stubborn defense. When Player 1 passes the ball and immediately sprints into space, it forces the defender to make a split-second decision: watch the ball, or track the runner. This momentary hesitation creates the exact pocket of space needed for Player 2 to return the pass for a quick shot or cross.
How do you coach the timing of an attacking run into the box?
The biggest mistake youth players make is sprinting into the penalty box too early and having to stand still while waiting for the cross. A golden rule for strikers is: arrive on time, not early. Attackers should hold their run just outside the box and only explode toward the near or far post the exact moment the winger plants their foot to strike the cross.
Where is the most dangerous place to aim a cross?
Wingers should aim for the “corridor of uncertainty.” This is the space between the six-yard box and the penalty spot. A hard, driven cross into this area forces the goalkeeper to stay on their line, while forcing retreating defenders to face their own goal—making it incredibly easy for an attacker to finish with one touch.
How can players improve their one-touch finishing?
One-touch finishing requires players to decide exactly how they are going to strike the ball before it arrives. In this 3-part drill, players must practice reading the speed of the wall pass, adjusting their feet early with small, choppy steps, and keeping their head over the ball to keep the shot low and driven.
Take Your Team’s Attack to the Next Level
Mastering the final third is what separates good teams from great ones. By incorporating this 3-part combination drill into your weekly practice plan, your players will develop the muscle memory, timing, and composure needed to finish confidently on match day. Remember to demand high intensity, crisp wall passes, and game-realistic speed every time you run it.
Looking for more ways to sharpen your team’s attack? We have an entire library of exercises dedicated to scoring goals. Check out our complete collection of Shooting & Finishing Drills for more game-realistic setups, striking techniques, and attacking combination plays to keep your strikers dangerous all season long!