Master the Diamond Passing Drill: 3 Essential Variations
Great possession teams do not just pass; they pass with a purpose. They use angles, triangles, and diamonds to move the opponent and break lines.
If you are looking for a diamond passing drill to sharpen your team’s technique, this session covers the three most important patterns in modern soccer: rhythm, breaking lines (up-back-through), and tight combination play.
📺 Watch the Diamond Passing Drill in Action
Reading the passing sequences is one thing, but seeing the speed, body shape, and timing of the “up-back-through” variation at full speed makes it much easier to coach. Watch the complete video breakdown below to see exactly how this drill flows in a live practice environment.
💡 Key Takeaways
- Rhythm First: Establish a clean one-touch tempo before adding complexity.
- “Set” the Ball: The wall pass requires a soft “lay-off” touch, not a hard pass.
- Match Realism: Variation 2 mimics a midfielder bouncing the ball back to play a winger through.
| 👶 Target Age: | U11 – Pro |
| 🎯 Main Focus: | Passing Patterns & Support Angles |
| ⏱️ Duration: | 15 Minutes |
| ⚽ Equipment: | 4 Cones, 1 Ball (Minimum) |
Variation 1: Basic One-Touch Rhythm
The Concept: Before we can run, we must walk. This variation establishes the “Shape” and the “Tempo.” The goal is to move the ball around the diamond as fast as possible using only one touch.

Setup:
- 4 Cones in a Diamond shape (12-15 yards apart).
- 1 Player at each cone (extra players stack at the start).
The Pattern:
- Player A passes to Player B (Right).
- Player B passes to Player C (Top).
- Player C passes to Player D (Left).
- Player D passes back to Start.
- Progression: After 2 minutes, switch direction to the Left (Counter-Clockwise).
Coaching Point:
- “Pass to the Correct Foot”: Pass to the back foot (the foot furthest from the ball) to help your teammate play quickly. If you pass to the front foot, they get stuck.
Variation 2: Wall Pass & Deep Ball (Up-Back-Through)
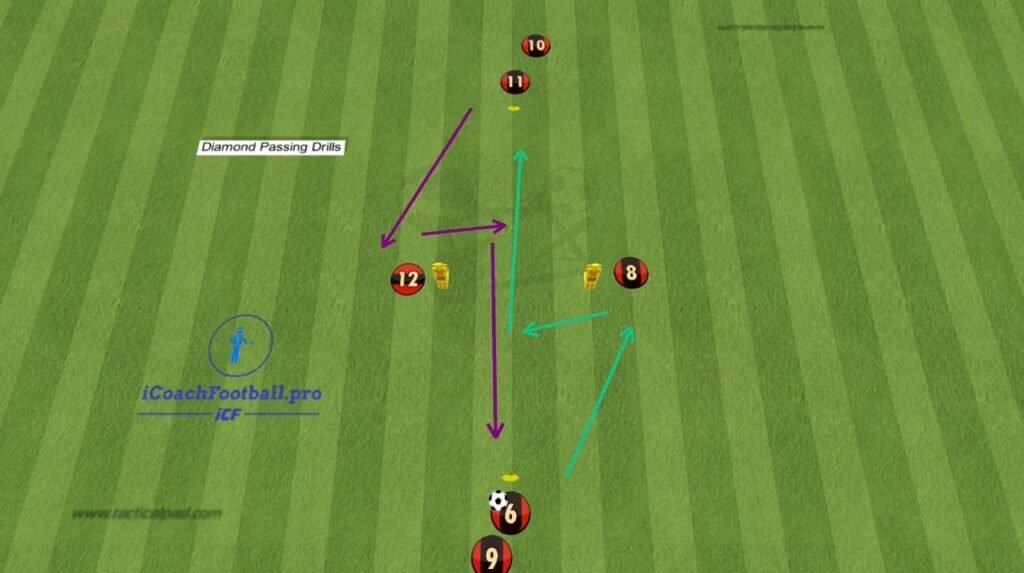
The Concept: This is the most tactical variation. It simulates a specific game scenario: A forward checks to the ball, lays it off, and a midfielder plays a through ball to a runner.
The Pattern:
- Pass: Player A passes to Player B.
- Set (Wall Pass): Player B plays a one-touch “bounce” pass back to Player A.
- Deep Pass: Player A hits a longer, firm pass across the diamond to Player C (skipping B).
- The sequence repeats from Player C -> D -> A.
Why it works: This teaches the “Up-Back-Through” trigger. The “Set” pass pulls the defender in, creating space behind them for the “Deep Pass.”
Variation 3: Diamond 1-2 Combinations
The Concept: Now we increase the technical difficulty. Every single pass involves a “Wall Pass” (1-2). This forces players to support the ball constantly at close range.

The Pattern:
- Player A passes to Player B.
- Player A immediately sprints towards Player B.
- Player B plays a one-touch wall pass back to Player A.
- Player A plays the ball into Player B’s path (completing the 1-2).
- Player B then repeats this sequence with Player C.
Coaching Point:
- “Don’t Admire Your Pass”: The moment you pass, you must move. In this drill, if you stand still, the combination fails. Speed of thought is everything.
Frequently Asked Questions (FAQ)
What is the purpose of the diamond passing drill?
The main purpose of the diamond passing drill is to teach players how to receive the ball on their “back foot” (the foot furthest from the ball) so they can open their hips to the field. It also develops muscle memory for one-touch passing, quick combination play, and the habit of immediately moving into space after making a pass.
How large should the diamond be for youth players?
For youth players (U10 to U14), setting the cones about 10 to 12 yards apart is ideal. This distance is short enough to ensure passing accuracy but long enough to force players to strike the ball with proper pace. For older or elite players, you can expand the diamond to 15-20 yards to simulate longer, driven game passes.
How do players rotate in a diamond passing drill?
The standard rule for rotation in a basic diamond drill is: follow your pass. After a player passes the ball to the next cone, they immediately sprint to take the place of the player they just passed to. This ensures constant movement and conditioning throughout the drill.
How can I make the diamond passing drill more difficult?
Once your players master the basic flow, you can increase the difficulty by making it strictly one-touch. You can also add a passive (or active) defender inside the diamond to apply pressure, or introduce a second soccer ball starting at the opposite end of the diamond to force players to scan the field and play faster.
Elevate Your Team’s Possession Game
The diamond passing drill is a foundational exercise that every team—from U10 to the professional level—should run regularly. By mastering the basic one-touch rhythm, the wall pass, and the “up-back-through” trigger, your players will develop the muscle memory needed to break lines and dominate possession on match day. Start slow, demand high-quality touches, and gradually increase the speed of play.
Want to build a midfield that never loses the ball? If your team mastered the diamond, it is time to challenge them with more advanced possession patterns. Browse our complete library of Soccer Passing Drills for high-intensity rondos, square passing complexes, and game-realistic combination plays!