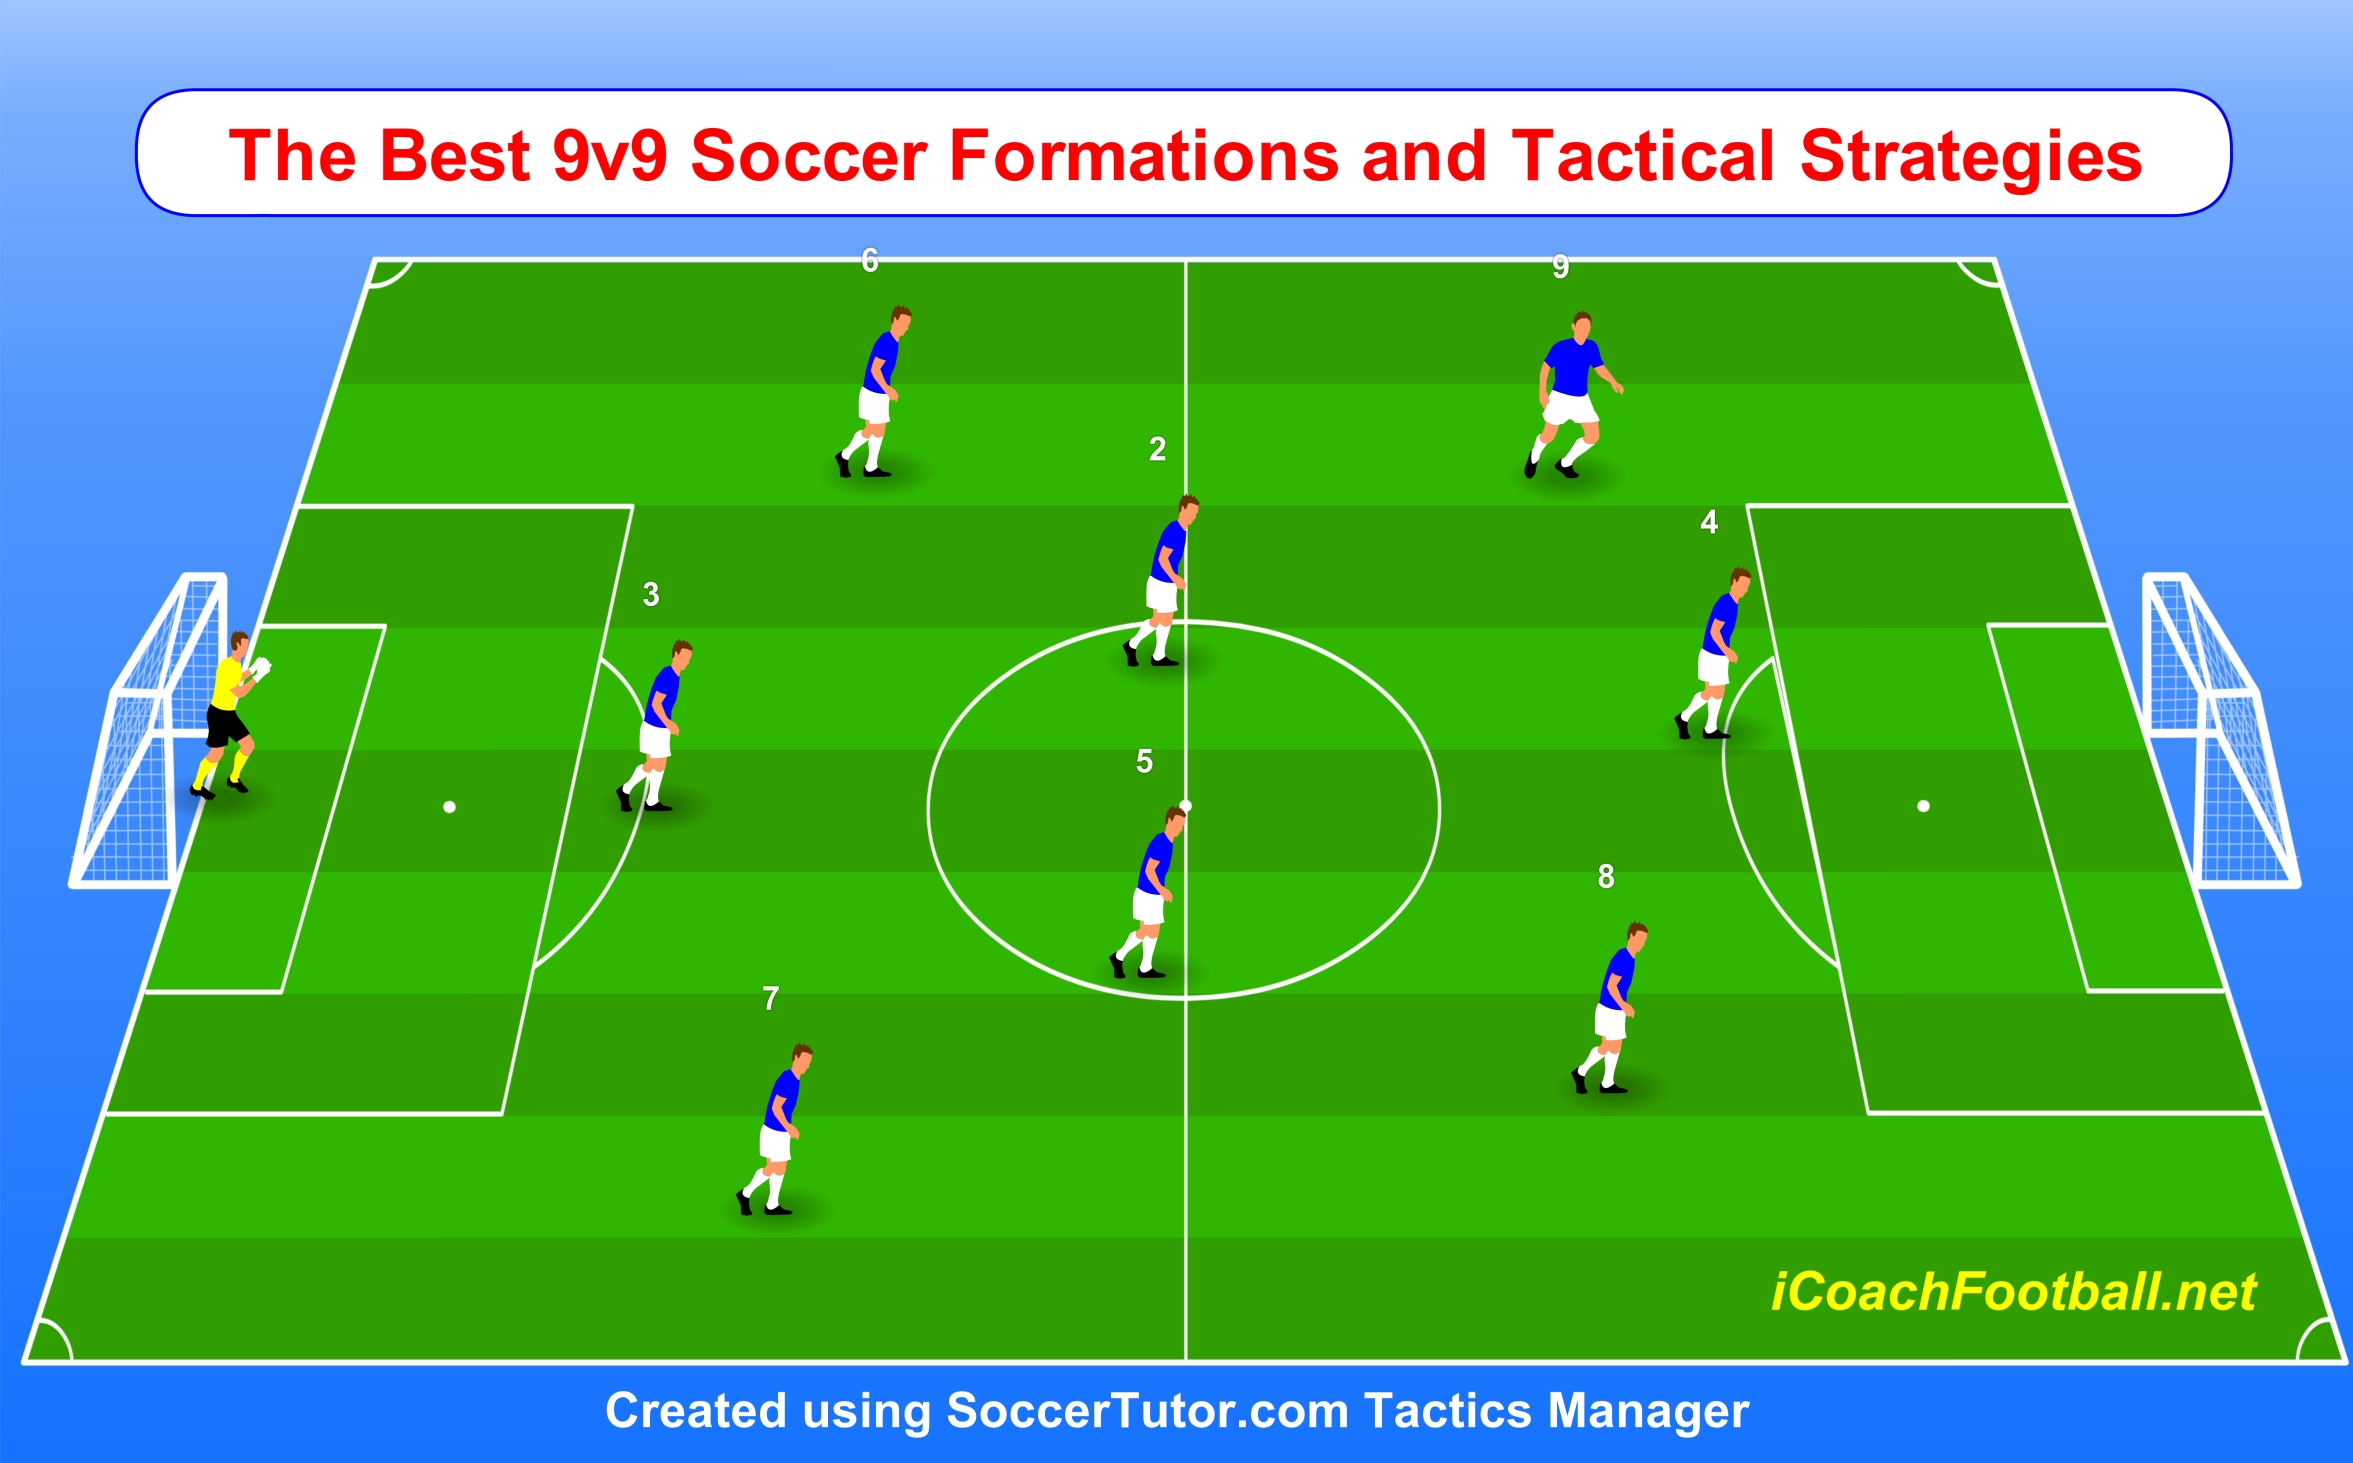
The Best 9v9 Soccer Formations and Tactical Strategies
The 9v9 game is the critical bridge between “Junior Football” (7v7) and “The Real Game” (11v11). As a UEFA Pro Coach, I don’t just pick a formation to win the match on Saturday; I pick a formation that teaches the tactical concepts my players will need two years from now.
In this guide, we won’t just look at shapes. We will analyze how to use 9v9 formations to prepare your players for the 11-a-side game, specifically linking them to the 4-3-3 and 3-5-2 systems used at the elite level.
⚠️ Moving up from U10? If your team is just graduating from 7v7, do not jump straight into complex 9v9 tactics yet. Make sure they have mastered the 2-3-1 shape first. Read our Guide: The Best 7v7 Formations & Transition Tactics
Understanding 9v9 Formations: Principles & Philosophy
The 9v9 game typically involves a goalkeeper and eight outfield players. This format allows for more complex tactical structures than 7v7 but maintains a focus on individual player development in a less crowded environment than 11v11.
Key Considerations for 9v9:
Player Development: Ensure the formation allows players to develop in various roles and touch the ball frequently.
Balance: A good formation offers balance between defense, midfield, and attack.
Space Management: How does the formation help your team occupy key areas and exploit space?
Player Strengths: Adapt the formation to suit your team’s specific talents (e.g., strong central defenders, fast wingers, creative midfielders).
Our goal is not just to pick a formation, but to understand its philosophy and train the movements that bring it to life.
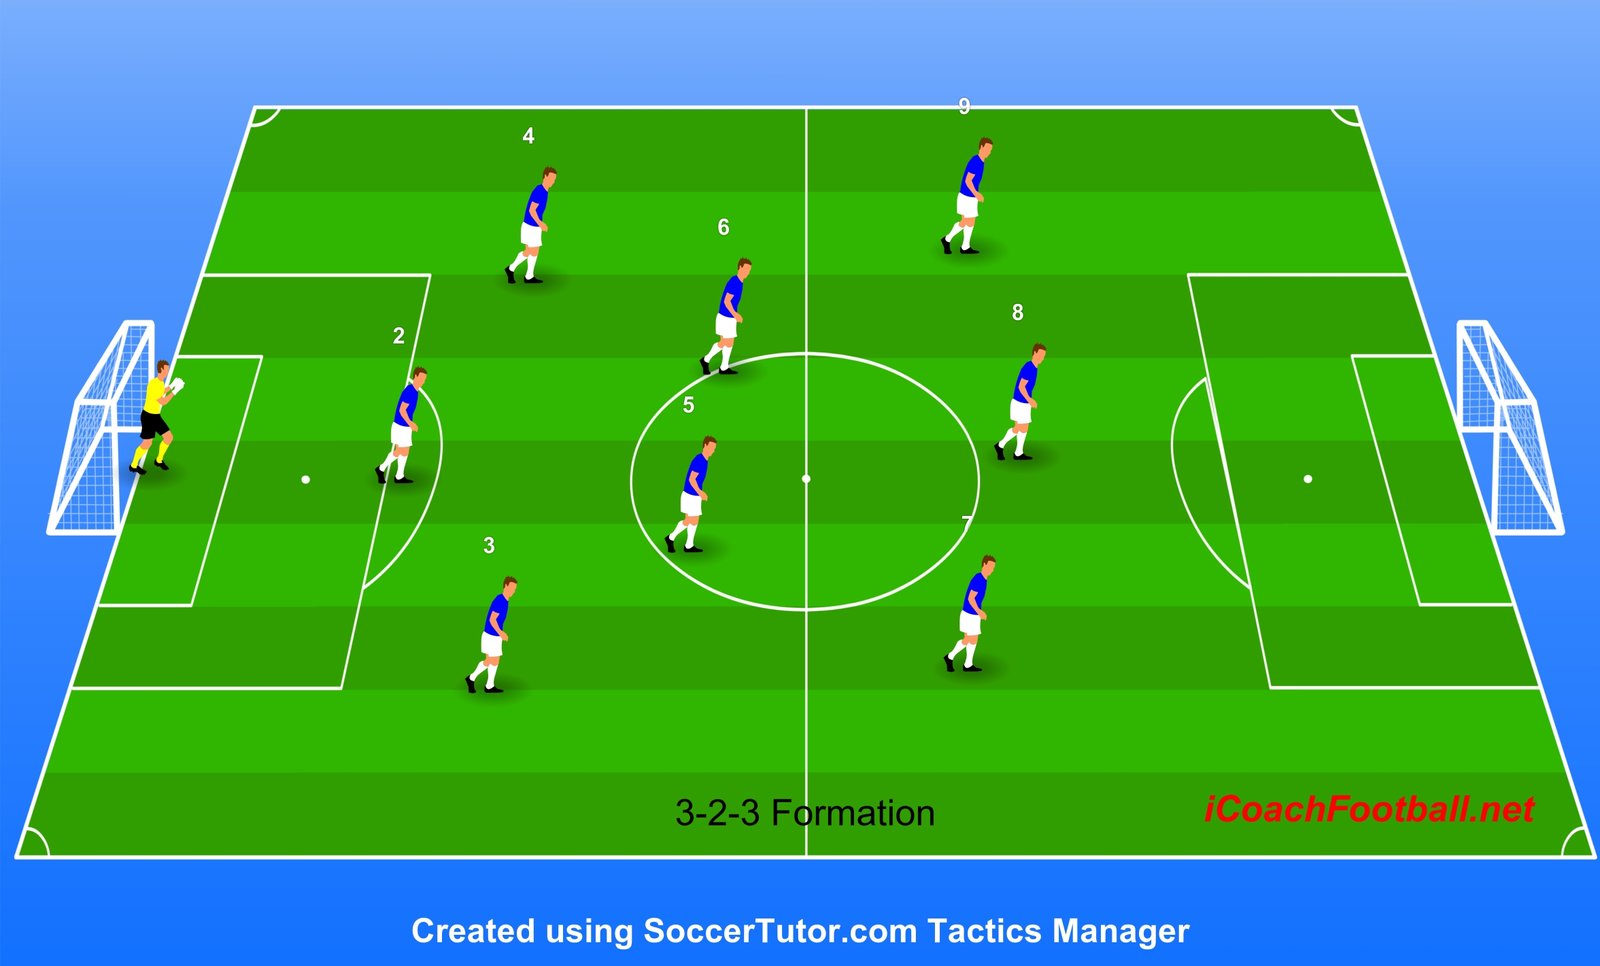
The 3-2-3 (Attacking Dominance)
11v11 Pathway: Prepares for 4-3-3 (Attackers learn to be true Wingers). Key Player Profile: Requires aggressive Wingers who can win 1v1s and a #9 who can hold up the ball alone.
The 3-2-3 formation (or 1-3-2-3 with GK) is a very popular choice for teams looking to dominate possession and create numerous attacking opportunities. It’s an aggressive setup that aims to overwhelm opponents in wide and central attacking areas.
Diagram: 3-2-3 Formation Layout
3-2-3 Formation: Strengths & Weaknesses
| Strengths | Weaknesses |
| ✅ Width & Depth: The three forwards stretch the opponent vertically and horizontally. | ❌ Central Midfield Overload: With only two central midfielders, they can easily be overrun by a team playing 3-3-2 or 4-3-1. |
| ✅ Attack Focus: Great for teams with strong, creative attacking players and dynamic wide players. | ❌ Defensive Vulnerability: High risk of counter-attacks, especially down the flanks if the wide defenders push too high. |
| ✅ Clear Roles: Roles for the central defender, center-mids, and forwards are well-defined. | ❌ Reliance on Central Defender: The middle defender must be fast, tactically astute, and capable of covering large areas. |
Key Tactical Principles of the 3-2-3
Build-Up Play: The Central Defender initiates play, looking to pass directly into the two central midfielders (2) who link play to the front three (3). The two wide defenders (3) must provide width in the midfield phase.
Attacking Strategy: Focus on quick combinations between the two central midfielders and the central forward, releasing the two wide forwards into 1v1 situations. Encourage diagonal runs from the wide attackers into the box.
Defending Strategy: The front three must be the first line of defense, pressing high to delay the opponent’s build-up. When defending deep, the two midfielders must drop to screen the back three, forming a compact 5-2 shape.
3-2-3 Build-Up Demonstration
Training the 3-2-3:
Drill Name: Central Overload to Wide Attack
Setup: Mark out half the 9v9 pitch. Use a central zone (15×15 yards) and two wide channels (5 yards wide).
Instructions: Red Team (Attacking, using the 3-2-3 structure) must use the two central midfielders to combine and attract the Blue defenders (Defending, 3 players) into the central zone. The goal is to successfully pass the ball out into the wide channels to the Red Wide Forwards, who then deliver a cross/pass into the box for the Central Forward to finish 1v1 against the goalkeeper.
Focus: Training the central midfield pairing to rapidly transition from tight combination play to a quick, penetrative pass out wide.
The 3-1-3-1 (The “Diamond” / Man City Style)
11v11 Pathway: Prepares for 4-3-3 (Point Backwards) or 3-2-2-3 (Box Midfield). Key Player Profile: Requires a highly technical #6 (Pivot) and intelligent #8s (Attacking Midfielders) who can operate in tight spaces (the “pockets”).
The Layout:
- 1 Goalkeeper.
- 3 Defenders (CB, LB, RB).
- 1 Defensive Midfielder (#6).
- 3 Attacking Midfielders (#10, #8, #8).
- 1 Striker (#9).
Why use it: This formation teaches the modern 3-2-2-3 build-up structure used by Pep Guardiola. The single #6 learns to pivot, and the two wide midfielders learn to play in the “Half-Spaces” rather than just hugging the touchline.
Transition to 11v11:
- Prepares players perfectly for the 4-3-3 (Point Backwards) or the 4-2-3-1.
Ideal For:
- Teams with intelligent midfielders who can play in tight pockets.
- NOT for teams with weak defenders, as the 3 defenders cover a lot of width.
Strength and Weaknesses for 3-1-3-1 Formation:
| Strengths | Weaknesses |
|---|---|
| ✅ Central Overload: With a single pivot (#6) behind three attacking midfielders, you have four central players. This guarantees dominance in possession against standard 2 or 3-man midfields. | ❌ Vulnerable Wide Channels: With only three defenders covering the entire width, the space immediately behind the Left Back and Right Back is highly exposed to direct counter-attacks. |
| ✅ Elite Build-Up Structure: The shape naturally creates diamonds and triangles everywhere on the pitch, perfectly teaching the modern “Box Midfield” concepts used in top-tier 11v11 football. | ❌ Lack of Natural Width: There are no traditional wingers hugging the touchline. Attacking width must be generated by the back three pushing forward recklessly, which leaves the defense exposed. |
| ✅ Half-Space Danger: The two wider attacking midfielders operate in the “half-spaces” (between the opponent’s defense and midfield lines), making them incredibly difficult to mark man-to-man. | ❌ High Tactical Demand: This formation fails if players lack high “Soccer IQ.” Requires intelligent midfielders who understand spacing; otherwise, they will bunch up centrally and clog the play. |
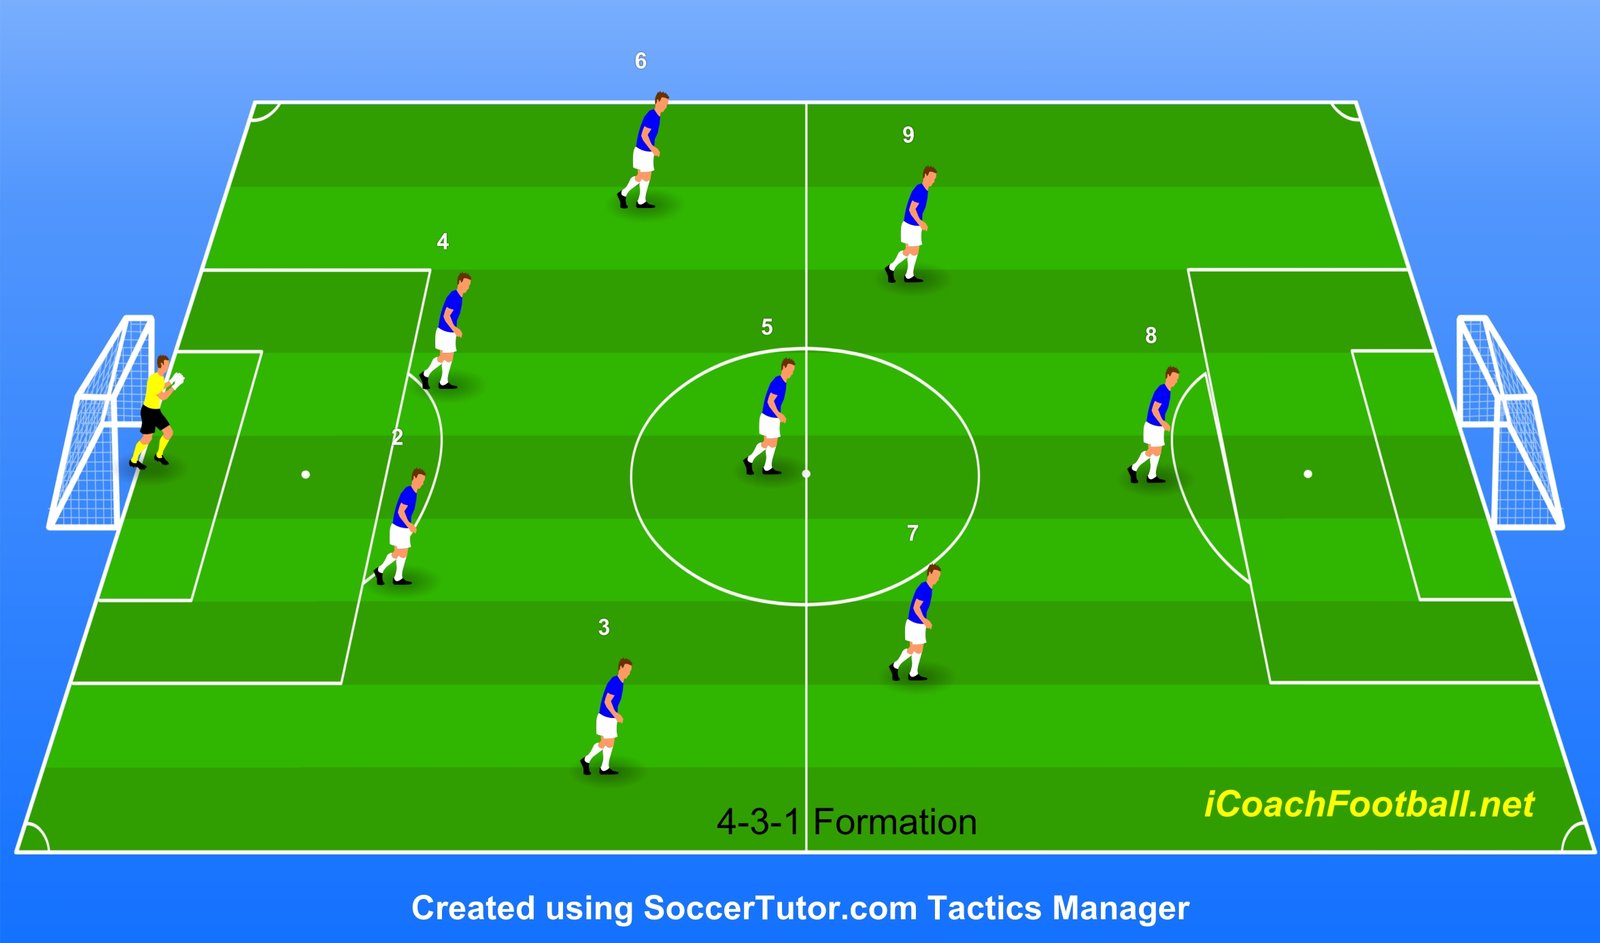
The 4-3-1 (Solid & Structured)
11v11 Pathway: Prepares for 4-2-3-1 or 4-3-3 (Defensive stability). Key Player Profile: Ideal for teaching a “Back Four” zonal defense. Requires intelligent Center Backs who know when to step up and when to drop.
The 4-3-1 formation emphasizes defensive solidity and midfield control. By placing four players in the defensive line (1-4), it provides a robust shield, while the three midfielders ensure they always control the center of the pitch.
Diagram: 4-3-1 Formation Layout
4-3-1 Formation: Strengths & Weaknesses
| Strengths (The Why) | Weaknesses (The Risk) |
| ✅ Defensive Resilience: The back four provides the best stability and depth, great for shielding a lead. | ❌ Lack of Attacking Width: Relying on a single forward and potentially slow full-backs can limit high attacking options. |
| ✅ Midfield Control: Three central midfielders dominate the key area of the pitch, making ball retention easier. | ❌ Isolation of the Striker: The lone forward (1) can become isolated if the midfield three are too slow to push forward and support. |
| ✅ Effective Counter: The solid shape makes it ideal for winning the ball deep and launching quick counter-attacks. | ❌ Difficult Transition: Requires high fitness from the full-backs to transition quickly between attack and defense along the flanks. |
Key Tactical Principles of the 4-3-1
Build-Up Play: Starts safely with the two center-backs. The Central Defensive Midfielder (CDM) should drop deep to create a passing triangle (3v1) against any pressing forward, allowing smooth transition to the other two midfielders.
Attacking Strategy: The primary attacking threat comes from the Full-Backs making overlapping runs, and the two Central Attacking Midfielders making runs beyond the isolated striker, ensuring the striker has targets for lay-off passes.
Defending Strategy: The back four should stay narrow and compact. The midfield three works as a pressing unit, forcing the opponent wide and denying central penetration. This formation is about patience and discipline.
Training the 4-3-1
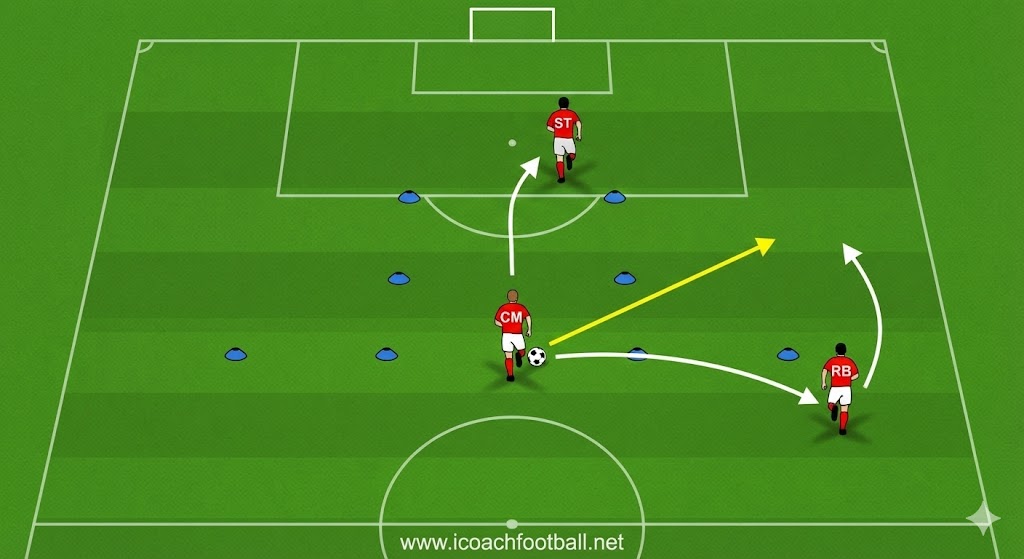
Drill Name: Full-Back Overlap & Cross
Setup: Mark out one half of the pitch with the goal. The Red team sets up in a 4-3-1 structure against passive Blue cones/markers in a 3-4-1 or 4-2-2 defensive shape.
Instructions: The attack always starts from the Center Backs, passing through the Central Midfield. The key focus is on the Midfielder laying the ball wide to the Full-Back who has made a timed, overlapping run. The Full-Back then delivers an early cross or cut-back for the Striker and the other two Midfielders making box runs.
Focus: Training the timing and weight of the pass to release the Full-Back, and ensuring the Midfielders provide timely support runs into the box.
Video for 4-3-1 Midfield Pressing Drill:
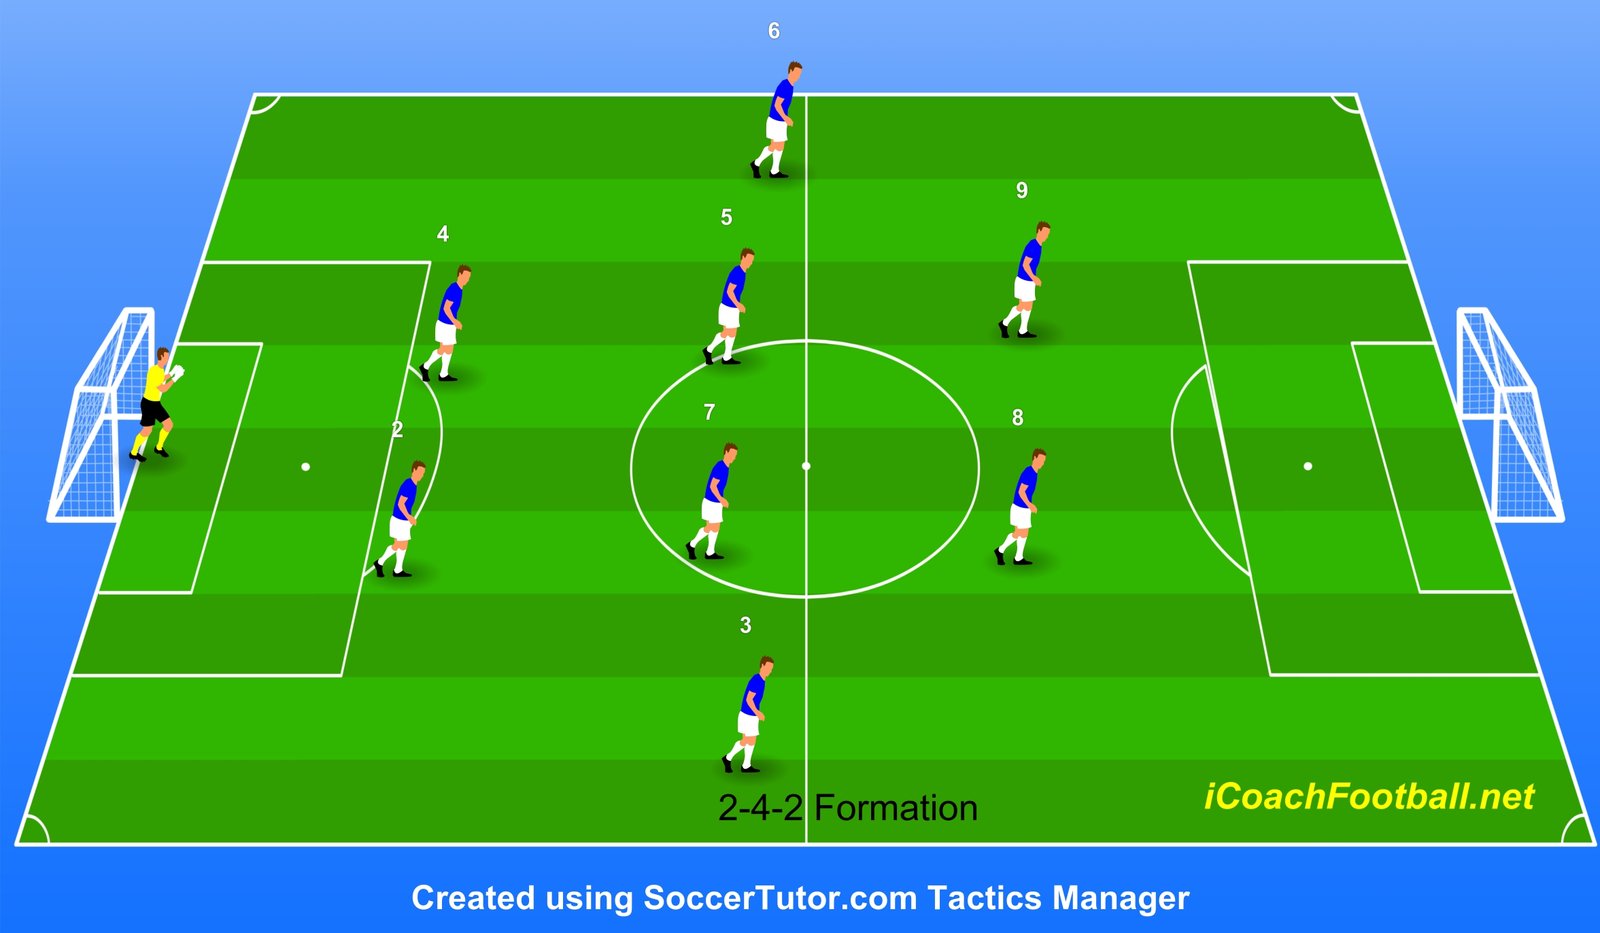
The 2-4-2 (Midfield Control & Width)
11v11 Pathway: Prepares for 4-4-2 or 3-5-2. Key Player Profile: Needs tireless Wide Midfielders (Box-to-Box) who can attack and defend.
The 2-4-2 formation is the most midfield-dominant structure in 9v9. With four players across the middle, it is built for teams that excel at ball possession, high-pressing, and controlling the tempo of the game.
Diagram: 2-4-2 Formation Layout
2-4-2 Formation: Strengths & Weaknesses
| Strengths | Weaknesses |
| ✅ Midfield Overload: Dominates the central areas, making it hard for opponents to transition or maintain possession. | ❌ Defensive Exposure: Only two center-backs (with no Full-Backs) are very vulnerable to balls played into wide channels or direct through-balls. |
| ✅ High Pressing: The midfield four can press high and narrow, forcing quick turnovers near the opponent’s goal. | ❌ High Fitness Demand: The wide midfielders must cover huge distances—functioning as both wingers and full-backs defensively. |
| ✅ Flexible Attack: The two forwards are supported by the wide midfielders, creating frequent 2v1 or 2v2 situations against the defense. | ❌ Reliance on Wide Midfielders: If the wide midfielders are not defensively disciplined, the back two will be constantly stretched. |
Key Tactical Principles of the 2-4-2
Build-Up Play: The two center-backs must be comfortable playing short passes under pressure. The midfield four should be staggered (two holding, two attacking) to offer short passing options at all times.
Attacking Strategy: Focus on combinations in the wide areas. The Central Midfielders should look to feed the ball to the Wide Midfielders, who then work with the nearest forward to create a crossing or shooting opportunity.
Defending Strategy: High intensity is mandatory. The midfield four must aggressively press the opponent’s build-up. When the press is bypassed, the Wide Midfielders must instantly track back to protect the flanks alongside the two Center Backs.
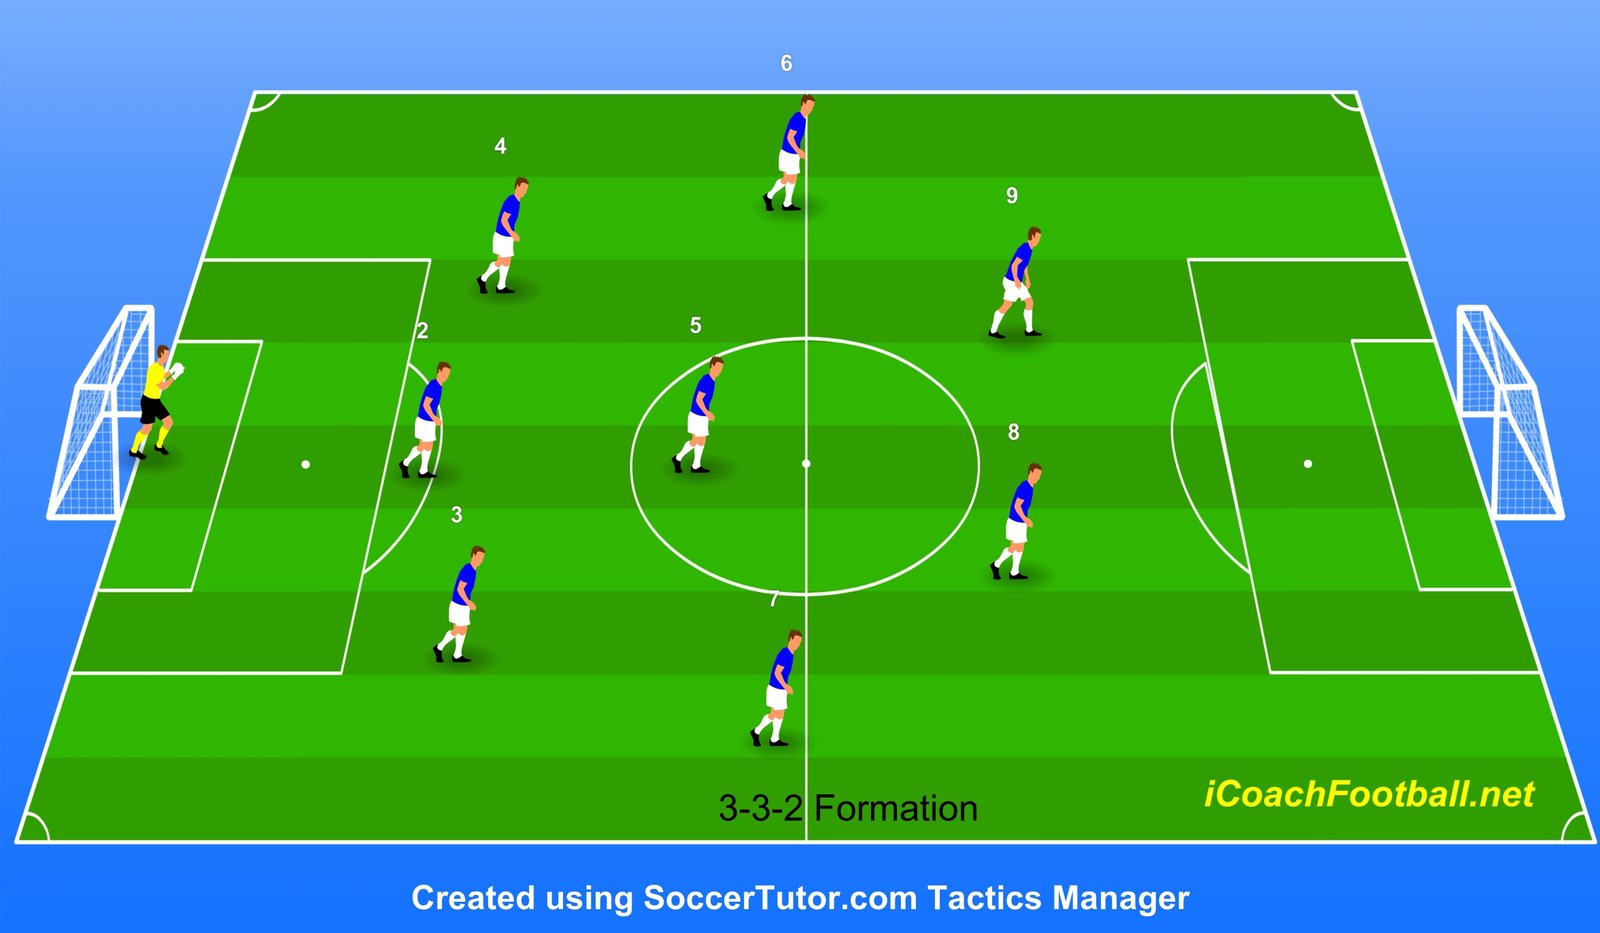
The 3-3-2 (Balanced & Adaptable)
11v11 Pathway: Prepares for 3-5-2 (Conte Style). Key Player Profile: Excellent for developing two Strikers (#9 and #10 relationship).
The 3-3-2 is arguably the most balanced formation in 9v9 soccer. It mirrors the structure of the popular 11v11 3-5-2 or 4-4-2, making it an excellent developmental bridge. It offers stability at the back, presence in the middle, and a genuine dual-striker threat upfront.
Diagram: 3-3-2 Formation Layout
3-3-2 Formation: Strengths & Weaknesses
| Strengths (The Why) | Weaknesses (The Risk) |
| ✅ Perfect Balance: Covers every zone of the pitch evenly (3 back, 3 mid, 2 front). | ❌ Wide Midfield Duty: The two wide midfielders (wingers) must work extremely hard to support both attack and defense. |
| ✅ Dual Striker Threat: Two strikers mean constant pressure on the opponent’s center-backs. | ❌ Space Between Lines: If the strikers press and the midfield doesn’t follow, huge gaps open up for the opponent. |
| ✅ Defensive Flexibility: Can easily transition into a 5-3-0 when defending a lead. |
❌ Predictability: Can become rigid if players don’t rotate positions fluidly. |
Key Tactical Principles of the 3-3-2
Build-Up Play: The back three spread wide. The central midfielder (the “6”) drops deep to collect the ball, allowing the wingers to push high.
Attacking Strategy: Use the two strikers to pin the opponent’s defense deep. The central midfielder dictates play, distributing to the wingers who look to cross early for the two waiting strikers.
Defending Strategy: The front two press the center-backs. The midfield three must shuffle across as a unit—if the ball is on the left, the right winger must tuck in centrally to prevent gaps.
Video for 3-3-2 Defensive Shape & Shifting:
Training the 3-3-2

Drill Name: The 2-Striker Link-Up
Setup: Use the final third of the pitch. Two strikers (Red) vs. Two Center Backs (Blue) + GK. Three Midfielders (Red) start 15 yards deeper.
Instructions: A Midfielder plays a vertical pass into one of the Strikers. The Striker must hold up the ball (with back to goal) and lay it off to a supporting midfielder or the second striker making a run. The play ends with a shot.
Focus: Developing the relationship between the two forwards—one comes short, one goes long.
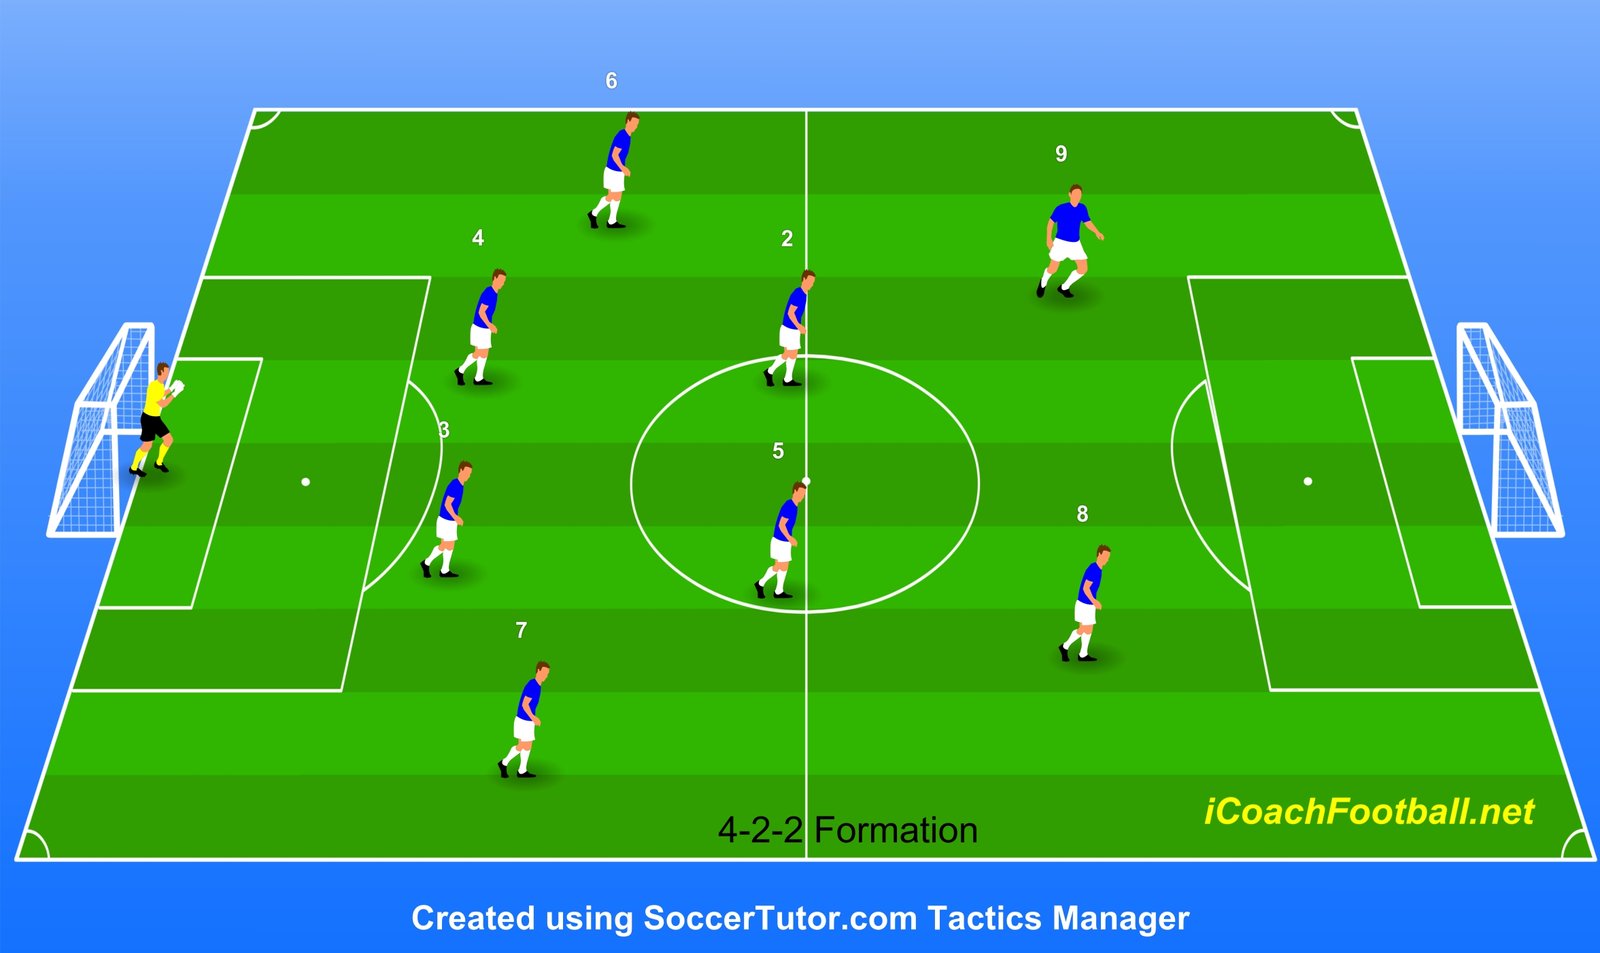
The 4-2-2 (Defensive Stability with Attacking Threat)
11v11 Pathway: Prepares for 4-4-2 (Defensive Block) or 4-2-4. Key Player Profile: Perfect for teams that want to play on the counter-attack. Requires two fast strikers who can exploit space when the ball is won back.
The 4-2-2 is a slightly more defensive variation that prioritizes a solid back four and a compact central midfield duo. It relies heavily on the two strikers to create magic or hold the ball up until support arrives.
Diagram: 4-2-2 Formation Layout
4-2-2 Formation: Strengths & Weaknesses
| Strengths (The Why) | Weaknesses (The Risk) |
| ✅ Defensive Fortress: A back four + two defensive midfielders creates a nearly impenetrable block of 6 players. | ❌ Congested Midfield: Only two midfielders can make it hard to link play if the opponent presses well. |
| ✅ Counter-Attack Speed: Ideal for absorbing pressure and hitting long balls to the two forwards. | ❌ Lack of Creativity: Can become too rigid and “boring” if the team doesn’t have creative full-backs. |
| ✅ Simplicity: Easy for young players to understand—”Defend your zone, clear the ball.” | ❌ Isolation: The forwards can feel very lonely if the team sits too deep. |
Key Tactical Principles of the 4-2-2
Build-Up Play: Risk-averse. The goalkeeper distributes to the Full-Backs. The two Central Midfielders stay close together to offer a safe pass.
Attacking Strategy: Rely on transitions. As soon as the ball is won, look for the vertical pass to the feet of a striker. The Full-Backs must push up to provide the width that is missing from the midfield.
Defending Strategy: The team drops into two banks of four (or a 4-2 block). The goal is to force the opponent outside and deal with crosses using the numbers advantage in the box.
Training the 4-2-2

Drill Name: The 6v4 Defensive Wall
Setup: Defense (Back 4 + 2 Midfielders) defends a big goal. Attack (4 players) tries to score.
Instructions: The Attack starts with the ball. The Defense must shift as a unit, keeping the distance between the back line and midfield line to less than 10 yards. If the Defense wins the ball, they get a point by passing through two small gates at the halfway line (simulating a counter-attack pass to a striker).
Focus: Staying compact, communication, and the transition moment.
Final Verdict: Which Formation Should You Choose?
There is no single “best” formation in football, only the best formation for your specific players. When selecting your shape for the season, you must balance your desire to win with your responsibility to develop players for the future.
Here is the “Coach’s Checklist” to help you decide:
- Choose the 3-1-3-1 (Diamond) if you want to develop elite possession play and prepare players for a modern 4-3-3 or Box Midfield. This requires intelligent midfielders.
- Choose the 3-2-3 if you have aggressive wingers and want to dominate the game through attacking width.
- Choose the 3-3-2 if you want a balanced, robust structure that allows you to play with two strikers—perfect for physical battles.
- Choose the 4-3-1 if your priority is teaching the fundamentals of a Back Four Zonal Defense, ensuring your team is difficult to break down.
The Golden Rule: Do not force your players into a system that doesn’t fit their profiles. Analyze your squad, pick the formation that highlights their strengths, and stick to it long enough for them to master the tactical nuances.
🎥 Further Learning: 9v9 Systems Explained
Still undecided? This video presentation by Mass Youth Soccer covers the tactical trade-offs of these systems in depth. It is a great resource to visualize how the formations flow against each other.
Frequently Asked Questions (FAQ) on 9v9 Formations
What is the best formation for 9v9 soccer?
There is no single “best” formation, but the 3-2-3 is widely considered the best for player development because it encourages attacking play, width, and triangulation. The 3-3-2 is the most balanced option for transitioning to 11v11.
How do you beat a team playing a 3-2-3?
To beat a 3-2-3, exploit the space behind their wide defenders (wing-backs). A formation like 2-4-2 or 3-3-2 can overload their two central midfielders, allowing you to dominate possession and launch quick counters into the wide channels they leave open.
What is the offside rule in 9v9 soccer?
The offside rule in 9v9 is typically the same as in 11v11. A player is in an offside position if they are nearer to the opponent’s goal line than both the ball and the second-last opponent when the ball is played to them. (Check your local league rules as some U9-U10 leagues may have specific variations).
How big is a 9v9 soccer field?
A standard 9v9 field is typically 70-80 yards long and 45-55 yards wide. The goal size is usually 6×18 feet or 7×21 feet, depending on the age group and federation standards.