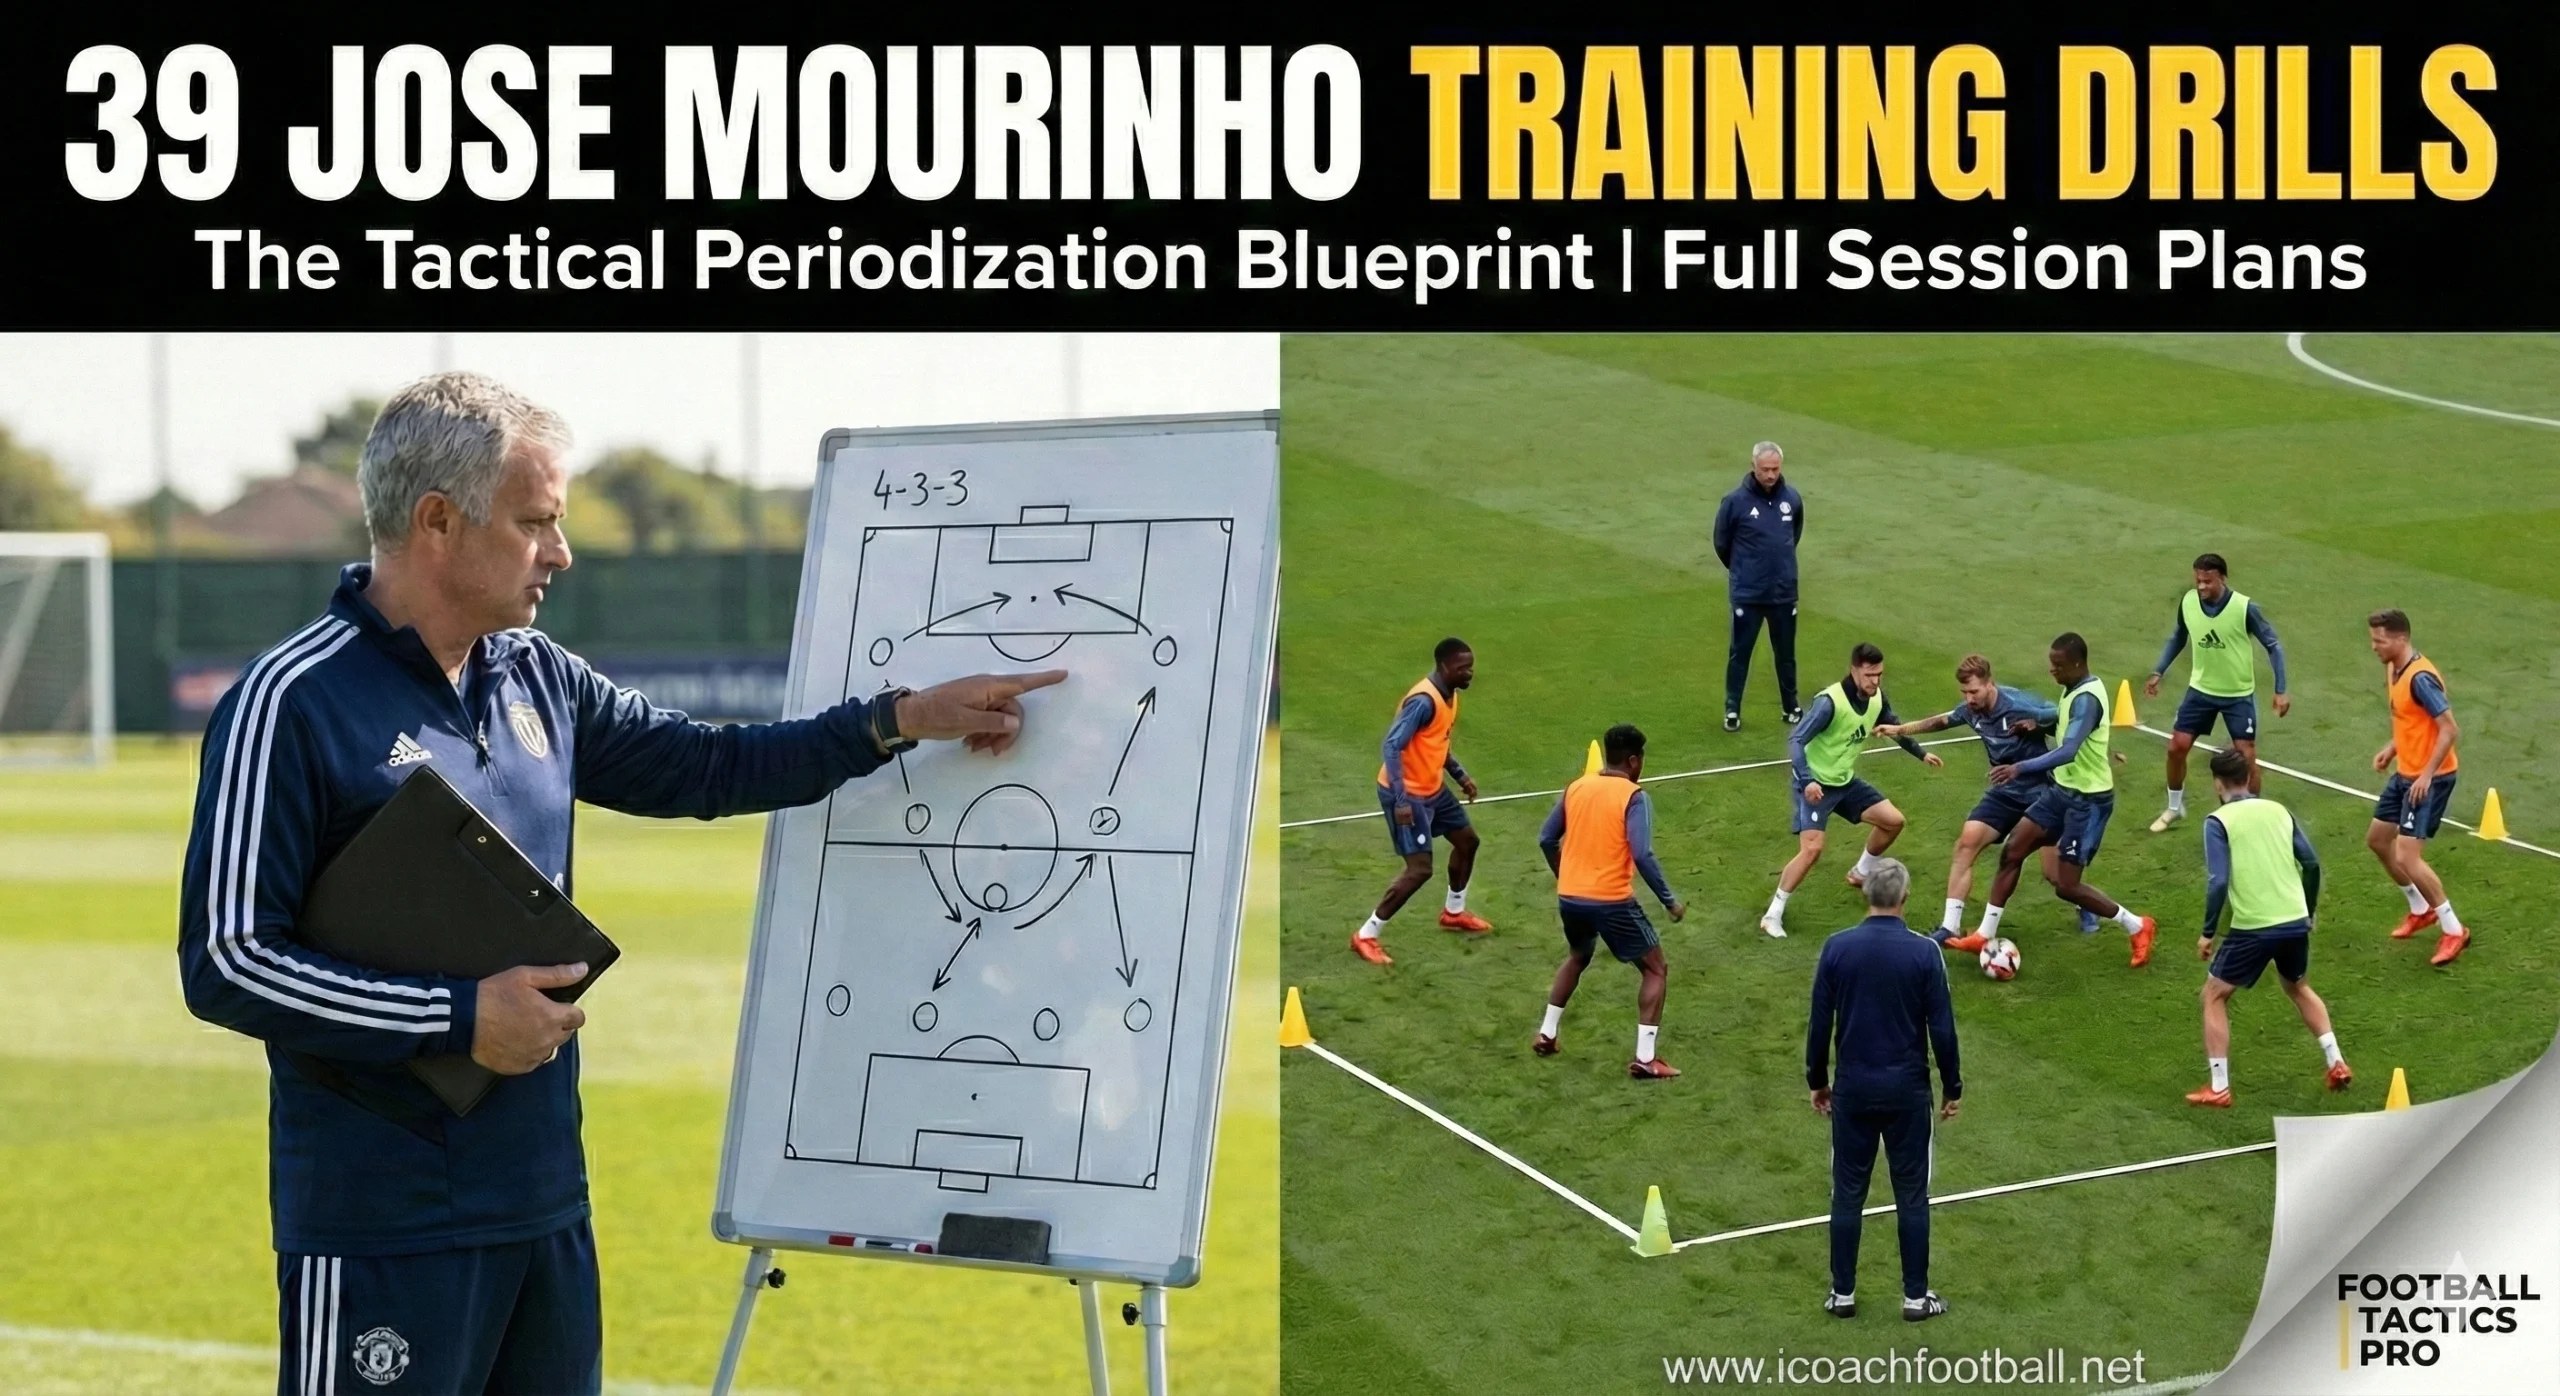
39 Jose Mourinho Training Drills: The Complete Tactical Periodization Guide
Jose Mourinho changed the landscape of football training with Tactical Periodization—a methodology where the physical, tactical, and psychological aspects of the game are trained simultaneously. There is no running without the ball. Every sprint, pass, and rondo is designed to improve the team’s tactical understanding while building match-specific fitness.
We have uncovered the complete collection of 39 specific exercises used during Mourinho’s most successful era at Chelsea. Below is the full breakdown, organized by tactical focus.
Part 1: Warm-Ups & Technical Activation
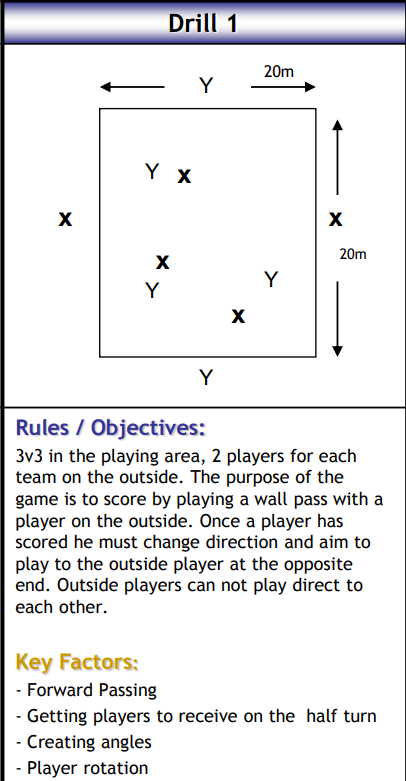
3+2 v 3+2 Wall Pass Game (High Intensity Rondo)
- Profile: Small Sided Game (SSG) | 10 Players
- Setup:
- Create a playing area (approx. 20m x 20m).
- Two teams of 5 players (Red vs Blue).
- Inside: 3v3 battle in the center.
- Outside: 2 “Wall” players for each team positioned on opposite end lines.
- Instructions:
- Teams keep possession in the central area.
- To score, a team must play a pass to one of their outside “wall” players and receive a return pass (wall pass).
- Once a point is scored, the team must change direction and attack the wall players at the opposite end.
- Constraint: Outside players cannot pass directly to each other .
- Coaching Points:
- Forward Passing: Look to break lines immediately.
- Receiving: Receive on the half-turn to play forward.
- Angles: Create triangles to combine with wall players.
- Rotation: Swap inside and outside players regularly .
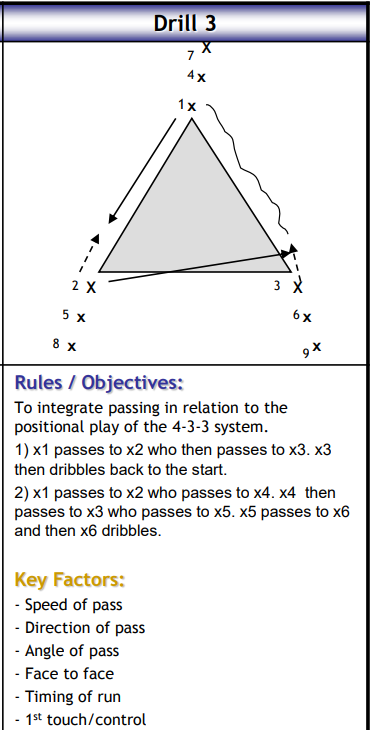
4-3-3 Y-Passing Triangle (Technical)
- Profile: Technical Pattern | Unopposed
- Setup:
- Set up cones in a Y-triangle shape to replicate a midfield trio (e.g., #6, #8, #10).
- Distance approx 15-20m between cones.
- Instructions:
- Player X1 passes to X2.
- X2 turns and passes to X3.
- X3 dribbles the ball back to the start position.
- Variation: X1 passes to X2, who “sets” the ball back for X1 to play a long pass into X3 .
- Coaching Points:
- Speed of Pass: Crisp, firm passing.
- Body Shape: Face-to-face with the passer.
- Timing: Don’t move too early; timing of the run is crucial .

Triangle Combination
- Profile: Technical Pattern | 6 Players
- Setup:
- Expand the triangle setup to include more depth (simulating connecting midfield to attack).
- Instructions:
- X1 passes to X2, who plays to X4.
- X4 sets the ball back to X3.
- X3 plays through to X5.
- X5 passes to X6, who dribbles out.
- Note: This integrates passing lines specific to the 4-3-3 system .
- Coaching Points:
- Direction: Accurate passes to the correct foot.
- First Touch: Set the ball up for the next action.
- Tempo: One-touch play where possible .
The Diamond Passing Drill
- Profile: Technical Pattern | 8+ Players
- Setup:
- Cones arranged in a Diamond shape.
- 2 balls starting at opposite ends (Top and Bottom) simultaneously.
- Instructions:
- The balls are passed around the diamond.
- The “wide” players (sides of diamond) must make a movement—checking away or coming short.
- The passer must read this movement and deliver the appropriate pass (to feet or space).
- Progression: Add overlaps and set-plays .
- Coaching Points:
- Awareness: Head up to see the movement before passing.
- Weight of Pass: Must be perfect to allow a one-touch continuation .
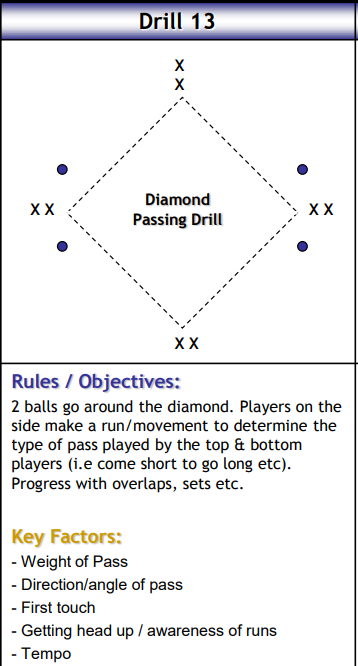
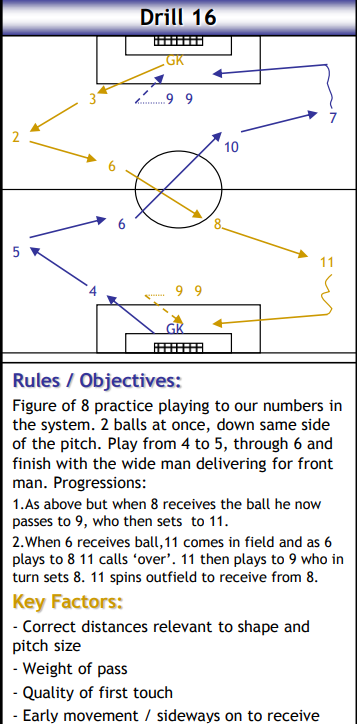
Figure of 8 Tactical Shape
- Profile: Tactical Shape | Full Team
- Setup: Half pitch. Mannequins in 4-3-3 positions.
- Instructions: Ball moves #4 -> #5 -> #6 -> #8 -> Winger -> Cross to #9.
- Coaching Points: Realistic distances, quality of first touch.
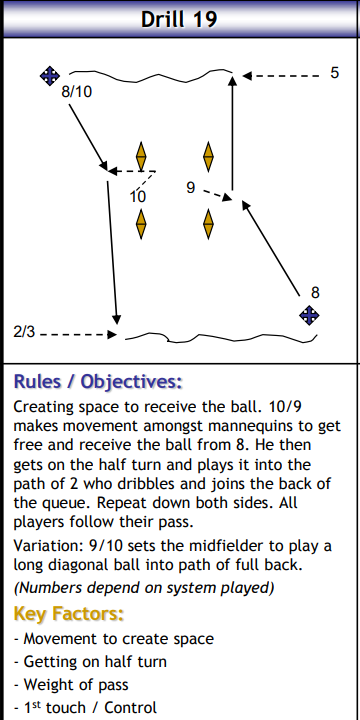
The “10 & 9” Movement
- Profile: Attacking Pattern | Unopposed
- Setup: Mannequins representing defenders.
- Instructions: #10 makes movement to receive from #8. Turns and plays through ball to #2.
- Coaching Points: Creating space, receiving on half-turn.
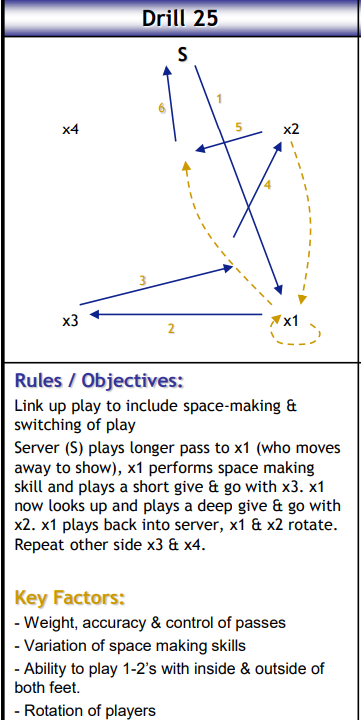
Link Up Play (Variation 1)
- Profile: Technical Skill | 5 Players
- Setup: Server + 4 players.
- Instructions: Long pass to X1 -> Space making skill -> Short 1-2 with X3 -> Deep 1-2 with X2.
- Coaching Points: Use inside/outside of both feet.
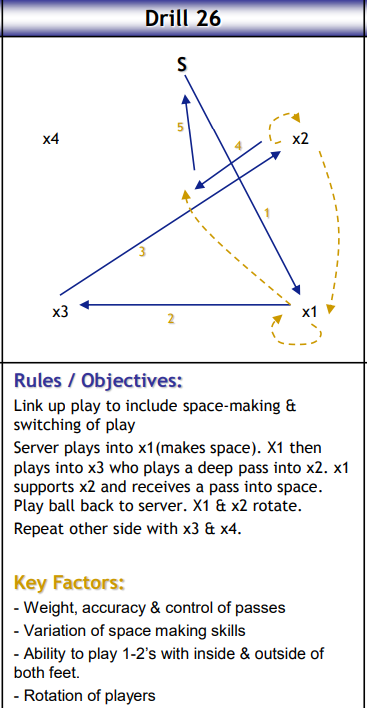
Link Up Play (Variation 2)
- Profile: Technical Skill | 5 Players
- Setup: Server + 4 players.
- Instructions: X1 receives -> Plays X3 -> Deep pass to X2 -> X1 supports in space.
- Coaching Points: Rotation of players, passing accuracy.
These technical patterns are just the start. Check out our full library of Football Warm-Up Drills and Passing Exercises to get your sessions started right.
Part 2: Possession & Rondo Games
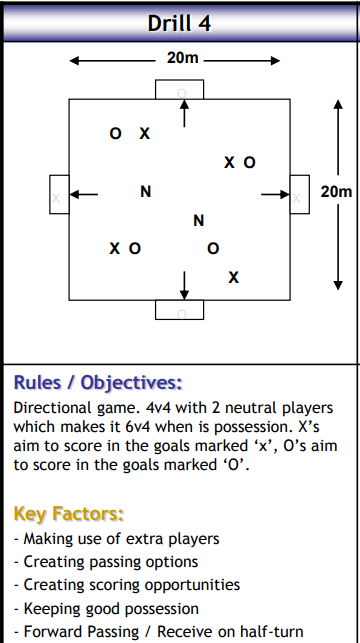
4v4 + 2 Neutrals (Directional)
- Profile: Possession Game | 10 Players
- Setup:
- 20m x 20m box.
- 4v4 inside the area.
- 2 Neutral (N) players inside who always play for the team in possession (creating a 6v4 overload).+1
- Instructions:
- This is a directional game: Team X attacks the goals marked ‘X’; Team O attacks goals marked ‘O’.
- Teams must use the neutrals to keep possession and progress up the pitch.
- Coaching Points:
- Overloads: Use the extra players to bypass pressure.
- Vision: Neutrals must constantly scan the field.
- Creating Options: Forward passing and receiving on the half-turn .
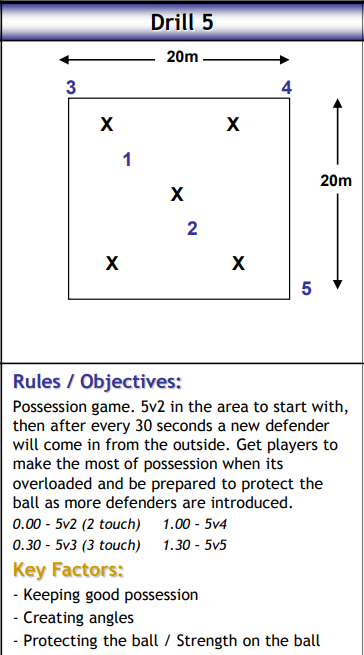
The “Pressure Cooker” (5v2 to 5v5)
- Profile: Rondo | High Pressure
- Setup:
- 20m x 20m grid.
- Start with 5 Attackers vs 2 Defenders inside.
- Remaining defenders waiting on the outside lines.
- Instructions:
- Start 5v2 (Limit: 2 touches).
- Every 30 seconds, a new defender enters the grid from the outside.
- Progression: 0:30 (5v3, 3 touch) -> 1:00 (5v4) -> 1:30 (5v5).+1
- Coaching Points:
- Composure: Don’t panic as space disappears.
- Shielding: Use the body to protect the ball.
- Angles: Support runs must be constant .
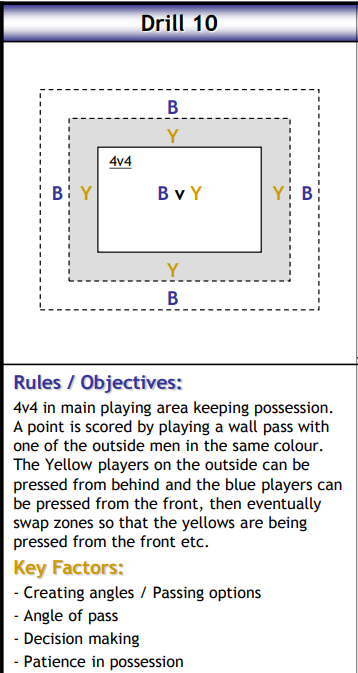
4v4 Rondo Possession
- Profile: Possession | 12 Players
- Setup:
- Main playing area (approx 30x30m).
- 4v4 in the middle.
- 4 “Wall” players (2 for each team) on the outside lines.
- Instructions:
- Teams aim to keep possession in the central area.
- Score a point by playing a wall pass with an outside player of your own color.
- Progression: The outside players can be pressed from behind to force quicker decisions .
- Coaching Points:
- Patience: Circulate the ball until the passing lane opens.
- Decision Making: Pass to feet or space? .
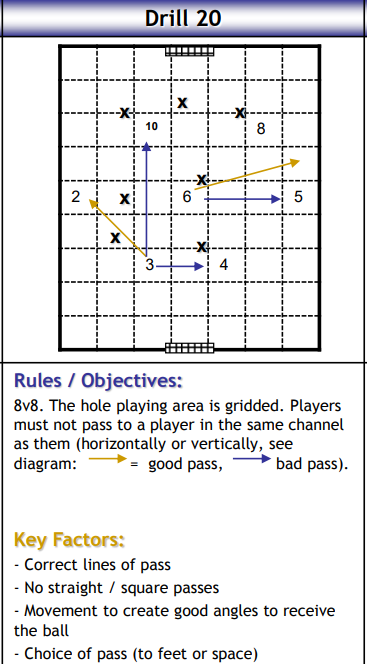
8v8 “Grid” Game
- Profile: Tactical Possession | 16 Players
- Setup:
- 8v8 on a pitch divided into grid channels (vertical and horizontal lines).
- Instructions:
- Standard possession game with a constraint: Players cannot pass to a teammate standing in the same vertical or horizontal channel.
- Passes must be diagonal or break a line.
- Straight/Square pass = Turnover .
- Coaching Points:
- Movement: Move out of lines to create diagonal angles.
- Vision: Scan for the furthest diagonal option .
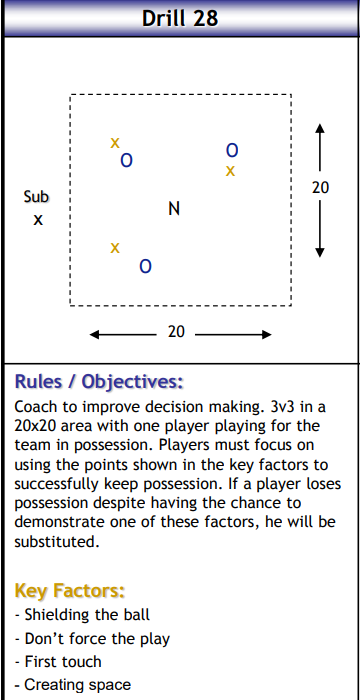
3v3 Decision Making
- Profile: Cognitive SSG
- Setup:
- 20m x 20m area.
- 3v3 inside with one Neutral player (Magic Man).
- Instructions:
- Teams compete for possession.
- The coach monitors decision making strictly.
- Rule: If a player loses possession because they ignored a key factor (e.g., shielding or easy pass), they are substituted immediately.
- Coaching Points:
- Don’t force the play.
- Shielding the ball under pressure.
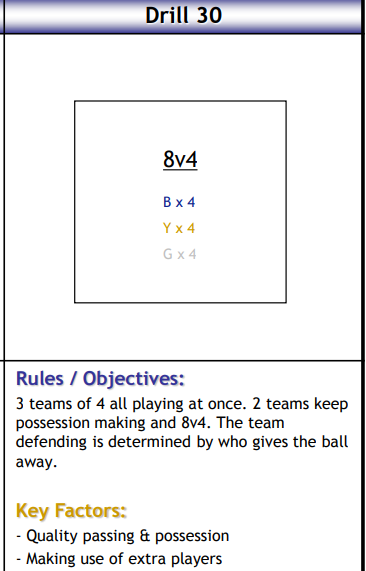
Drill 30: 3-Team Transition Rondo
- Profile: Rondo | 12 Players
- Setup:
- 3 teams of 4 players (Red, Blue, Yellow).
- Instructions:
- Two teams join forces to keep possession against the third team (Creating an 8v4).
- If the defending team wins the ball, the team that gave possession away becomes the new defenders.
- Coaching Points:
- Reaction: Instant transition from attack to defense.
- Width: Use the full area to tire the defenders.
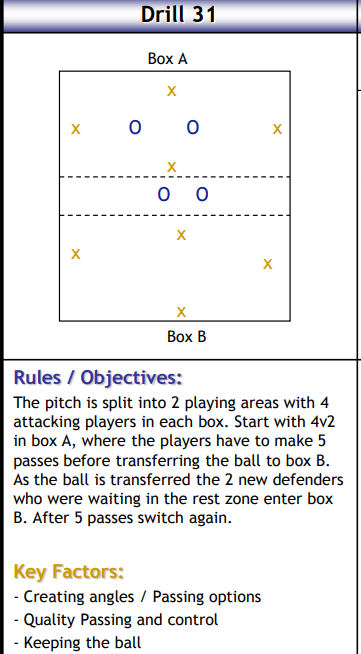
Transfer Box (4v2)
- Profile: Possession | 10 Players
- Setup:
- Two boxes (Box A and Box B) separated by a central zone.
- Resting defenders wait in the central zone .
- Instructions:
- Start with 4v2 in Box A.
- Attackers must complete 5 passes.
- After 5 passes, they transfer the ball to Box B.
- As the ball travels, 2 new defenders from the central zone sprint into Box B to press.
- Coaching Points:
- Transfer Pass: Must be accurate and driven.
- Support Speed: Attackers must support the new grid quickly.
If you want more rondos and keep-ball sessions like the “Pressure Cooker,” browse our complete collection of Possession Football Drills.
Part 3: Transition & Reaction Games
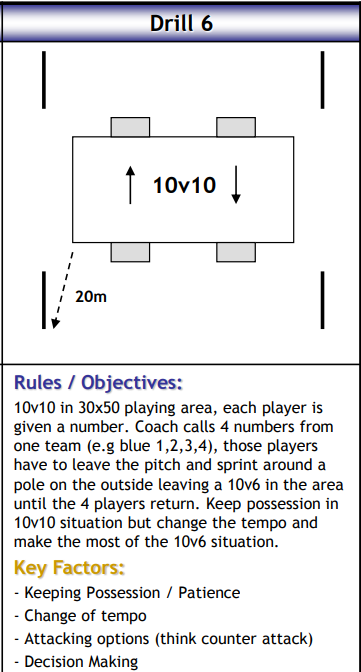
10v10 “Sprint Transition”
- Profile: Phase of Play | 20 Players
- Setup:
- Large pitch (30m x 50m).
- 10v10 game. Each player is assigned a number (1-10).+1
- Instructions:
- Play normal possession.
- Coach calls 4 numbers from one team (e.g., “Blue 1, 2, 3, 4!”).
- These players must sprint off the pitch, run around a pole on the outside, and sprint back in.
- The Overload: While they are gone, the game continues as a 10v6.
- The team of 10 must attack immediately; the team of 6 must survive .
- Coaching Points:
- Attackers: Change tempo and exploit numbers.
- Defenders: Patience and compactness.
- Counter: If the 6 win it, can they score? .
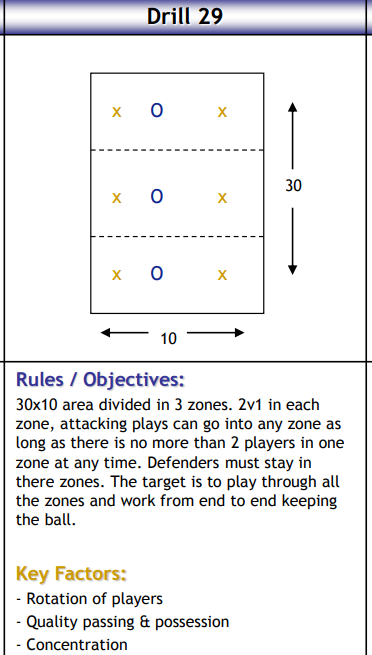
Zone Breaker (2v1)
- Profile: Attacking Overloads | Small Groups
- Setup: 3 zones. 2v1 in each zone.
- Instructions: Attackers play through zones. Defenders must stay in their zones. Attackers can enter new zones to create 3v1 or 4v1 overloads.
- Coaching Points: Creating space. First touch forward. Committing the defender.
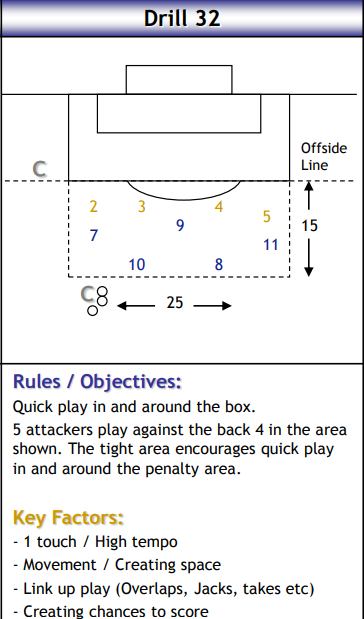
Box Brawl (5v4)
- Profile: Tight Area Attack | Finishing
- Setup: Penalty Box area. 5 Attackers vs 4 Defenders.
- Instructions: High tempo attack in a restricted space. No long build-up allowed.
- Coaching Points: 1-touch finishing. Overlaps and underlaps. Aggressive movement.
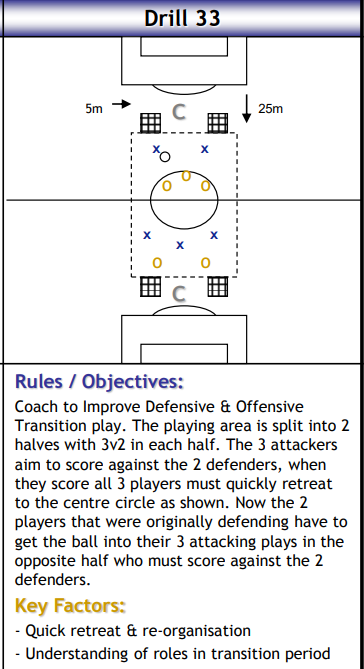
The 3v2 Transition War
- Profile: Counter Attack | 10+ Players
- Setup:
- Pitch split into two halves (25m length each).
- Start with 3 Attackers vs 2 Defenders in each half.
- Instructions:
- The 3 Attackers aim to score against the 2 Defenders.
- Transition: Upon scoring or losing the ball, the 3 attackers must sprint back to the center circle.
- The 2 defenders then quickly play the ball to their 3 teammates in the opposite half to launch a counter-attack .
- Coaching Points:
- Recovery: Quick retreat and re-organisation.
- Understanding Roles: Switch mindset from attack to defense instantly .
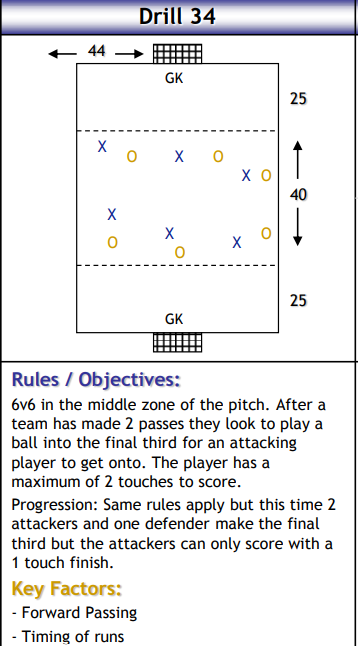
6v6 Breakout
- Profile: Small Sided Game
- Setup:
- 44m x 40m area.
- 6v6 in the middle zone.
- 25m “End Zones” at both ends with Goalkeepers.+1
- Instructions:
- Teams play 6v6 in the central zone.
- After completing 2 passes, a team looks to play a through ball into the End Zone.
- An attacking runner sprints onto it and has a maximum of 2 touches to score against the GK .
- Coaching Points:
- Timing: Don’t run offside; time the run.
- Finishing: Clinical 1-touch finishing.
Transition games are the best way to improve reaction speed. Find more high-tempo games in our Small Sided Games library.
Part 4: Tactical Shape & Attacking
8v8 “Switch Play”
- Profile: Tactical Game | 18 Players
- Setup:
- 40m x 30m area.
- 8v8 in the center.
- 1 Neutral Full Back (FB) positioned in the wide channels on each side.
- Instructions:
- There are 3 small goals at each end.
- Teams can score in any goal, but are encouraged to switch play using the neutral FBs to find the open goal.
- Coaching Points:
- Switching Play: Recognize when the center is blocked.
- Width: FBs must stay high and wide .

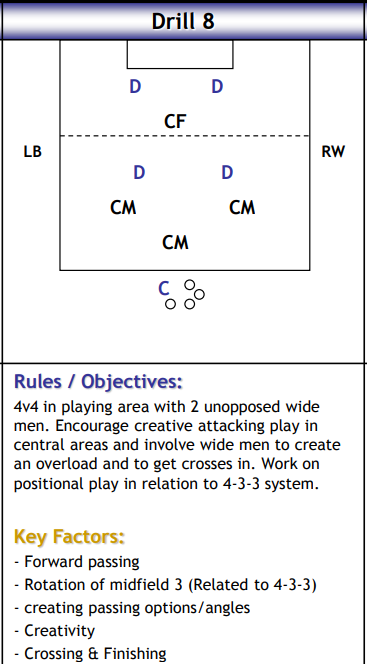
4v4 Wide Overloads
- Profile: Attacking Game
- Setup:
- 4v4 in central playing area.
- 2 unopposed wide players (Wingers).
- Instructions:
- Encourage creative attacking play in central areas.
- Involve wide men to create crosses.
- Midfielders must rotate to create space in the box.
- Coaching Points:
- Forward passing.
- Rotation of midfield 3.
- Crossing & Finishing .
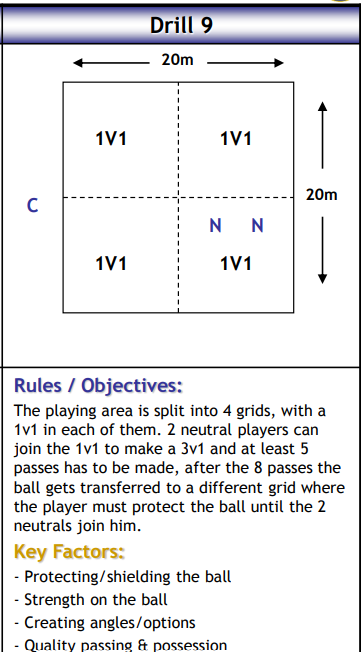
1v1 Shielding Grid
- Profile: Individual Skill | Physical
- Setup: 4 grids. 1v1 in each.
- Instructions: Play 3v1 rondo then transfer ball to a new grid. The receiver must shield the ball 1v1 against a defender until help arrives.
- Coaching Points: Strength on the ball. Hiding the ball from defender.
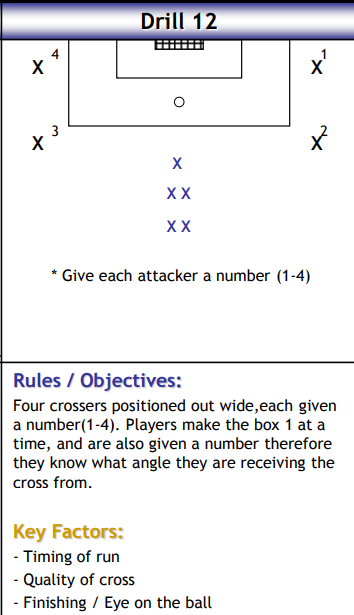
Crossing Chaos
- Profile: Finishing Drill
- Setup:
- 4 Crossers positioned out wide, numbered 1-4.
- Attackers waiting centrally.
- Instructions:
- Coach calls a number (e.g., “1!”).
- Crosser #1 delivers.
- Attackers make runs into the box but must adjust their run (Near post, Far post, Cutback) based on the angle of delivery from that specific number.
- Coaching Points:
- Timing: Arrive as the ball arrives.
- Eye on the ball: Watch the delivery all the way .
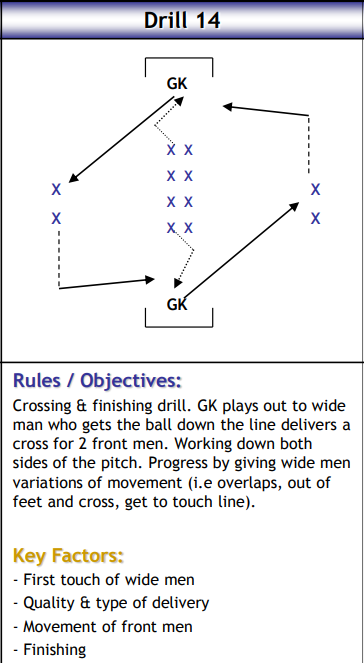
GK Distribution
- Profile: Functional | Goalkeeper Focus
- Setup: GK, Winger, Strikers.
- Instructions: GK throws to Winger. Winger drives down the line and delivers a cross. Strikers finish.
- Coaching Points: Quality of GK distribution. Winger’s first touch.
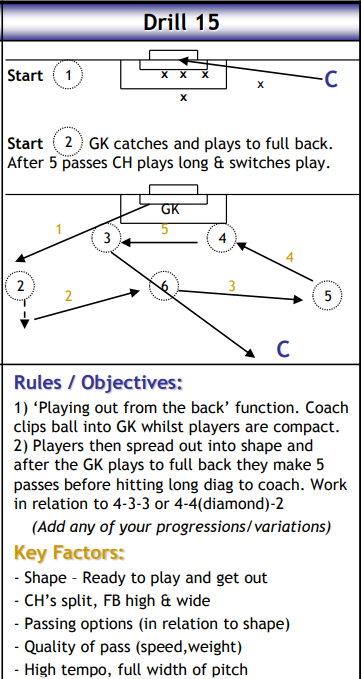
Playing Out From The Back (Shadow Play)
- Profile: Tactical Shape | Unopposed
- Setup:
- GK + Back 4 vs Zero opposition (Shadow Play).
- Coach serves the ball to the GK.
- Instructions:
- Coach clips ball into GK.
- Players split into expansive shape (Center Backs split, Full Backs high).
- The unit makes 5 passes to “set” the shape before hitting a long diagonal to the coach.
- Coaching Points:
- Shape: Be ready to play before receiving.
- Tempo: High ball speed even without pressure .
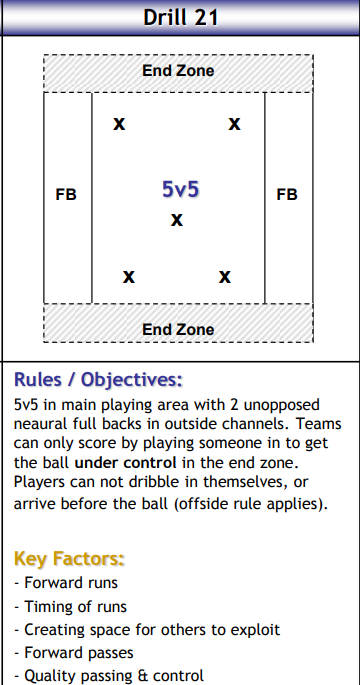
5v5 End Zone Game
- Profile: Penetration Game | 14 Players
- Setup:
- 5v5 in main playing area.
- 2 unopposed neutral full backs in outside channels.
- End Zones at both ends.
- Instructions:
- Teams can only score by playing a teammate into the end zone.
- The receiver must arrive after the ball (offside rule applies).
- Players cannot dribble into the zone themselves .
- Coaching Points:
- Timing of runs to stay onside.
- Creating space for others to exploit .
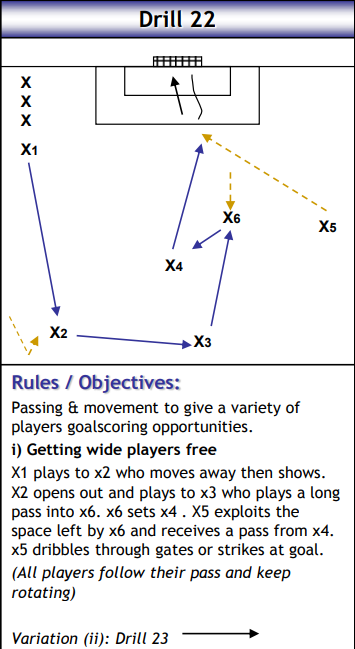
Pattern to Score (Wide)
- Profile: Pattern Play | Unopposed
- Setup: Half Pitch. Mannequins.
- Instructions: X1 -> X2 -> X3 (Long) -> X6 (Set) -> X4 -> X5 (Shoot). Focus on third man running.
- Coaching Points: Timing of the run. Weight of pass.
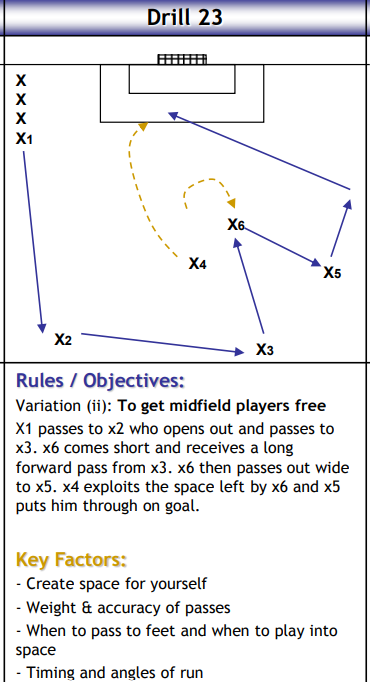
Pattern to Score (Central)
- Profile: Pattern Play | Unopposed
- Setup: Half Pitch. Mannequins.
- Instructions: X1 -> X2 -> X3 -> X6 (Short) -> X5 (Wide) -> X4 (Through Ball).
- Coaching Points: Decision: Pass to feet vs pass to space.
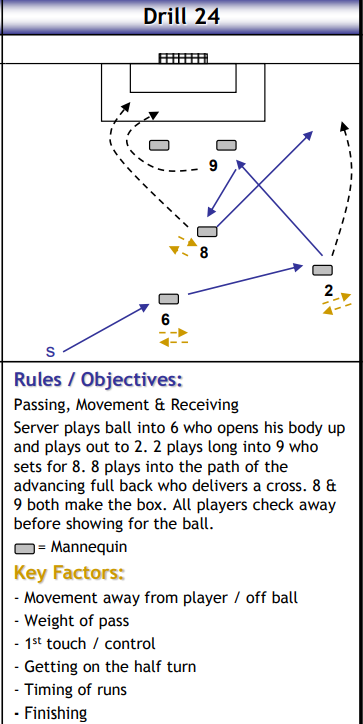
Set and Spin
- Profile: Functional | Striker Focus
- Setup: Half Pitch.
- Instructions: Ball played into #9. #9 Sets for #8. #8 Passes to overlapping FB. Cross for #9 and #8.
- Coaching Points: Movement off the ball. Quality of set play.
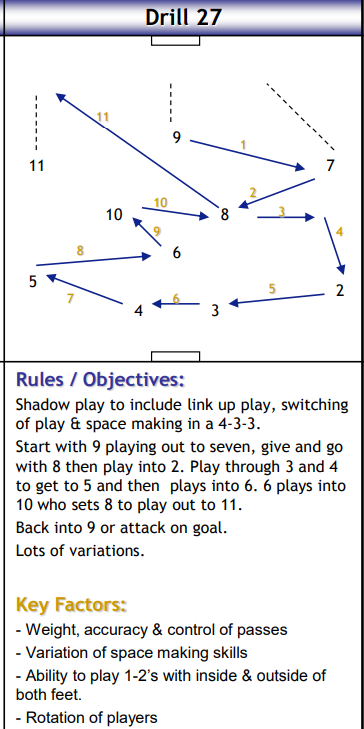
Shadow Play (Full Attack)
- Profile: Tactical Shape | Team Pattern
- Setup: Full Team.
- Instructions: Execute full team pattern: #9->#7->#8->#2->#3->#4->#5->#6->#10->#8->#11. Finish with shot.
- Coaching Points: Rhythm and tempo of the move.
Turn these patterns into goals on matchday. Click here to see our specialized Finishing & Shooting Drills and attacking session plans.
Part 5: Football Fitness (The “Mourinho” Way)
Getting fit by performing football actions at match intensity.
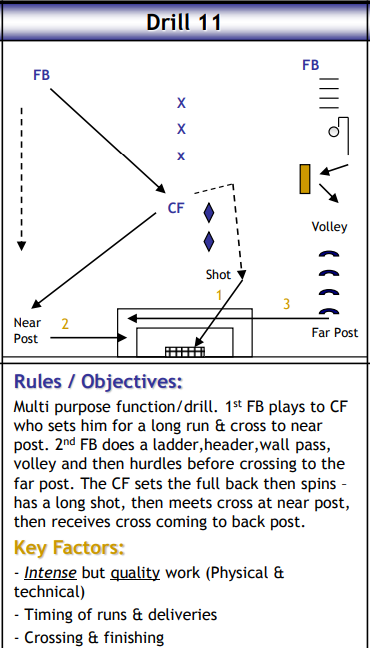
The Multi-Functional Circuit
- Profile: SAQ & Technical
- Setup: Two lines of players. Hurdles, Ladder, Cones .+1
- Instructions:
- 1st FB plays to CF -> Long run & cross to near post.
- 2nd FB does: Ladder -> Header -> Wall pass -> Volley -> Hurdles -> Cross to far post.
- CF spins and shoots .
- Coaching Points:
- Intense but quality work (Physical & technical).
- Timing of runs & deliveries .
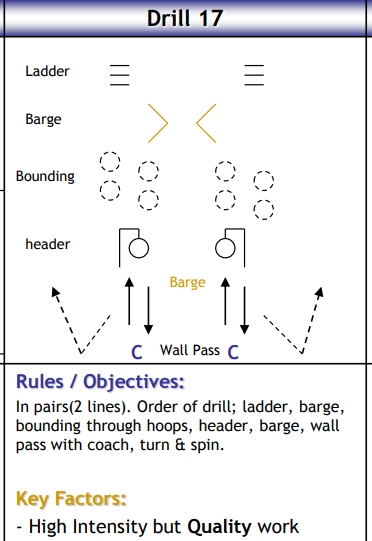
High-Intensity Pairs (Ladder)
- Profile: Anaerobic Endurance
- Setup: Pairs working in lines with Ladders and Hoops.
- Instructions:
- Complete the circuit: Ladder -> Barge (shoulder to shoulder) -> Bounding through hoops -> Header -> Barge -> Wall pass -> Turn & Spin.
- Coaching Points:
- High Intensity but Quality work.
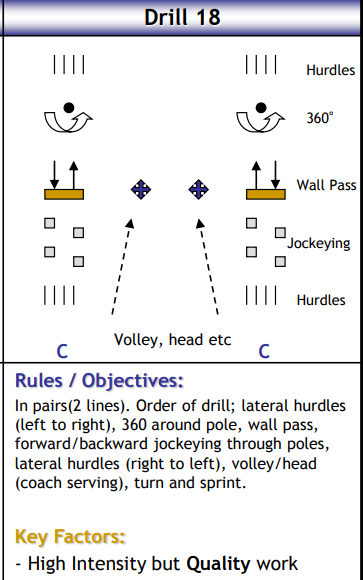
High-Intensity Pairs (Hurdles)
- Profile: Endurance | Physical
- Setup: Pairs working in lines.
- Instructions: Lateral hurdles -> 360 turn -> Wall pass -> Jockeying -> Volley.
- Coaching Points: Quality technique when tired.
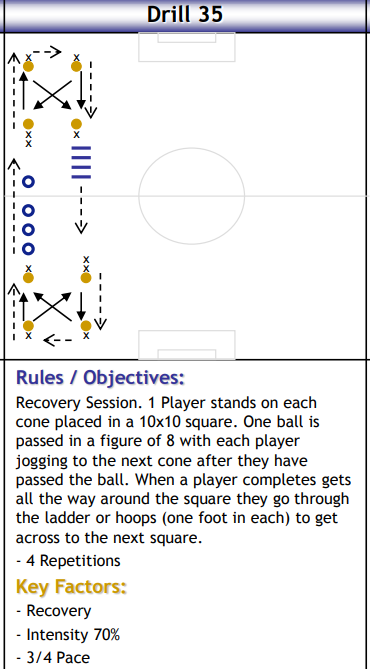
Recovery Square
- Profile: Active Recovery | Low Intensity
- Setup: 10x10m square.
- Instructions: Pass and jog in a figure of 8 pattern. Move through agility ladder to next square.
- Coaching Points: 70% Intensity (3/4 pace).
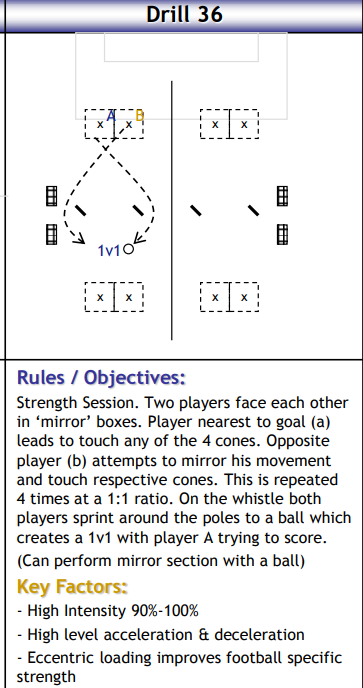
Mirror Strength
- Profile: Strength/Reaction | 1v1
- Setup: 2 players facing each other.
- Instructions: Player A touches cones randomly; Player B must mirror. On whistle, sprint to 1v1 duel.
- Coaching Points: Deceleration (Eccentric load). Reaction speed.
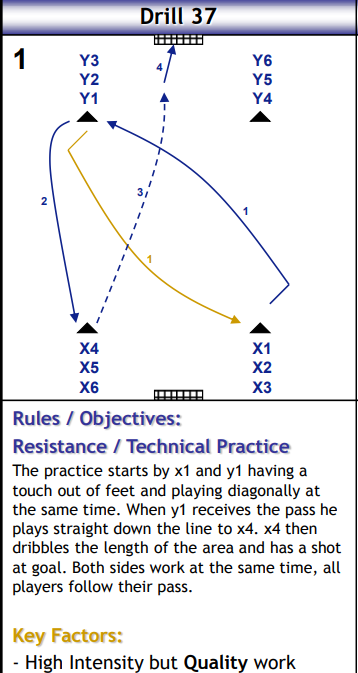
Resistance Technical (Linear)
- Profile: Power | Technical
- Setup: Resistance bands (optional) or Bodyweight.
- Instructions: Touch out of feet -> Pass Diagonal -> Receive return -> Dribble length -> Shot.
- Coaching Points: Explosive speed. Drive with the ball.
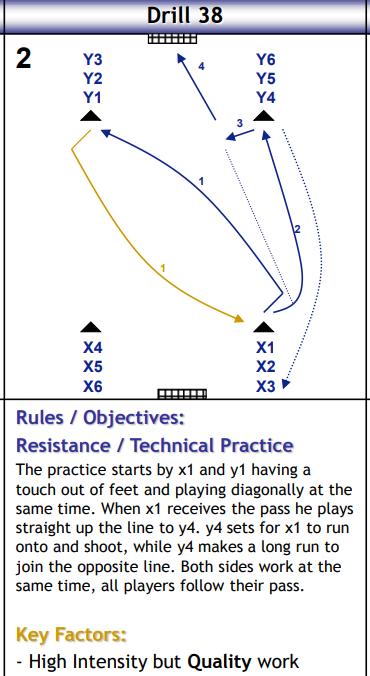
Resistance Technical (Set)
- Profile: Power | Finishing
- Setup: Resistance bands (optional).
- Instructions: Pass up line -> Set -> Run onto shot -> Recovery run.
- Coaching Points: Explosive power. Strike through the ball.
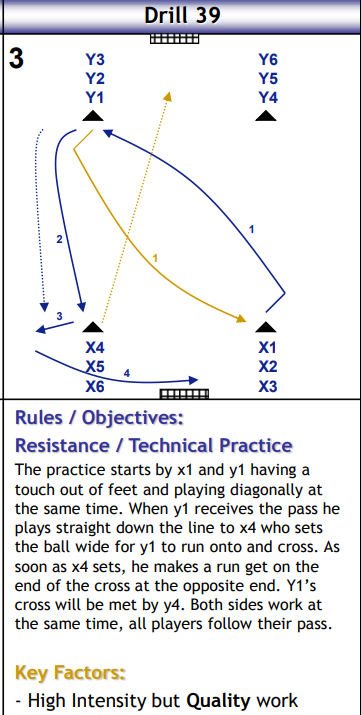
Resistance Technical (Crossing)
- Profile: Power | Crossing
- Setup: Resistance bands (optional).
- Instructions: Pass down line -> Set wide -> Run onto cross -> Sprint to box.
- Coaching Points: Explosive power. Delivery quality.
Stop running laps. Get your team fit with the ball using our modern Soccer Fitness & SAQ Drills.
Coaching the Mourinho Way: Common Questions (FAQ)
What age groups are these drills suitable for?
While these were designed for Chelsea’s First Team and Academy (U16+), drills like the 3v3 Wall Pass (Drill 1) and 4v4 Directional Game (Drill 4) are excellent for players as young as U10 to teach spatial awareness.
What is the main focus of Tactical Periodization?
The focus is to never separate the physical training from the tactical training. Instead of running laps for fitness, Mourinho uses high-intensity drills like Drill 6 (10v10 Transition) to build stamina while teaching the team how to react to counter-attacks.
Do I need a full pitch for these drills?
Many drills, such as the Diamond Passing (Drill 13) or Pressure Cooker Rondo (Drill 5), require only a 20x20m area. However, the Transition games (Drill 6, Drill 34) work best on half or full pitches.
How long should each drill last?
Mourinho focuses on intensity over duration. A typical block might be 4 to 6 minutes of high-quality work followed by a rest period. If the quality drops, stop the drill.
Ready to Train Like a Champion?
Implementing Jose Mourinho’s training philosophy requires more than just copying drills; it requires a commitment to intensity and tactical discipline. By using these 39 exercises, you aren’t just making your players fitter—you are teaching them to think, react, and play like winners. Don’t try to do them all at once. Pick 3 drills for your next session, visualize them using our Formation Maker, and demand 100% focus from the very first whistle.